Let’s Make a Welcome Card for a Teacher

By Anna Escalada York

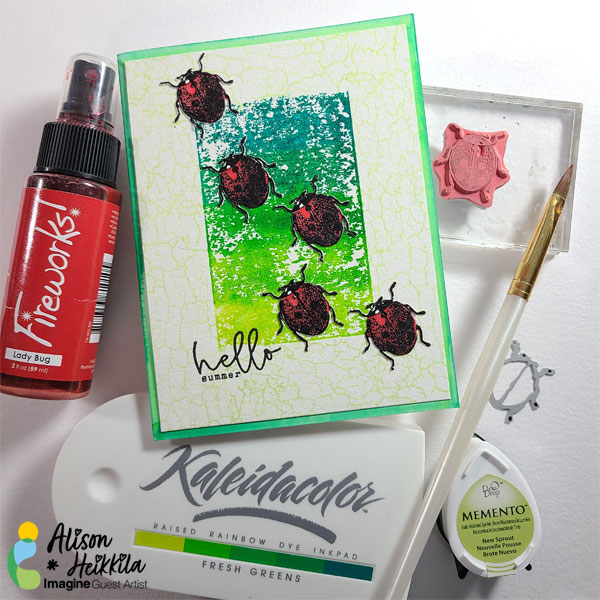
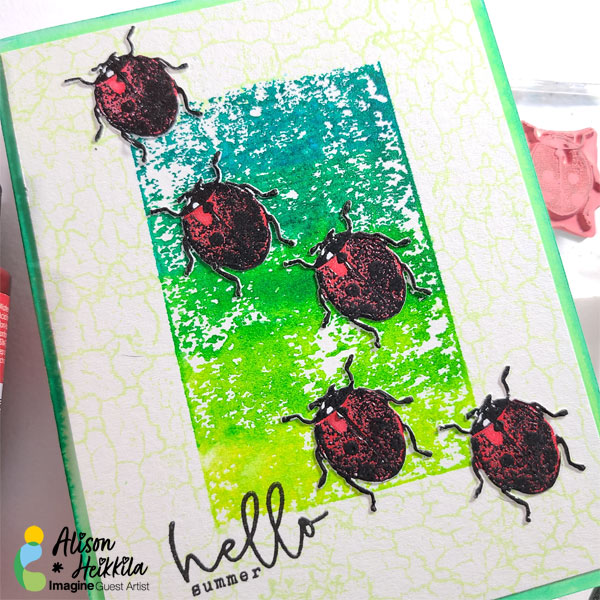
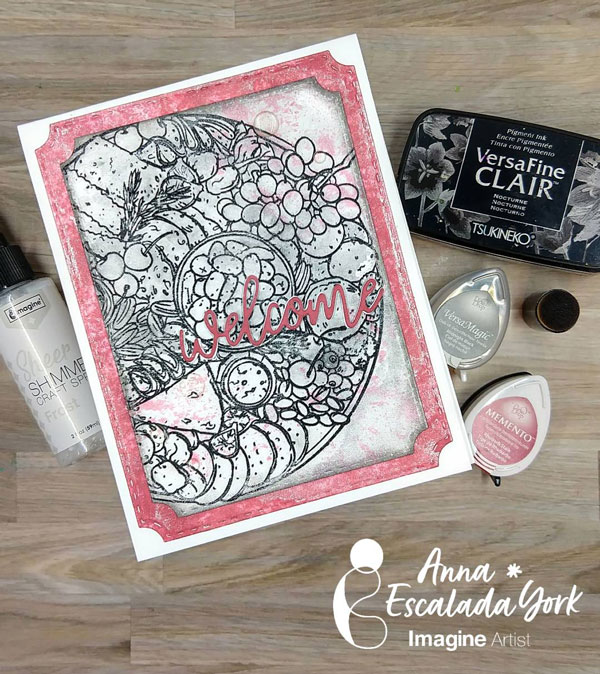
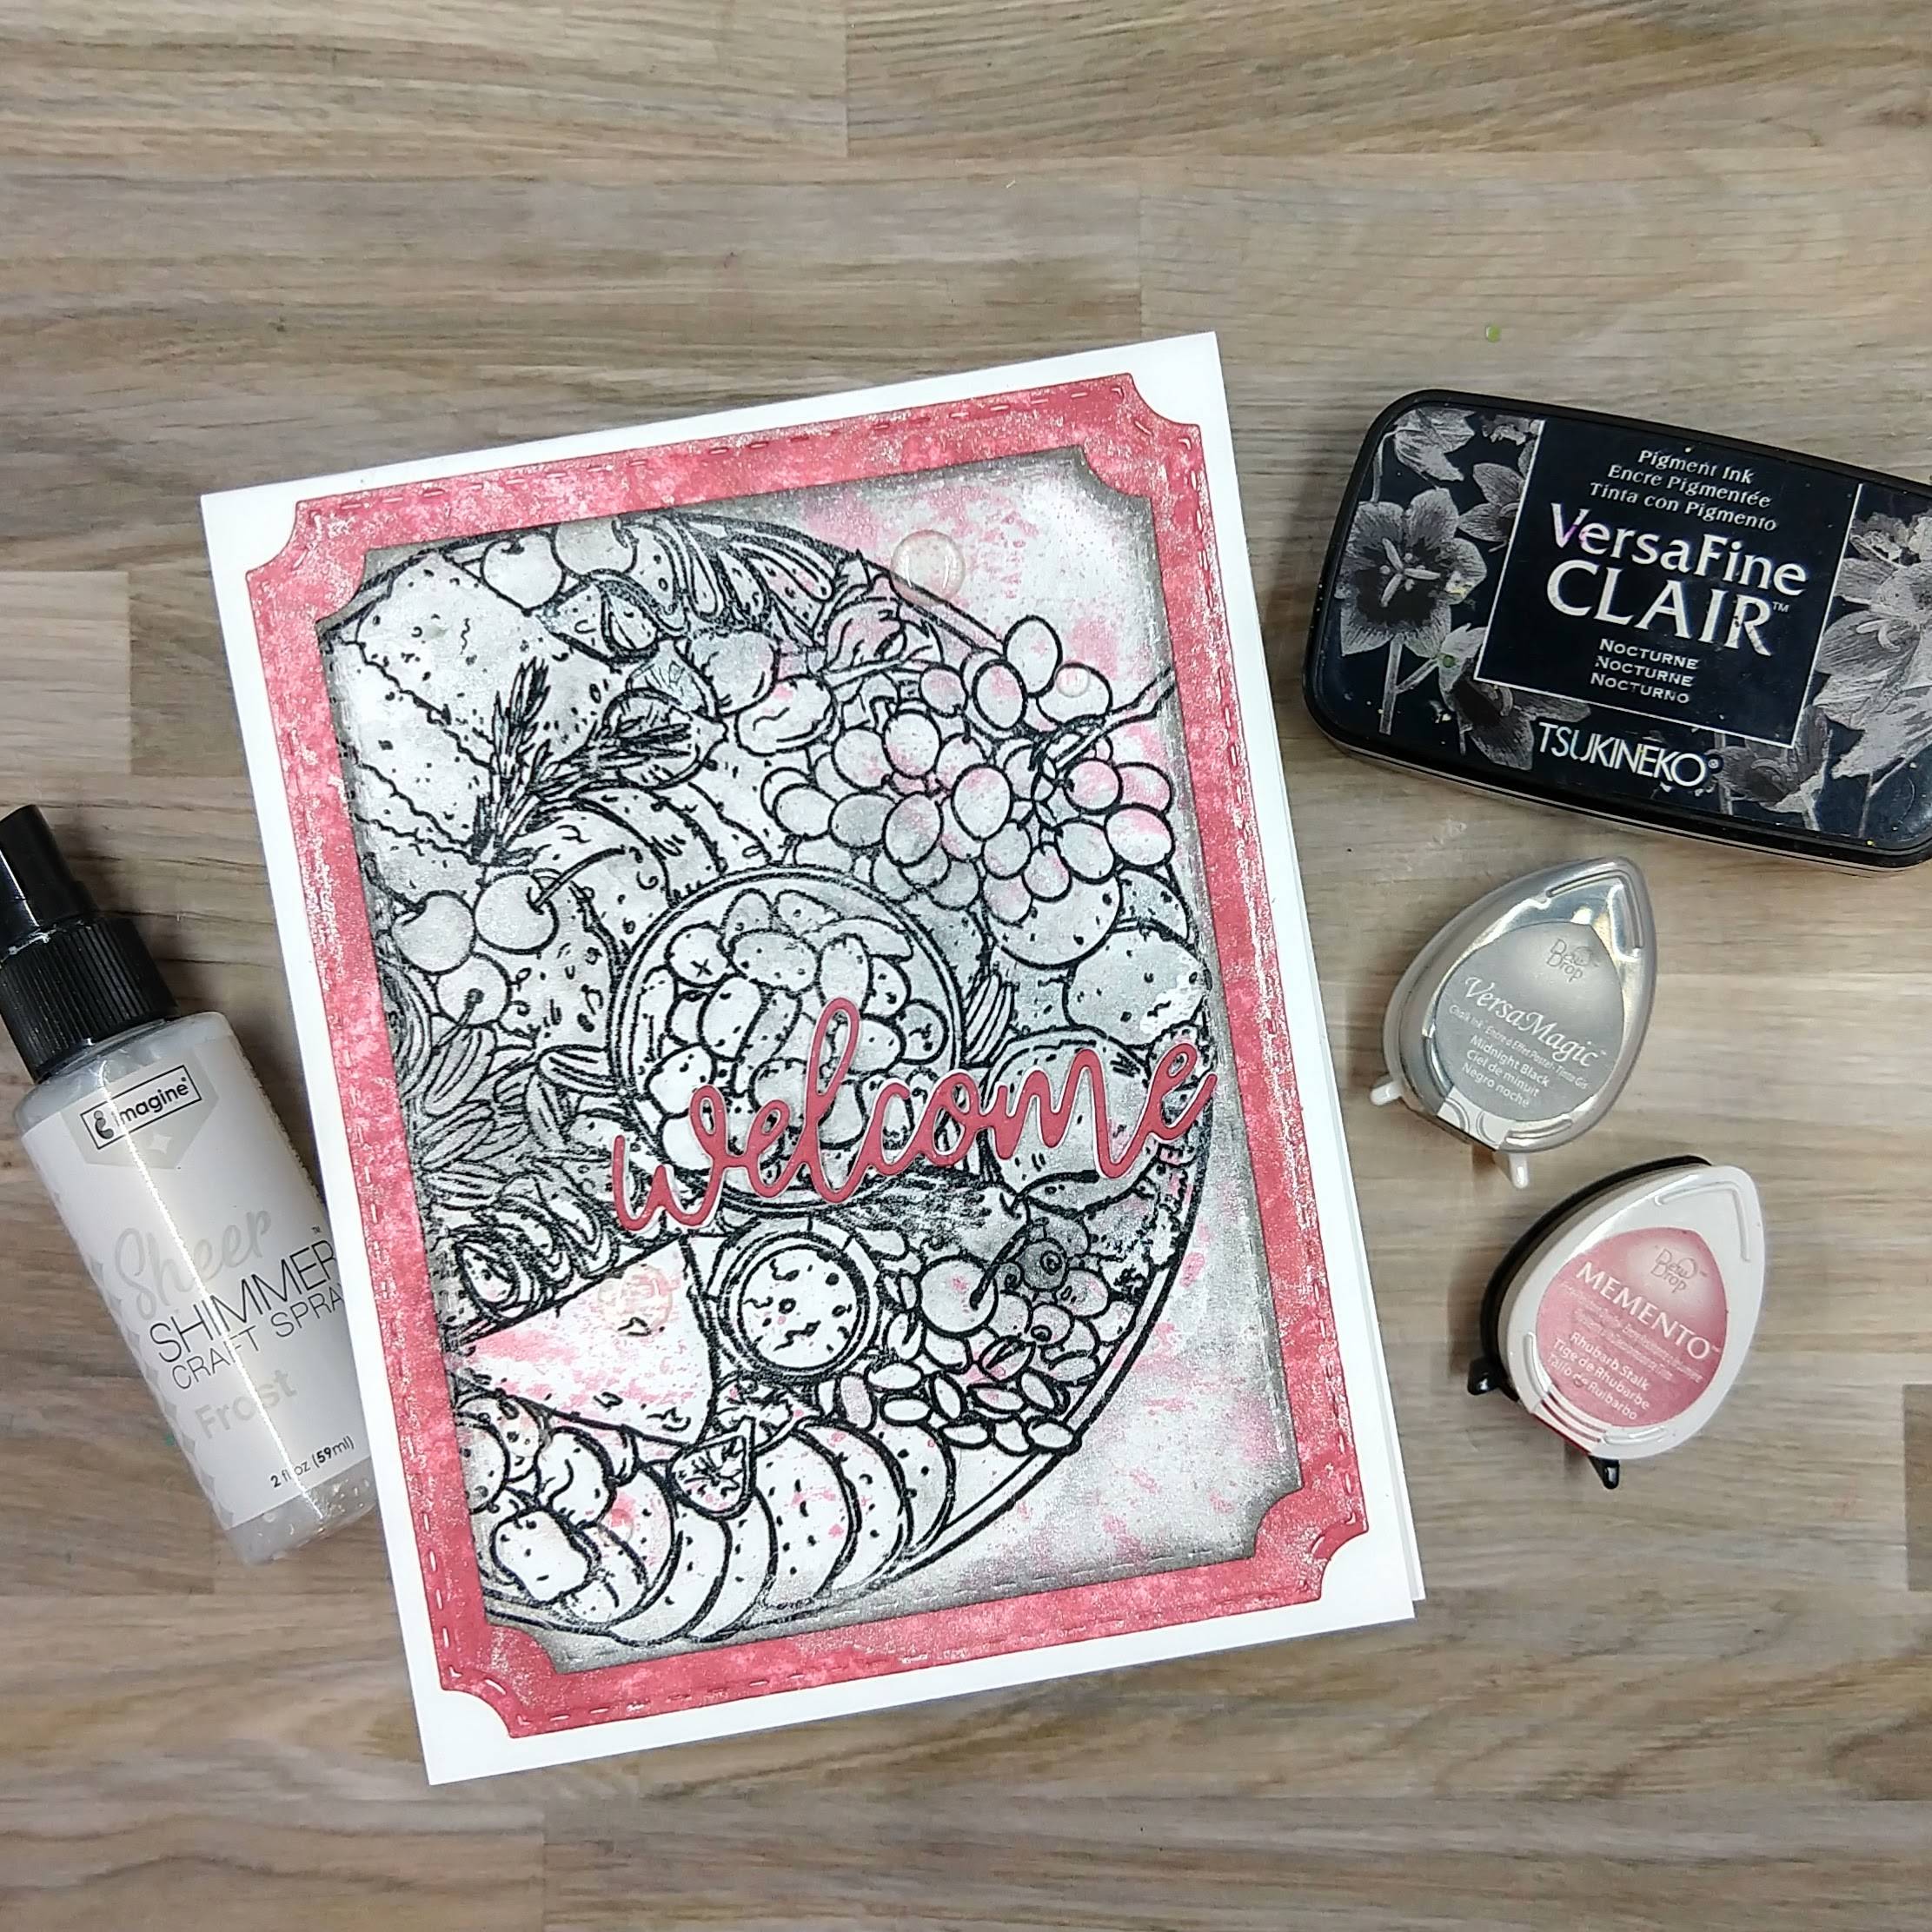
As a veteran teacher in a local high school, I was excited to make a welcome card for the new culinary teacher at my high school. I decided that since I was making the card specifically for them, I would personalize it– using maroon (or as close as I could with the colors in my stash) and gray as the color scheme of the card as our school colors and use a cute new to me charcuterie-themed stamp set.

Skill: Intermediate
Time: 1.0 hour

Directions:

Step 1:
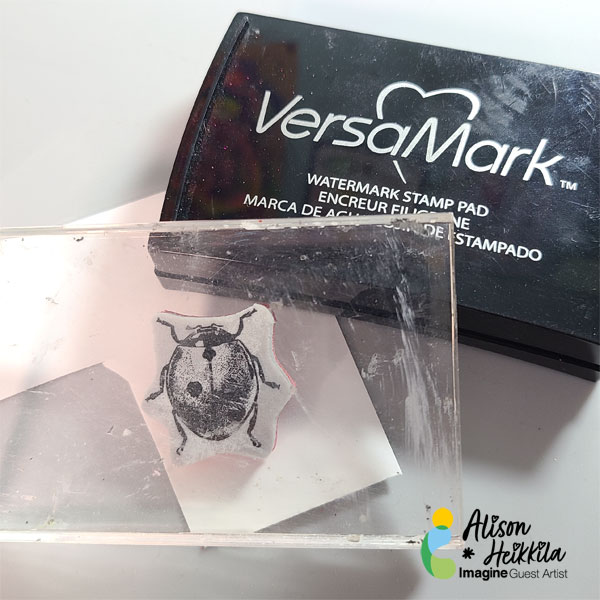
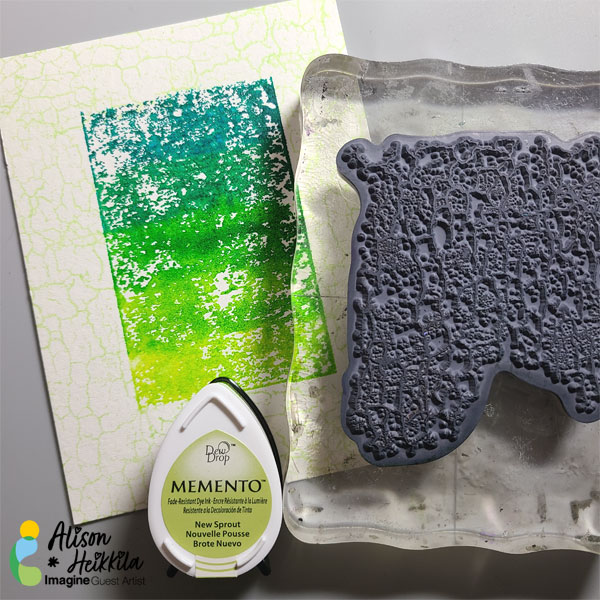
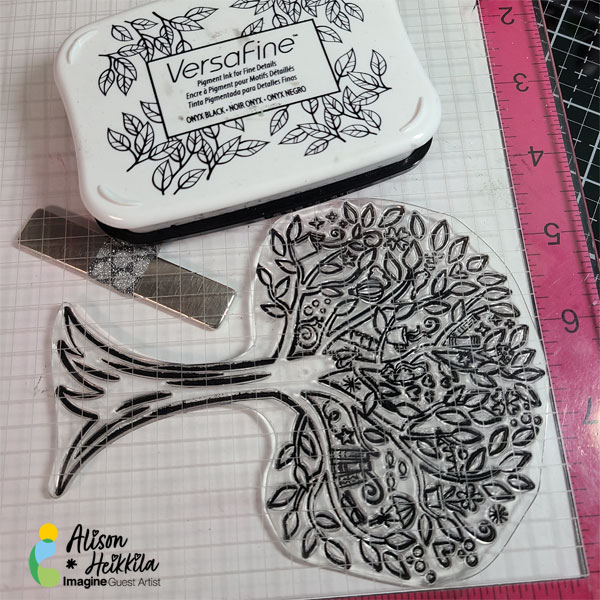
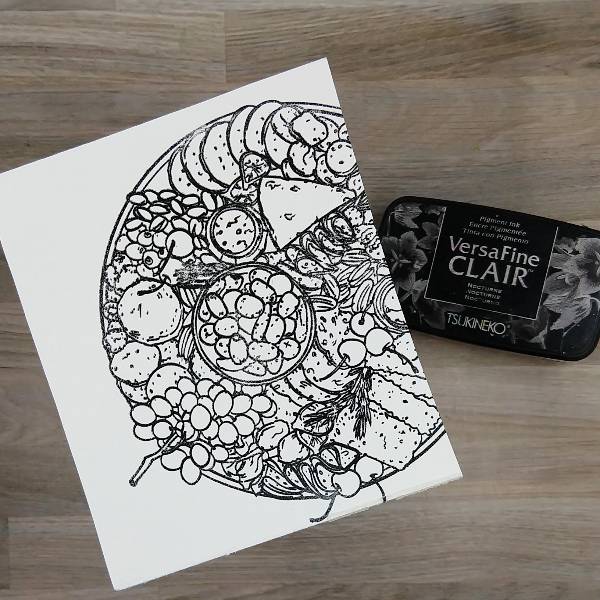
Stamp the large charcuterie stamp onto a piece of watercolor paper with Nocturne VersaFine Clair ink and heat emboss with clear embossing powder.
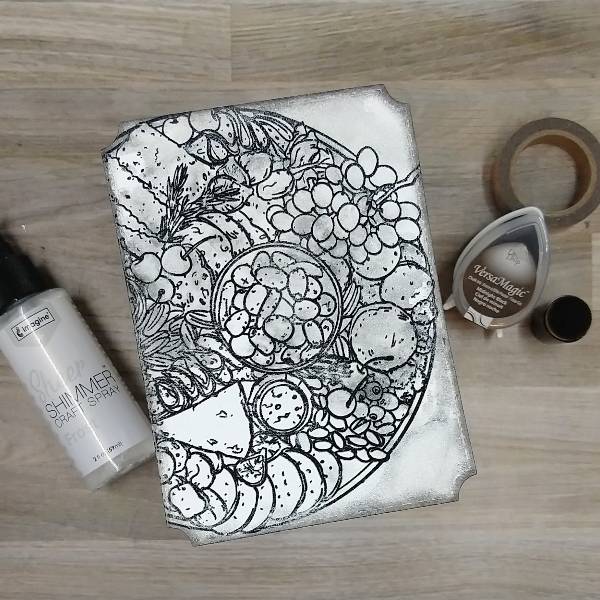
Step 2:
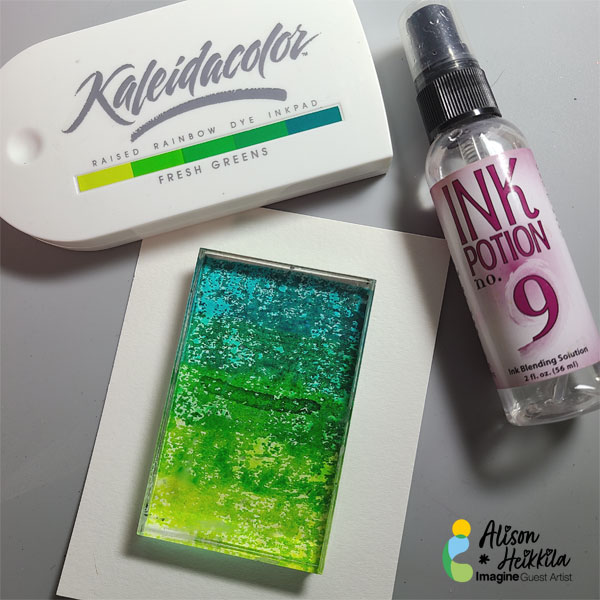
After die cutting the colored watercolor paper with the second-largest die from an A2-sized background die set, press the Midnight Black VersaMagic ink pad onto a piece of acetate packaging and then sprayed the ink with Frost Sheer Shimmer Craft Spray. Then press the acetate onto the watercolor panel. After everything dried, ink blend the edges of the panel with more of the Midnight Black VersaMagic ink using a sponge dauber.
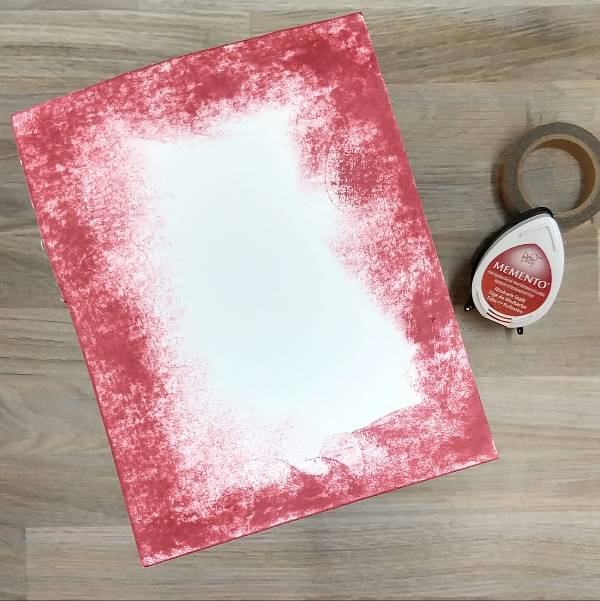
Step 3:
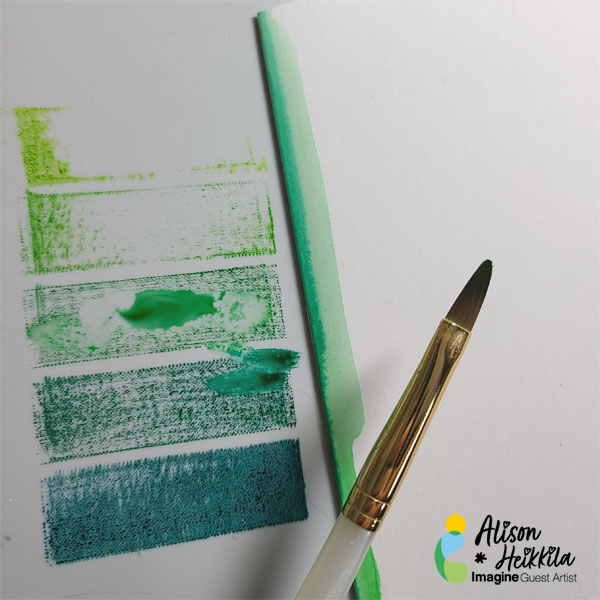
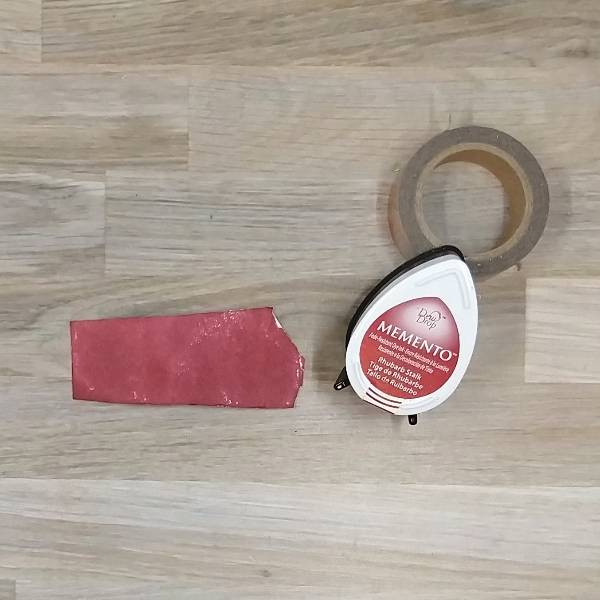
Press the Rhubarb Stalk Memento ink pad onto the edges of a watercolor panel.
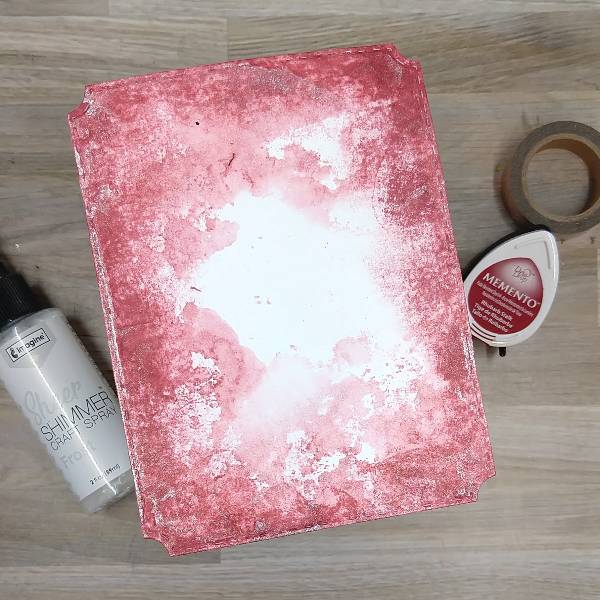
Step 4:
Die cut the panel with the largest die from the A2-sized background die set. Then press the Rhubarb Stalk Memento Ink pad onto another piece of acetate packaging and spray the acetate with more of the Frost Sheer Shimmer Craft Spray and then watercolor smooshed the Rhubarb Stalk-colored panel. Allow to dry.
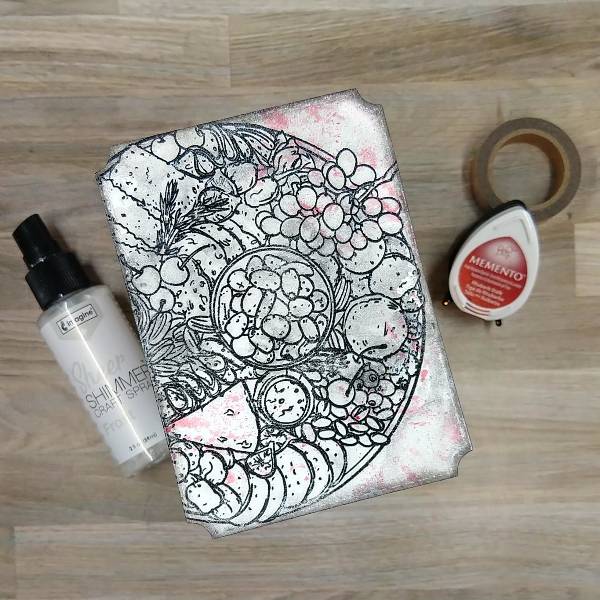
Step 5:
Press more Rhubarb Stalk Memento Ink pad onto acetate packaging and spray the acetate with more of the Frost Sheer Shimmer Craft Spray and then watercolor smoosh the stamped gray and white charcuterie board stamped panel to add a hint of color to the card. Allow to dry.

Step 6:
Press Rhubarb Stalk Memento ink pad onto a small scrap of watercolor paper. Make sure the paper is fully colored. After the ink has dried, die cut the watercolor paper with the sentiment die. While die cutting, die cut two additional scraps of cardstock to create a-three layered die cut for dimension.

Step 7:
Assemble the card. Glue the two panels together. Then glue the three layers of the sentiment together and glue to the center of the card. Attach clear enamel dots onto the card (while they are hard to see on the photo, there are three on the lower left corner of the gray panel, and two on the upper right panel). Then glue everything onto an A2-sized white cardbase.

Art Supplies

Imagine
Memento Ink – Rhubarb Stalk
Sheer Shimmer Craft Spray – Frost
VersaFine Clair Ink – Nocturne
VersaMagic Ink – Midnight Black
Sponge Dauber

Other
Altenew – enamel dots –
Crystal Clear Enamel Dots
Colorado Craft Company – stamp set –
Charcuterie Board
Pink and Main – die set –
Notched Corners
Welcome sentiment die
Clear Embossing Powder
Watercolor paper
Die cutting machine
Glue

Watercolor with VersaMagic Inks for a Teacher’s Card

By Jessica Lin

Skill: Intermediate
Time: 45 hour

Hello hello! Back to school season is right around the corner, can you believe that summer flew by so quickly? Today I have a Teacher’s card to share with you and we are coloring with some of my favorite ink pads as well!

Step 1:
Stamp the mermaid image using VersaFine Clair Nocturne ink pad and heat emboss with clear Mboss powder. I also stamped 2 sentiments partially to create a new phrase.

Step 2:
Dab some ink on the Craft Mat and watercolor the image using a waterbrush.

Step 3:
Mask the image with masking tape and blend Starlite Silver ink across the moroccan stencil. I also blended Memento Tuxedo Black ink around the mermaid image to create a shadow-glow effect.

Step 4:
Adhere the front panel to a square cardbase with foam tape, and the card is complete!

Products Used

Imagine Supplies:

Other Supplies:

  • Penguin Palace – Stamps – Take a Break
  • Stampin’ Up! – Stencil – Artistic Mix Decorative Masks
  • We R – Tool – Precision Press
  • Foam Tape
  • Heat Tool
  • Stampin’ Up! – Cardstock – Coastal Cabana

Make a Thank You Card for your Teacher

Apples 1 600

By Alison Heikkila –

Hello! It’s getting close to the end of the school, so I thought it was time to make cards for teachers that have worked so hard this year (and every year!). If you have a stamp set with coordinating dies, I’ve got some fun techniques that you can recreate. We’ll be using 2 types of masks and several colors of Memento inks. 

Skill Level: Intermediate to Advanced
Time to Complete: Approx. 20-30 minutes

Directions:


Apples 2
Step 1:


Let’s grab all of our supplies. Be sure to have focal images, a sentiment, the dies, and plenty of ink. We’ll be using Memento Inks because they blend so nicely.


Step 2: On a piece of white cardstock, cut to 4” x 5 1/4,” stamp the apple with Nocturne Ink. This is the apple that will be in the front.

Step 3: Stamp an additional apple on some scrap paper and fussy cut it out. You could use the die for this, but I wanted to get right up to the edge of my apple. This will be our first type of mask.

Apples 3

Step 4:

Place the fussy cut apple on to the one you stamped on your card front (you can use some low tack glue to hold it in place if you like). Then stamp your second apple, as shown above. When you remove the mask from the first apple, it will look like the second apple is behind the original. 

Apples 4

Here’s what the apples look like after they’re stamped. 

Apples 5

Step 5: Die cut an apple out of scrap paper. Make sure you have plenty of negative space around the die cut. This will be our second type of mask and will be used to protect the card front except for the apple you’re ink blending. 

Apples 6

Step 6: Let’s start ink blending! I love coloring apples because there is often so much variation in colors on them. I started with Lady Bug ink, then moved into Cantaloupe, and finished with Pear Tart. The mask we made with the die cut allows us to get a perfect edge around the apple. 

Apples 7 

Again, these dies cut slightly larger than the stamped image, but I don’t mind that clean, extra rim of color around the apple. 

Apples 8

Step 7: Place the fussy cut apple on to the inked apple, then line up your other mask around the uninked apple. Repeat the ink blending on this apple, but try to make it look a little different from the first one. 

Apples 9

Step 8: Grab one of your brown Memento markers (I used Espresso Truffle) and color in the stems. 

Apples 10

Step 9: Stamp a leaf on a separate piece of cardstock with Nocturne Ink. Ink blend Pear Tart ink on top and die cut it. 

Apples 11

Step 10:

Use the same 3 colors you used on the apples to ink blend the edges of your card base. 

Step 11:

Stamp the sentiment with Shady Lane ink. 

Step 12:

Adhere the card front with your favorite adhesive. Attach the leaf using foam tape. 

Apples 12 600


Finished!


Art Supplies:

Imagine:

Memento Inks in Lady Bug, Cantaloupe, and Pear Tart

VersaFine Clair Inks in Nocturne and Shady Lane

Memento Marker in Espresso Truffle

Other:

Mama Elephant: Fresh Fruits Stamps and Dies (discontinued…but there are many other fruit sets out there)

Stamping Bella: Planty Dandy

Blending Brushes

White Cardstock

Adhesive

Foam Tape


Create a Fun Summer BBQ Invitation

Ladybug-Greens-1-600

By Alison Heikkila

Summer is fast approaching and that means it’s almost barbecue season! After many of us spent last year at home, isolated, I know a lot of folks are looking forward to spending summer with friends and family again. Today, I have a simple tutorial to help you make sweet invitations (or just regular greeting cards) using some of my favorite products from Imagine, like Kaleidacolor inks and Fireworks! Spray.

Skill Level: Beginner

Time: Approx. 20 Minutes, plus drying time

Directions:

Ladybug-Greens-5

Step 1

Stamp the ladybug from the Entomology stamp set 5 times on to Smooth Bristol cardstock with VersaMark Ink.

Ladybug-Greens-6

Step 2

Sprinkle Black Embossing Powder on to the ladybugs, shake off the excess, and heat set.

Ladybug-Greens-7

Step 3:

Using Lady Bug Fireworks! Shimmery Craft Spray and a brush, paint the ladybugs. Once the color is dry on the paper, you should wipe the embossed areas with a cloth, to remove any excess.

Ladybug-Greens-8

Step 4

Die cut the ladybugs with the coordinating die.

Ladybug-Greens-9

Step 5

Cut a piece of watercolor paper to 4″ x 5 1/4.”

Step 6

Swipe the Fresh Greens Kaleidacolor Inks across an acrylic block, and then spray with Ink Potion No. 9 a few times to get the colors to blend and move.

Step 7

Place the inked acrylic block in the center of the watercolor panel, put something heavy on top (I used a tape dispenser), and leave for a few minutes. The texture of the watercolor paper allows for imperfect color transfer, which I happen to love. If you prefer a smoother look, use paper with less tooth, or texture.

Ladybug-Greens-10

Step 8

Once you removed the acrylic block, stamp a subtle pattern around the edges with New Sprout ink. I used a crackle stamp from Stampendous.

Ladybug-Greens-11

Step 9

To add color to my white card base, I pressed my Fresh Greens Kaleidacolor inks into my Craft Mat, wet my brush, and applied the 3 center colors to the edges. I kept the colors soft and slightly blended. Using the same inks for the border as we did in the center of the card allows us to have perfectly matched elements, but since they’re applied differently, you create interest on your card.

Ladybug-Greens-2jpg

Step 10

Stamp a sentiment on the card with VersaFine Ink in Onyx Black. I combined a stamp from Erin Lee Creative with a stamp from Recollections to get the sentiment I wanted.

Step 11

Adhere your ladybugs to the card front, and your card front to the base when it’s dry.

Art Supplies

Imagine

VersaMark Ink
Black Embossing Powder
VersaFine Ink in Onyx Black
Fireworks! Spray in Lady Bug
Kaleidacolor Inks in Fresh Greens
Memento Ink in New Sprout
Ink Potion No. 9

Other

Stampers Anonymous/Tim Holtz: Entomology Stamp Set and Entomology Die Set
Erin Lee Creative: Winter Magic Stamp Set
Recollections: Sentiment set
Acrylic Blocks
Small paint brushes
Strathmore Smooth Bristol Cardstock
Canson Watercolor Paper
White A2 card base

Create Beautiful Appreciation Card for Your Teacher

Grow-1-600

By Alison Heikkila

Hello! It’s getting close to the end of the school year, and between last year and this year, teachers have been champions, in my opinion. They’ve done so much for our students, learned so many new things themselves over the past year, that honoring them with a handmade card is a simple way to thank them for all of their dedication. I decided to combine Memento Markers with the Calypso Kaleidacolor Ink Pad and the March 2021 My Monthly Hero Kit to create a special card that’s perfect for any teacher.

Skill Level: Beginner

Time: 45 Minutes, plus drying time

Directions:

Grow-2

Step 1

Stamp the tree from the My Monthly Hero March 2021 kit on to Memento-friendly paper with VersaFine Ink. I used Smooth Bristol Cardstock.


Grow-3

Step 2

Color the tree using Memento Markers. My list of colors is below.

Step 3

Die cut the tree.


Grow-4

Step 4:

Cut an additional piece of Smooth Bristol cardstock, cut to 4 3/4″ x 6 3/4.”

Step 5

Push the Calypso Kaleidacolor Ink pad directly into your Imagine Craft Mat and spray with water. *Please note, I opted to use a larger brush than the one pictured here. Please see the supplies list for details.


Grow-5

Step 6

Begin painting the Calypso inks on to the Bristol cardstock. Use waters to help blend colors, and hold the tree up to the cardstock occasionally to see if you like your placement of colors. I worked diagonally, in the order the colors are in the ink pad.


Grow-6

Step 7

Continue working your way down the cardstock, blending colors as you go. I left a bit of a border around the edge of (most) of the Bristol.


Grow-7

Step 8

Once the panel is fully painted, let dry. Or, you can speed up the process with a heat tool. You can see how beautiful and vibrant the colors are, even after they’ve been watered down.


Grow-8

Step 9

Stamp your sentiment with VersaFine Clair Ink in Twilight. I assembled my sentiment with words from a Recollections stamp set.


Grow-9


Step 10

Create your card base out of black cardstock, cut to 10″ x 7.”

Step 11

Adhere the painted panel to the card base.

Step 12

Apply foam tape or pop dots to the back of the tree and adhere it to the card.


Grow-10

Step 13

Adhere Sparkle Blends to the card using On Point Glue.


Art Supplies

Imagine

VersaFine Ink in Onyx Black

Memento Markers in Rick Cocoa, Toffee Crunch, Bamboo Leaves, Pear Tart, Ladybug, Potter’s Clay, Dandelion, Summer Sky, Desert Sand, Angel Pink, Rose Bud, Lulu Lavender, Tangelo, Elderberry, Grape Jelly, Cantaloupe, Bahama Blue. 

Kalediacolor Ink in Calypso

VersaFine Clair Ink in Twilight

On Point Glue


Other

Hero Arts: My Monthly Hero March 2021 Kit

Doodles Paper Playground: Clearly in Love

Canson: Smooth Bristol Cardstock

Princeton: Snap! Size 10 Round Watercolor Brush

Recollections: Sentiment stamps and Black 110 lb cardstock