Learn to Make a Back to School Card

2022_Aug_Martha-Lucia-Gomez_600x600

By Martha Lucia Gomez –

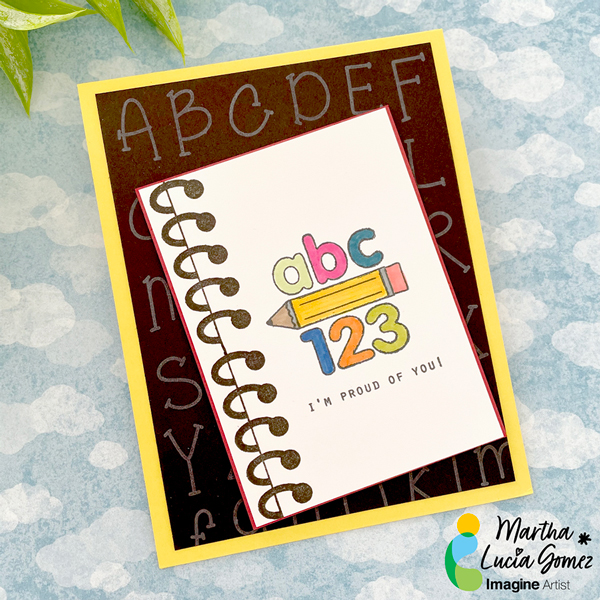
Hello there! During summer our time es limited and today I have an easy and fun Back To School Card featuring several of Imagine products, like VersaColor, Memento Ink and Markers and VersaFine. During the process you will see how all the different inks looks according to the project.

Skill Level: Beginner
Time to Complete: 30 Minutes

Directions

2022 - August - Martha Lucia Gomez - Step 1a

Step 1:

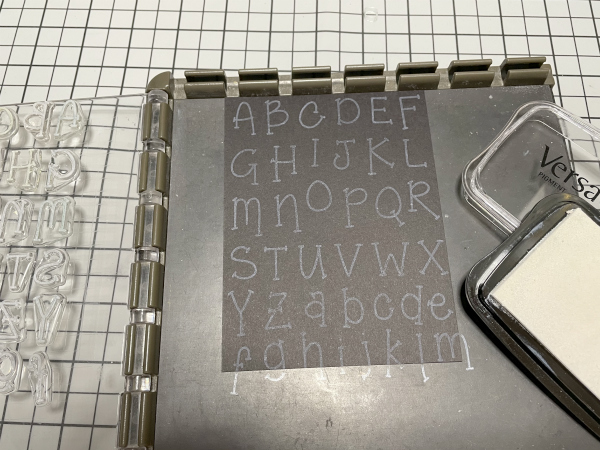
Take a piece of a dark color cardstock to create the background. On my sample, I am using dark grey, but this type of stamping looks great in additional colors like red, blue or black. Select the stamp set that you prefer to create the background.

 I selected an alphabet set of stamps but I stamped the entire sheet at once. To make it, just secure the entire sheet over the stamping tool. To create the soft look, I used VersaColor  White. It is a soft ink ideal to emboss or create shadows.  

If you are not heat embossing it, let the piece a side for a while to ink dry naturally or use a heat tool to speed the process.

2022 - August - Martha Lucia Gomez - Step 2

Step 2:

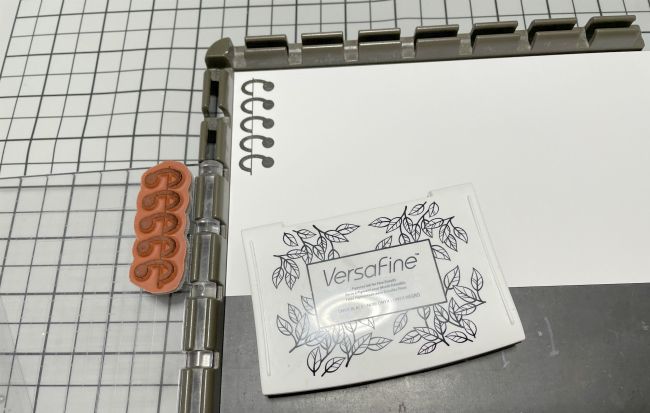
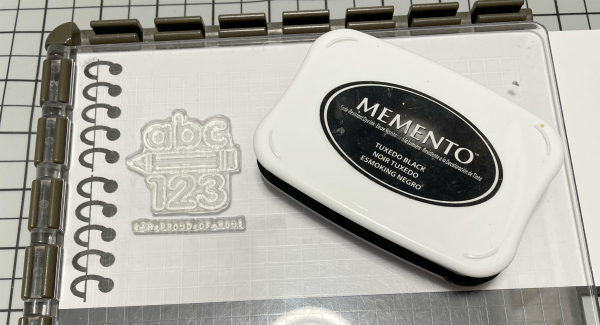
In a separate piece of white smooth cardstock, stamp the spiral image using VersaFine Onix. Let the ink dry naturally and you will obtain a crisply image. Or if you prefer, you can heat emboss the stamped image to add a shiny look. 


2022 - August - Martha Lucia Gomez - Back to School - Step 3

Step 3:

Stamp the focus image with Memento Tuxedo Black Ink.

2022 - August - Martha Lucia Gomez - Back to School - Step 4

Step 4:

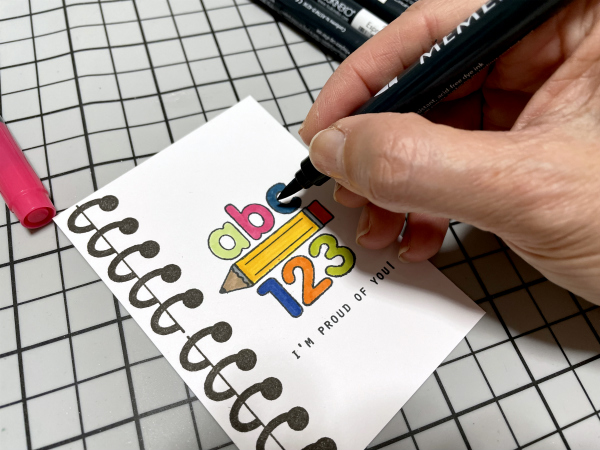
Color all the details with Memento Dual Tip Markers.  

TIP: Keep in mind that you can use your Memento Dual Tip Markers with both inks, VersaFine and Memento without any coloring problem. 

2022---August---Martha-Lucia-Gomez---Step-5

Step 5:

Create the card base and resize all the layers of your card. You can paste them with Tear It! Tape or use crafty foam tape to add more dimension and interest to your card.

Art Supplies:

Imagine:

• VersaColor – White 

• Memento – Tuxedo Black 

• Memento Dual Tip Markers 

• VersaFine – Onix Black

• Tear it! Tape 

• Craft Mat 

Other:

• Joy Clair Designs – Friendly Alpha Clear Stamp Set, White Smooth Cardstock 

• Crackerbox Stamps – Spiral Side Rubber Stamp

• Precious Remembrance Shop – School Days Stamp Set

• Positional Stamp Tool.

• Scrapbook Adhesives Crafty Foam.

Learn Thumping Technique using Ink Pads

2022-July-Martha-Lucia-Dandelion-Card-700

By Martha Lucia Gomez –

Hello there! In today’s crafting tutorial I want to show you how to make the traditional thumping technique but this time using ink pads and not markers! To make my card, I used the large size of Memento Inks but it can be made with the Memento Drops too or with any other type of ink. This is an easy and fun summer card for any occasion.

Skill Level: Beginner
Time to Complete: 30 Minutes

Directions:


2022-July-Martha Lucia - Dandelion Card - Step 1
Step 1:

Select the stamp set that you prefer. To make most evident this technique you can use solid stamps. Additionally, pick the colors of ink that you wanted to use. I am using two, Memento Ink Bamboo Leaves and Tangelo. 

2022-July-Martha Lucia - Dandelion Card - Step 2

Step 2:

Ink your stamp with the first color. In my case Memento Bamboo Leaves. 

2022-July-Martha Lucia - Dandelion Card - Step 3

Step 3:

Without stamp the image over the cardstock, ink the stamp partially with the second colors. Keep in mind the parts that you want to look with different shadows.

2022-July-Martha Lucia - Dandelion Card - Step 4

Step 4:

Stamp the image over a piece of cardstock.

TIP: Clean the second ink pad with a dry towel to avoid contamination of the colors.

2022-July-Martha Lucia - Dandelion Card - Step 5

Step 5:

You can repeat the above step if you want to obtain darker colors. Stamp a sentiment using a contrast color to complete your card.

2022-July-Martha-Lucia---Dandelion-Card---Step-6

Step 6:

Resize the layer with, paste the sentiment and add the decorative layer over a card base. If you want, you can use your favorite crafty foam to add more dimension to your card.


Art Supplies:

Imagine:

• Memento – Bamboo Leaves and Tangelo

• VersaFine – Onix Black

Other:

• 88 and Clear – Clear Stamp Set Kissable Dandelion

• Scrapbook.com – Clear Stamp Set Handmade Essentials

• Joy Clair Designs – White Smooth Cardstock 

• Positional Stamp Tool.

• The Greetery LLC – Crimped Frame Die

• Die Cut Machine

• Scrapbook Adhesives Crafty Foam.

Let’s Make an Adorable Summertime Card 

2022-LeeAnn-June_700x700

By LeeAnn McKinney

– Nothing says Summertime to me like a nice juicy chunk of watermelon… and making this card made me get up and grab a watermelon popsicle when I was done…

Skill level: Beginner

Time: 30 minutes


Art Supplies

Imagine:

• VersaFine CLAIR Nocturne – 

• Fireworks Summer Sky – 

• Tear It! Tape – 

• Angel Pink Memento Marker – 

• Lady Bug Memento Marker – 

• Desert Sand Memento Marker – 

• Summer Sky Dew Drop – 

• Bamboo Leaves Dew Drop – 

• Pear Tart Memento Marker – 

• Toffee Crunch Memento Marker – 

Other supplies:

• MFT Through The Clouds Stencil

• MFT Summertime Pure Innocence Girl

• Accent Opaque 120lb White Cardstock

• Gina K Designs 80 lb Layering Weight Cardstock

Make a Hibiscus Sympathy Card with Creative Medium

2022_May_Neva_Sympathy_650x650

By Neva Cole 

I am always searching for new ways to use supplies and tools.  Creative Medium comes in many colors, but the Iridescent Green creates stunning results on black paper.  The use of an Embossing Folder helps the layers of the iridescent effect really shine.  A few layered stamped images and I have a beautiful sympathy card to send to a dear friend.  

Skill: Beginner

Time: 1 Hour plus dry time

Directions:

2022_May_Neva_Sympathy_Step1
Step 1

Cover a section of black paper (with or without texture) with a thin layer of Creative Medium in Iridescent Green.  I used Imagine’s Squeegee to spread the layer across the paper.  The rubber edge was very helpful to get a thin even layer.  Set aside to dry, possibly overnight.  After it is dry it will still have a slightly rubbery texture.

2022_May_Neva_Sympathy_Step2
Step 2:

Trim a section of the paper to 4” x 5 1/4” and pressure emboss with Sizzix Tropical Paisley Embossing Folder.  You can really see the detail in this photo.

2022_May_Neva_Sympathy_Step3
Step 3:

Layer stamp the Hero Arts Hibiscus and leaves images.  Start with the lightest ink first.  For the Hibiscus–Radiant Neon Electric Yellow, Memento Cantaloupe, Memento Tangelo, and VersaFine Habanero.  The leaves are stamped in Memento Bamboo Leaves and Northern Pine.  The images are die cut twice more from white and layered under matching die cuts with OnPoint glue.

2022_May_Neva_Sympathy_Step4
Step 4:

The sentiment from Unity Stamp Company is stamped in Versa Fine Habanero then heat embossed with Iridescent Embossing powder.  (Not shown) The image is die cut with Lawn Cuts Everyday Sentiments die.  One end is trimmed off square.  The banner is inked with an ink dauber and Radiant Neon Electric Yellow.  The edges are inked with Memento Cantaloupe.  

2022_May_Neva_Sympathy_Step5
Step 5:

Ink the edges of a 4 1/4” x 5 1/2” card with Radiant Neon Electric Yellow ink with an ink dauber.

2022_May_Neva_Sympathy_Step6
Step 6:

The layers are adhered together with Tear It! Tape.  It adheres well with the textured layers of the card.  The two Hibiscus flower are lifted a bit with dimensional foam adhesive.

Art Supplies

 Imagine

• Creative Medium Iridescent Green

• Imagine Squeegee

• Radiant Neon Electric Yellow

• Memento–Cantaloupe, Tangelo, Bamboo Leaves, Northern Pines

• VersaFine Habanero

• Tear It! Tape

• Ink Dauber

Other

• Black and white cardstock

• Sizzix Tropical Paisley Embossing Folder

• Stamp Platform

• Heat Embossing Gun

• Hero Arts Hibiscus C1868

• Unity Stamp Company “beautiful life, blessed memories”

• Lawn Cuts Die Everyday Sentiments

• Dimensional Foam Adhesive

Hang In There… An Inspirational Project 

LeeAnn_Feb_Card_Blog

By LeeAnn McKinney

– Hi there friends and fellow crafters, LeeAnn here with a project that I knew I was going to make the minute I saw the photo. See a friend of mine posted this amazing photo on her Facebook page last month, and I started thinking right then about how I was going to replicate it. How about leaving a comment below and let me know how I did. 

Skill level: Beginner

Time: 30 minutes


Art Supplies

Imagine:

• Fireworks! Angel Pink

• Fireworks! Summer Sky

• Fireworks! Lulu Lavander

• Imagine Craft Mat

• On Point Glue

• Imagine Tear It! Tape

• VersaFine Clair Nocturne

Other products:

Spring-Summer 2022 Coffee Lovers Blog Hop

2022-Spring-Summer_Coffee_Lovers_Blog_Hop

Welcome to our blog! Imagine Crafts is pleased to be a super sponsor for the Coffee Lover’s Blog Hop for the Spring/Summer of 2022.  Our design team members all joined in to show you some of the fun and coffee themed cards they made using some of the Imagine Inks and readily available stamps/dies that are coffee themed.  

We are also having a giveaway!  Since Imagine Crafts is a super sponsor, we will be giving away a $25.00 gift card to the store. Please comment below for your chance to win.

Some of our design team members have created extra projects in order to participate in the Coffee Lovers Blog Hop and we will now share their photos of their projects and links to the Imagine items used. That way, you can go visit the item and see if it is for you. 

Let’s get started with our Design Team Member’s Projects!


LeeAnns_Coffee_Blog_2022

Designed By: LeeAnn McKinney

– Hi there Coffee Lovers, for my project today I used The Perfect Blend Stamp Set from Gina K Designs. Using Memento Espresso Truffle I stamped the background and since Memento is a dye based ink it dried quickly.

I cut a panel of vellum to cover most of my background panel, and then grabbed a circle tag out of my stash. I stamped the coffee cups on the tag with the Memento Espresso Truffle and then used Memento Markers to add a pop of color. For The cup part I used Bamboo Leaves and Pistachio, while for the rings I used Rich Cocoa and Desert Sand.

The final stamping was the sentiment in which I used VersaFine Clair in Pinecone. I used Tear It! Tape and On Point glue to adhere my panels together and with that my project is complete.

Happy Hopping in the Coffee Lover’s Blog Hop Spring/Summer 2022!!!

Supplies used:

Imagine

• Memento Espresso Truffle Dye Ink

• Memento Marker: Rich Cocoa, Desert Sand, Bamboo Leaves and Pistachio


Other Supplies Used:

• Perfect Blend Stamp Set from Gina K Designs

• Recollections Coffee and Cream Cardstock Pack(Brown and Ivory)


Annie_Collins_Coffee_Blog_2022

By Annie Collins

– I created this fun coffee card featuring a stamp from @not2shabby and dies from @trinitystamps. I colored, embossed with @imaginecrafts products. 

Supplies Used:
Imagine:

• Memento Ink: Jumbo Java & Summer Sky 

• VersaFine Ink:  Onyx Black

• Memento Markers: Desert Sand, Toffee Crunch, Peanut Brittle, Espresso Truffle, New Sprout, Dandelion, Lulu Lavender, Rich Cocoa, Angel Pink., Rose Bud & Tuxedo Black

• Mboss Embossing Powder: Clear

• On Point Glue

• Tear It! Tape

Other Supplies Used:

• Stamps: Not 2 Shabby: Coffee, Paper Crafts Magazine: Macaroons, Run On & Caffeine Loading Sentiments

• Die: Trinity Stamps: Coffee 

• Accent 80# Ultra Smooth Cardstock: Opaque White

• Recollections Brand 110# Cardstock: White, Brown & Kraft

• Trinity Stamps Clay Elements: Coffee Beans and Hearts


2022_Coffee_Blog_Hop_Alison

By Alison Heikkila

– I went with a simply designed card that is perfect for any coffee lover. I ink blended two VersaFine Clair Inks with my coffee bean stencil. My sentiment was die cut and I used the die itself as a mask to softly ink around the sentiment. Sparkle Blends were adhered with On Point Glue for some shine. 

Supplies Used:
Imagine:

VersaFine Clair –  Fallen Leaves and Pinecone

VersaMagic Ink – Sahara Sand

On Point Glue

Other Supplies Used:

Stamp Anniething: Coffee Beans Stencil

Erin Lee Creative: Stamp from the Coffee Lover’s Kit (discontinued)

Doodles Paper Playground: Cinnamon Roll Sparkle Blend

Spellbinders: Die Cut

Copic: R22


Thank you so much for visiting the Imagine Crafts post for the 2022 Spring Summer Coffee Lovers Blog Hop.

Please use THIS LINK to go back to the main hop post.

You are invited to the Inlinkz link party!

Click here to enter
https://fresh.inlinkz.com/js/widget/load.js?id=a8b40ada7693d64e5923