See How to Make a Beautiful Beaded Bowl

by Iris Rodriguez

See How to Make a Beautiful Beaded Bowl

They say it’s the little things that matter. So one day, I was at my local craft store and noticed the beads were on clearance. How can I pass up this aisle, right? I saw these two large turquoise beads. I got inspired to wire wrap them into a small bowl. I made the bowl using Activa Self Hardening clay, a nice porous clay that takes pigment inks nicely. I decided to use inks that would complement the beads. I used Turquoise Gem, VersaMagic, a stunning turquoise that contrasts nicely with the Crimson Copper and Rocket Red Gold Brilliance inks.

Skill: Intermediate
Time: 1 Hour to make the bowl, 2 days total for bowls to air dry

Directions


Step 1

For this project, I used Activa Plus clay. In case you’re not familiar with this clay, I will describe its properties. It is an air-dry clay. It is fine, moist, malleable, firm, but not hard. Keep the clay moist by spraying a little water, which also makes it softer. When the clay is wet, it is a beige like color, and when dry it turns off white color. The rate that it dries will depend on the thickness of the project and room temperature. The drier the room, the faster it dries. It is highly porous, which is nice, because it takes just about any kind of medium for coloring onto the clay, such as Imagine’s dye/pigment inks and craft sprays. For this project, I used pigment inks. Use a wooden board or another non-porous surface to work with this clay.


Step 2

Condition the clay by wedging the clay or just rolling it around. Roll out a sheet of clay. You can use a pin roller used or use a clay roller. The clay is usually very smooth when it’s rolled out. If it is not, then smooth out the clay with your fingers, rib tool or another smooth-edged tool.


Step 3

Create a template for the bowl. Make the template out of scratch paper. The template will guide you when cutting out the clay.


Step 4

Place the stencil over the clay and in a pouncing motion ink the clay with Turquoise Gem VersaMagic ink. Then ink on the Crimson Copper Brilliance ink. Add the Rocket Red Gold Brilliance ink over the Crimson Copper. If you do not have a stencil, you can cut shapes out of paper and place over the clay. The moisture of the clay keeps the paper in place.


Step 5

Place the template over the clay and cut out the shape. Ensure that you work on the wooden board when cutting out the clay. DO NOT use the craft mat to cut.


Step 6

Place the bead on the end. Place the circle stencil over the bead and find a circle that fits the bead.


Step 7

Using the stencil as a guide, cut out the shapes. Repeat steps 7 and 8 for the other side. Ensure that you work on the wooden board when cutting out the clay. DO NOT use the craft mat to cut.


Step 8

Place the clay bowl into a real bowl or other object and allow it dry for one day. It will take on the shape of the object.


Step 9

At the start of day 2. The clay will be slightly moist. Perfect time for drilling the holes. If the clay is completely dry, and you try drilling, you risk the clay breaking. Use a small drill bit and manually drill the holes. Ensure that the wire will fit through the holes. Do not use a power drill; it’s overkill and the clay is too delicate. Wipe off the clay burrs with a brush. Let the clay dry for another day. No need to put it back in the real bowl. At this point, the shape will stay in place. To determine if it’s dry, take a look at the natural clay color; it will turn an off-white when dry. Also, if the clay feels cold then it’s still wet. It is very important to seal the bowls. The clay is porous, therefore liquids can weaken or activate the clay. The sealer makes it look purposely finished. You can use a spray sealers like 3M/Krylon or brush on a water-based varnish or polyurethane.


Step 10

Now that the bowl is completely dry. Time to embellish it. You will need beads, plyers and 20 gauge copper wire.


Step 11

Cut out about 15 inches worth of wire. Add the bead to the wire, take it to the center of the wire.


Step 12

Wrap the wire over and under the edge of the bowl.


Step 13

Wrap the wire three times to secure the ends. Cut the wire.


Step 14

Now you have you finished your decorative bowl.

Supplies

Imagine
Other
  • Activa Plus Self Hardening Clay – White
  • Modeling clay tools – rib tool, knife or needle tool
  • Rolling pin
  • Wooden board
  • Large Beads
  • 20 Gauge copper wire
  • Stencils
  • Sealer (spray, polyurethane)

Learn How to Create an Amethyst Diamond Background Pattern

by Martha Lucia Gomez

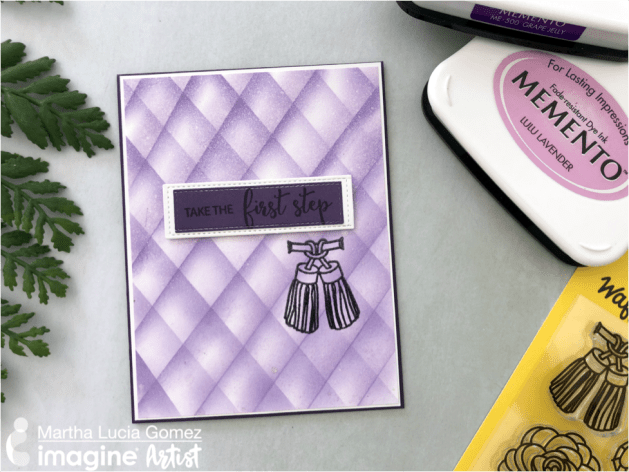
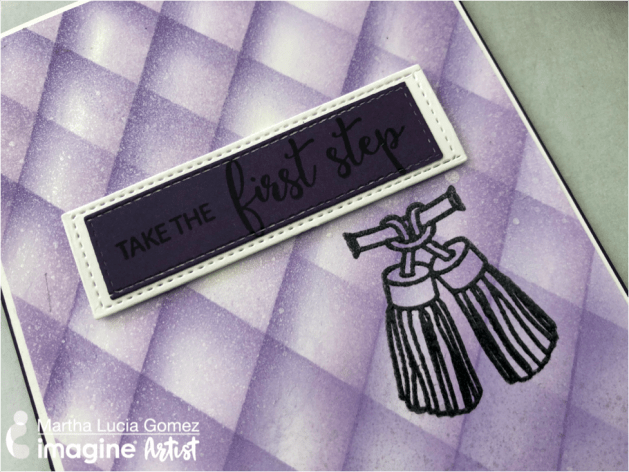
Learn How to Create an Amethyst Diamond Background Pattern. Martha Lucia Gomez shows you a step-by-step process.

Hi there, Martha Lucia here! Today, I have a fun project to create using your Memento Inks and Waffle Flower stamps. This month we are featuring the color Amethyst a beautiful purple hue. I am using Memento Ink in Grape Jelly and Lulu Lavender to create my faux diamond Amethyst background.

Skill: Intermediate
Time: 45 minutes

Directions


Step 1

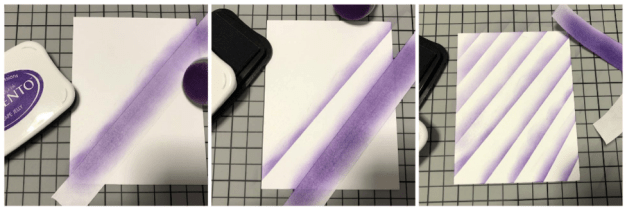
I started with a whisper white piece of cardstock and a strip of masking tape. I just created diagonal lines of color using a jumbo dauber and the Grape Jelly Memento Ink. This is a technique that you can use with any color of ink, but for this color scheme, I started with the dark purple. I used the grid side of my Craft Mat to determinate space in between each line. Mine are around 3/4″ of each in between.


Step 2

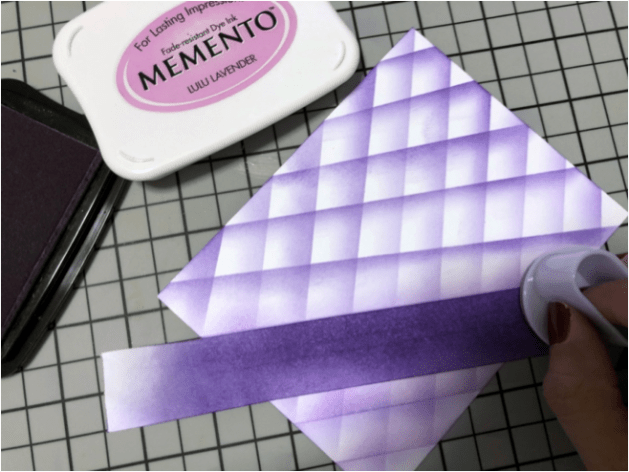
When I was satisfied with the look, I just turn the inked cardstock 180 degrees and repeat the process but this time using a lighter color of ink, Lulu Lavender Memento Ink, just to create the shadow.


Step 3

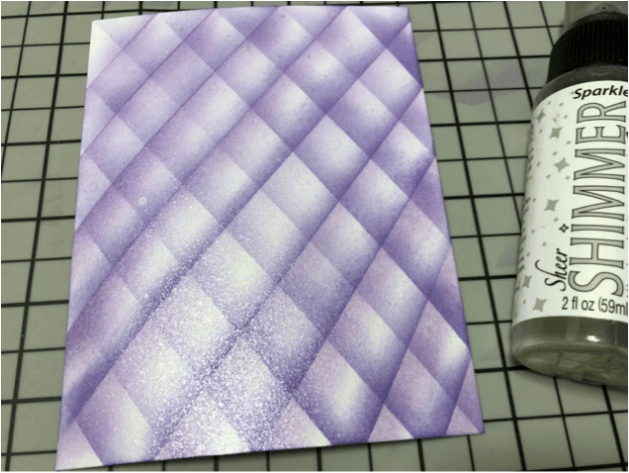
I sprayed the entire inked piece with Shimmer Sheer Sparkle to give the shimmering touch that a pair of shoes deserve. Yes, to finalize my card, I used images from the stamp set First Steep from Waffle Flower. This is a gorgeous stamp set that includes a pair of shoes with many embellishments and great encouraging sentiments.


Step 4

I just stamped one of the embellishments included in the First Step stamp set directly over my faux diamond background with VersaFine Clair Nocturne and Clear Mboss Embossing Powder. Then I combined two sentiments and stamped them over a piece of Gorgeous Grape cardstock that I cut and mat with whisper white cardstock using the Stitched Sentiments Strips Dies from Kat Scrappiness.

Thank you for stopping by and if you want a suggestion, try to use this faux diamond technique using opposite colors of ink and share your creations with us!

Supplies

Imagine
Other
  • Waffle Flower – First Step Stamp Set 
  • Card Stock – Whisper White, Gorgeous Grape
  • Masking Tape
  • Kat Scrappiness – Stitched Sentiments Strips Dies

Learn How to Add just a Pop of Color to an Elegant Card

by Lori Warren

Adding just a pop of color added to a black and white project can be very dramatic. When you use Rinea Foil Paper as that pop of color, it not only adds drama, it adds a level of elegance as well.  Black cardstock, Snowflake StazOn Pigment ink and Rinea Foiled paper are the perfect combination for drama and elegance!

Skill: Intermediate
Time: 45 minutes

Directions

Step 1

Accordion fold a color piece of Rinea foil paper – I chose this bright pink color.

Step 2

Emboss that piece of foil paper using an embossing folder.

Step 3

Die cut gold foil paper medallions using 3D Impresslits Embossing Folder.

Step 4

Stamp floral images and saying onto black card front with StazOn Pigment in Snowflake.

Step 5

Stamp floral images onto smaller strip of black cardstock.

Step 6

Layer strip of stamped cardstock over piece of embossed foil paper and adhere to card front; adhere foil medallion.

Step 7

Background options 2; randomly stamp floral images onto black card front.

Step 8

Stamp floral images onto smaller strip of black cardstock

Step 9

Mount a square piece embossed foil paper to black foil paper; adhere to card.  Adhere stamped strip of cardstock and foil medallion over the squares.

Supplies

Imagine
Other
  • Rinea – Double sided foiled paper
  • Sizzix 3D Impresslits Embossing Folder – Medallion
  • Cuttlebug Embossing Folder – Spots n Dots
  • Hot off the Press – Botanical Blooms stamps
  • Black Cardstock
  • Scissors or paper trimmer

Create a Beautiful Wedding Dress Card with Heat Embossing on Rinea Foil

by Jessica Lin

Create a Beautiful Wedding Dress Card with Heat Embossing on Rinea Foil

Hey there, crafty friends! Today, I have an exciting wedding card project to share with you. I’m a big fan of stretching my craft supplies and finding new, creative ways to use them. In today’s video, I’m teaching how you can combine dry and wet embossing on Rinea Foil Paper to create a new technique! It’s simple, but there are no limits to what you can create because you can choose from a wide array of embossing folders and embossing powders. I hope you feel inspired to give this technique a try. If you liked it, be sure to leave a like or comment to let me know!

Skill: Advanced
Time: 1 hour

Supplies

Imagine
Other
  • Rinea Foil Variety Pack – Metallics
  • EK Success Anti-Static Powder Tool
  • Heat Gun
  • Stampin’ Up Wonderful Moments
  • We R Memory Keepers Next Level Embossing Folder – Bouquet
  • Stampin’ Up Embossing Folder – Country Floral
  • Cardstock – White, Navy, Jade

See How to Heat Emboss on Rinea Foil Paper

by Martha Lucia Gomez

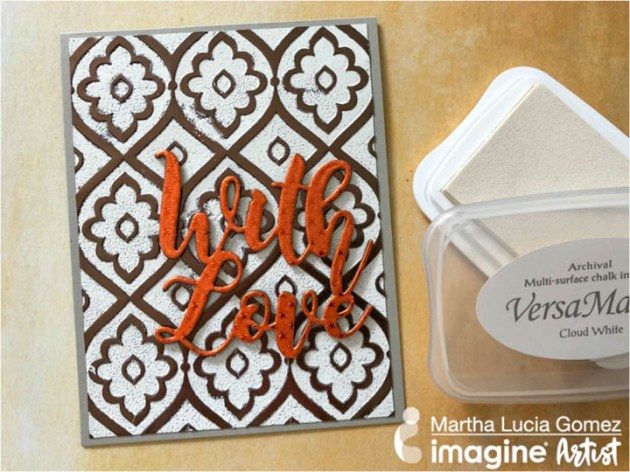
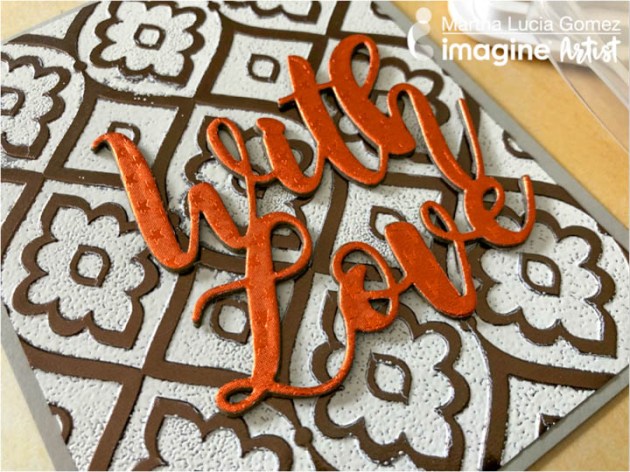
Hi there, Martha Lucia here! Today I am featuring one of my favorite techniques, heat embossing over Foiled Paper. During this month the teams of Imagine and Rinea are working together to promote the combination of these brands. The base of my card is Sahara sand card stock and the second layer is Mocha/Gold Glossy Rinea Foil Paper. Let me share with you the entire process.

Skill: Intermediate
Time: 30 minutes

Directions


Step 1

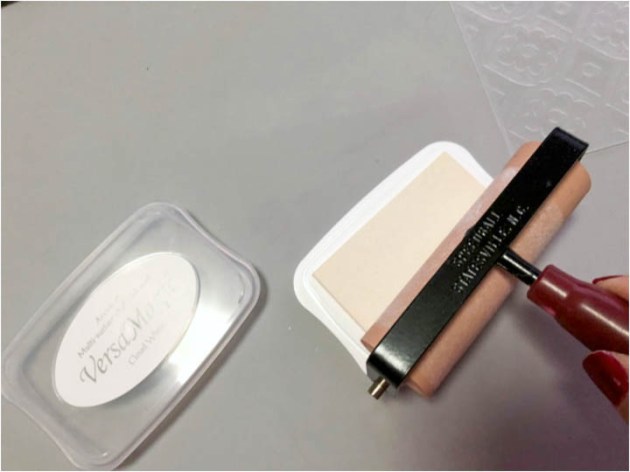
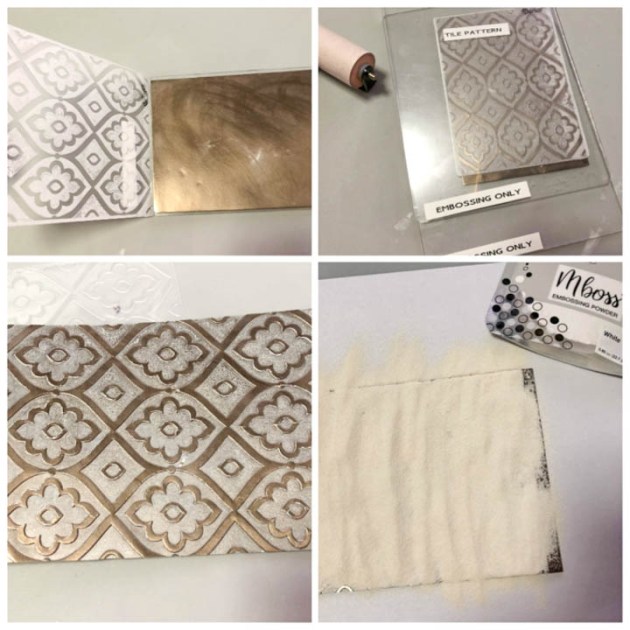
Cut the base of your card. Mine is 4-1/4″x11″ with the score in 5-1/2″. Cut a second layer using your favorite color of Rinea Foiled Paper. Mine is Mocha/Gold Glossy. Select the embossing folder that you want to use. Mine is Tile Patterned from Darice. Ink a brayer with VersaMagic Cloud White or any pigment ink. The brayer will make the color uniform.


Step 2

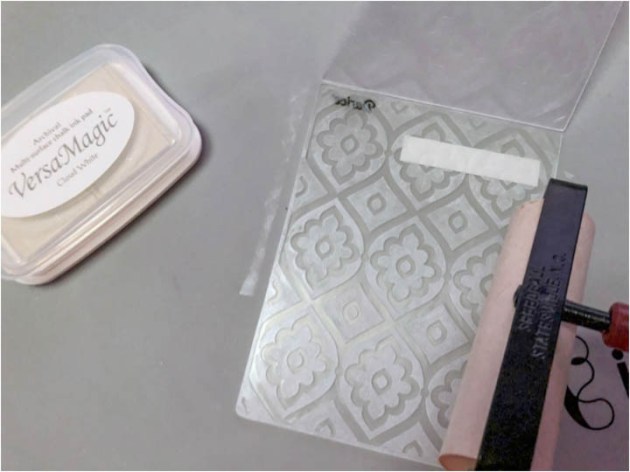
Ink the de-bossing side of the folder with VersaMagic Cloud White or any other pigment ink. Rub the Rinea foiled paper with an anti-static bag or embossing buddy.


Step 3

Put the Rinea foiled paper inside of the inked embossing folder and pass it through your die cut machine.  Remove the embossed foiled paper and cover it with white embossing powder. Melt the powder with the heat tool, taking care of not burn your foiled paper.


Step 4

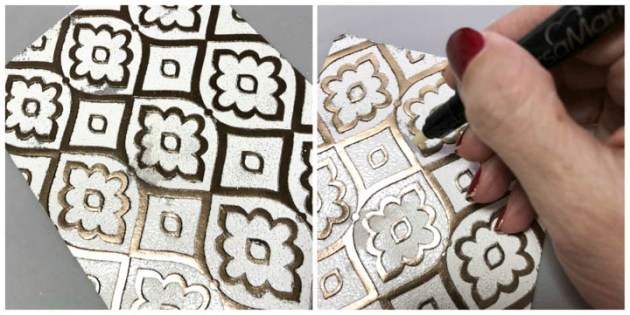
If you consider necessary to make a few retouches of the embossed layer, you can use the VersaMark pen and cover the area with the same color of embossing powder. In this case, white.


Step 5

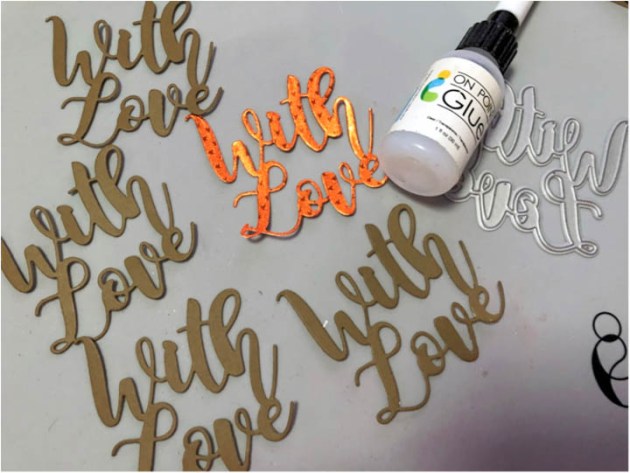
Paste the embossed layer over the card base and finalize the decoration of your card. I decided to add a thick word die cut and for that, I cut several layers of the die-cut in card stock and one on Marigold Starstruck Rinea Foiled paper.  I am using the With Love Word Die from Lil’Inker Designs.


Step 6

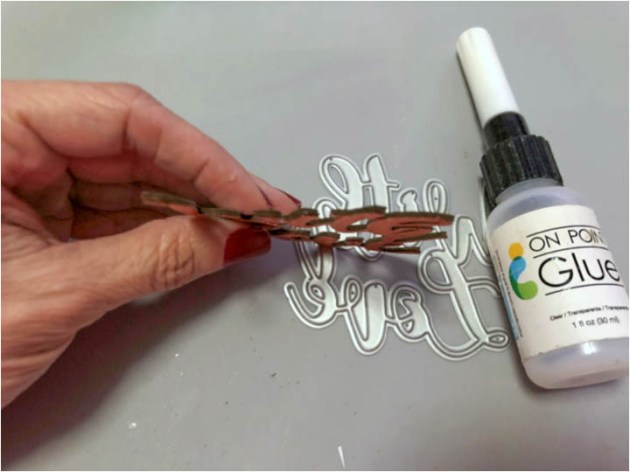
Paste and stock all the word die cuts using On Point Glue.


Step 7

Paste the decorated word over your decorated card with glue dots.

Supplies

Imagine
Other
  • Rinea Foiled Paper – Mocha Gold Glossy, Marigold Starstruck
  • Cardstock
  • Darice – Embossing Folder Tile Pattern
  • Lil’Inker Designs – “With Love” die
  • Big Shot or Die Cutting Machine
  • Brayer

Learn to Decorate an Art Journal & Follow Your Dreams

by Elina Stromberg

Learn to Decorate an Art Journal & Follow Your Dreams

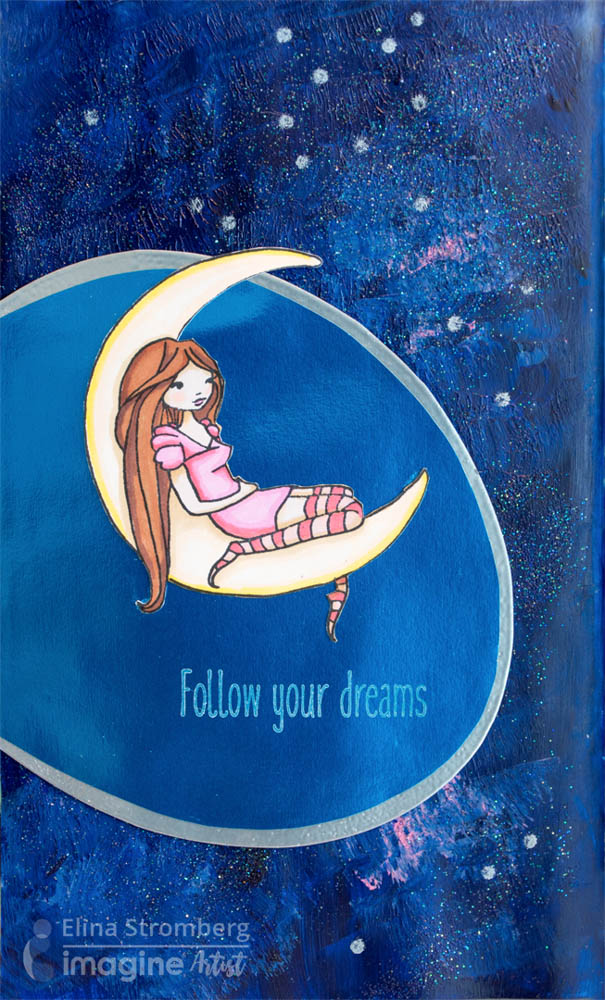
I love using stamped, colored and fussy cut images on my card projects, but they also make great collage elements for art journal pages. This page was inspired by a new stamp set I purchased a short while back. I liked the oval background illustration on the stamp package and decided to replicate it on my journal page. Instead of using the original pink and purple color scheme I decided to create a blue night scenery and to put the lovely girl and the moon on a sparkling and shimmering blue night sky background. I think that the versatile Rinea foil was a perfect choice for this project as was the white StazOn Pigment ink: It’s a creamy pigment ink suitable for all surfaces. I was happy to see how beautifully the white ink worked on the blue Rinea foil!

Skill: Intermediate
Time: 2 hours

Directions


Step 1

Stamp the main image on white cardstock. When coloring with alcohol markers, use water-soluble Memento ink for stamping. When using watercolors or watercolor pencils, use VersaFine Clair in Nocturne. Cut out the colored image with scissors. Draw an oval on white paper. Cut out and trim a slice from the left side. This straight line will be placed on the edge of the journal page. Use the white paper as a template to trace the same shape on blue Rinea foil. Cut with scissors. Then cut the foil oval slightly smaller than the paper template; remove approx. ¼ inch from the round edge.


Step 2

Decorate the round edge of the paper oval with heat embossing: Dab VersaMark on the edge and cover with Mboss embossing powder in Silver. Heat set with a heat tool.


Step 3

Mat the foil oval onto the white/silver paper. Stamp the sentiment on foil using StazOn Pigment inkpad in Snowflake.


Step 4

Paint the journal page background with blue acrylic paint. The oval main image area can be left unpainted. Add a hint of light blue and pink on the dark blue paint.


Step 5

While the paint is still wet sprinkle sparkling ‘Shimmery Night Sky’ Mboss embossing powder on the page. Let dry. Once dry heat set the embossing powder with a heat tool. Glue the ovals and “girl sitting on the moon” image on the page. Paint stars on the page background using white StazOn Pigment ink and a cotton swab. You can stop there or continue to craft until you are happy.


Supplies

Imagine


Other

  • Rinea Foil Paper – Glossy Sapphire/Gold
  • Carabelle Studio – ‘Follow Your Dreams’ Stamp set
  • Promarker Alcohol Markers
  • Piece of white paper
  • Pencil
  • Scissors
  • Acrylic paint – Blue, Light blue, light pink
  • Paintbrush
  • Cotton swab
  • Heat tool
  • Glue
  • Art journal book