In this Issue of Scrapbook Affairs with Jowilna Nolte

Today’s blog post is not a tutorial. We are just happy to share some love for our Artist in Residence Jowilna Nolte who is the featured artist in Scrapbook Affairs. We love the colors and illumination in this tag-making project using VersaFine Clair! See the page clipping below to see how Jowilna makes all sorts of projects with this fabulous ink.

Here is a sneak peek at one of the pages in the Scrapbook Affairs. In the image below see how Jowilna uses VersaFine Clair in so many different ways.

See more craft tutorials from Jowilna:

Use VersaFine Clair to create a Lavender Card

Design a Live Wild & Free Card

Create a Dazzling Raspberry Red Scrapbook Layout

Shop VersaFine Clair


Share Love and Hugs with Kaleidacolor Ink Blended Cards

by Arjita Sepaha Singh

Share Love and Hugs with Kaleidacolor Ink Blended Cards

For these beautiful set of cards, I used the Kaleidacolor ink pads. I added the color on a Gelli plate and then used a brayer to transfer the ink on the paper. I love the smooth beautiful blend and to add some texture I added few water and shimmer splatters. I used a floral stamp and embossed it on the inked cardstock using silver embossing powder and VersaMark Ink. I used a tiny strip of silver glitter paper and a sentiment to finish the card.

Skill: Beginner
Time: 30 minutes

Supplies

Imagine
Other
  • Xpress It smooth card stock
  • Gelli Plate
  • Brayer
  • Silver glitter paper
  • Misti Stamping Tool
  • Atlenew Stamp

Create a Beautiful Lavender Mosaic with Ink and Stencils

by Roni Johnson

Create a Beautiful Lavender Mosaic with Ink and Stencils

There are so many fun techniques that you can use with stencils. So many techniques that I couldn’t decide which one to use so I decided to see how many I could incorporate into a single creation! Of course, these don’t include everything you could do with a stencil but it’s a pretty good start to get the creative juices flowing. Try the entire project or perhaps just a few stenciling techniques!

Skill: Beginner
Time: Individual Techniques 2-15 minutes each or Entire Canvas 2 hours

Directions


Step 1

Beginning with the easiest technique, sponge a single color of ink through the stencil.


Step 2

Randomly sponge 2 or more inks through a stencil. Here I used Memento which is a dye ink and VersaMagic which is a pigment ink.


Step 3

Sponge a pigment ink over a stencil; remove the stencil; sprinkle with embossing powder and heat to set. The second example was made by flipping the inked stencil onto a piece of cardstock to transfer the excess pigment ink. It was then sprinkled with embossing powder as well.


Step 4

Spray Fireworks Shimmery Craft Spray in Lulu Lavender over a stencil. Flip the wet stencil onto a fresh sheet of cardstock for a reverse impression.

Step 5

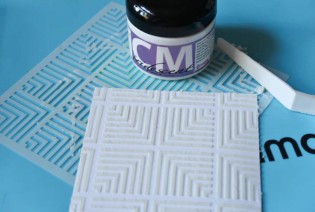
Spread Creative Medium over a stencil using a palette knife and carefully remove the stencil; set aside to dry. Before the medium dries press the stencil over onto a fresh sheet of cardstock to remove the excess Creative Medium from the stencil. This makes a grungy reverse image of the stencil.


Step 6

Use a pen or marker to trace the stencil onto cardstock. Doodle inside of the traced image. Sponge ink overall or select areas of the stenciled image for added interest.


Step 7

Position stencil over cardstock. Stamp the desired image over the stencil and smudge the excess ink off the stencil into the individual sections of the image.

Step 8

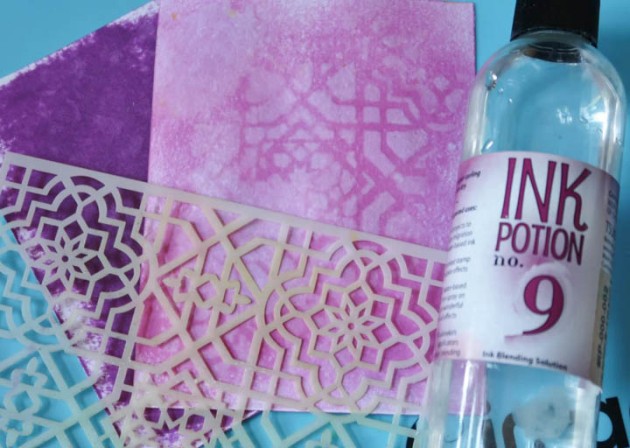
Sponge or brayer ink onto a sheet of cardstock. Place stencil over inked cardstock wet a sponge dauber with Ink Potion No.9 and pounce the dauber over the stencil. Remove the stencil and heat to speed drying.

Step 9

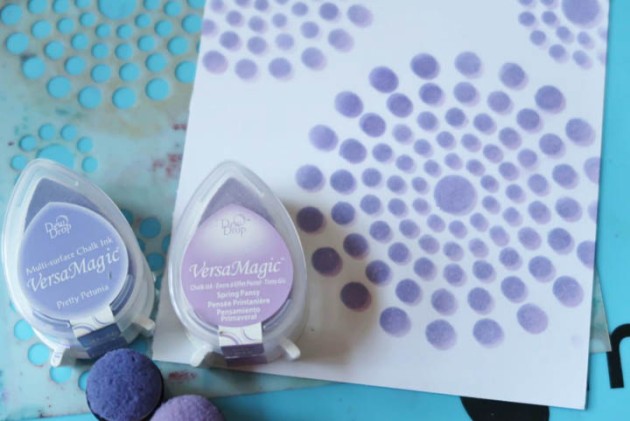
Sponge a dark color of ink over a stencil. Slightly shift the stencil to one side, ink with a lighter color of ink. Close up of the shifted stenciled pattern.

Step 10

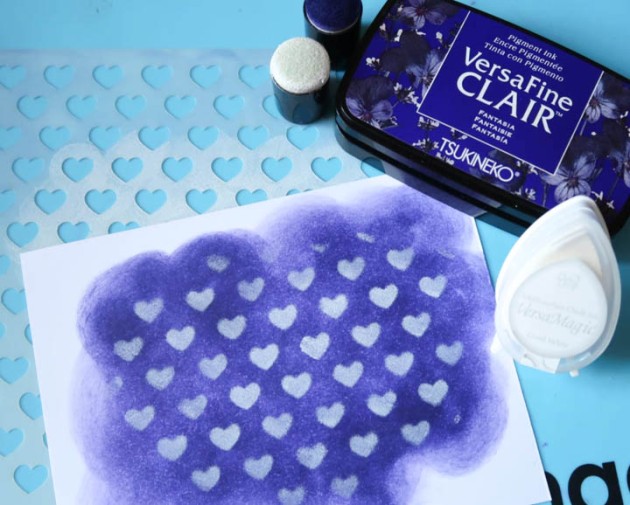
Sponge dark ink over a piece of cardstock. Position the stencil over the inked cardstock and sponge white ink over the surface. Heat emboss with white embossing powder for a more pronounced difference.


Step 11

Brayer ink through a stencil, use a Kaleidacolor ink pad for a fun, vibrant look.


Step 12

Pounce desired colors of ink on craft mat; spritz with water or Ink Potion No.9. Create a monoprint by pressing the cardstock into the ink mixture, set aside to dry. Once the monoprint has dried, brayer ink over a stencil, press the inked stencil over the monoprint for an interesting contrast.

Step 13

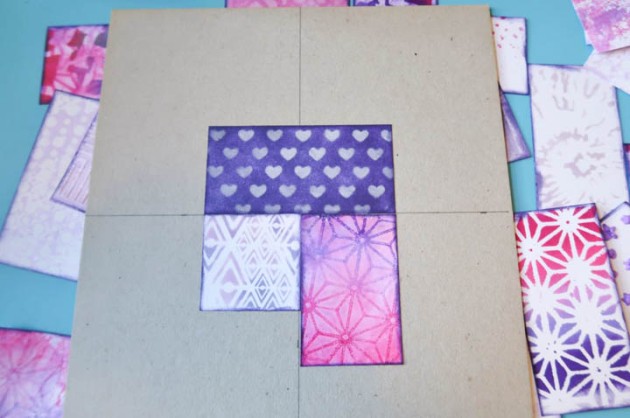
To create the canvas, trim the stenciled samples into 2” x 2”; 2” x 3” and 2” x 4” pieces. Ink the edges with VersaFine Clair Fantasia and a sponge dauber. Adhere each piece in a random pattern onto a piece of thick book board or cardboard. Embellish as desired.

Supplies

Imagine
Other

Make Lavender Feather Earrings Out Of Clay

by Kyriakos Pachadiroglou

Make these quick and easy jewelry pieces out of lightweight clay. The feathers are colored with Memento markers in Angel Pink and Lulu Lavender colors to create  contrasting but still matching shades. I decided to use markers instead of ink pads as they can easily color in the fine details of the clay feathers. The clay feathers are covered with gold embossing powder around the edge and on the backside to give a faux metallic case for the feather.

Skill: Beginner
Time: 30 minutes + dry time

Directions


Step 1

Press lightweight clay in the feathers mold and set it aside until it is dried.


Step 2

Color the clay feathers with the Memento Angel Pink marker and continue with the Lulu Lavender marker following the pattern of the feather.


Step 3

Press the back side of the feather on the VersaMark inkpad, cover with Imagine gold embossing powder and heat set. Repeat the process with the second feather. To give a bit of extra shine, emboss the edges of the clay feather.


Step 4

Color a couple of same size white feathers with the Memento Lulu Lavender marker. Let them dry well.


Step 5

Cover the clay feathers with the Creative Medium Iridescent Blue to protect the colors and to add effect.


Step 6

Attach earring clasps and jump rings.

See my tutorial on jewelry making for more information on supplies: Want to Learn How to Make Jewelry?

Supplies

Imagine
Other
  • Silicone feathers mold
  • Lightweight clay
  • White Feathers
  • Heat tool
  • Earring clasps
  • Jump rings
  • Pliers

Learn to Emboss with a Stencil

by Martha Lucia Gomez

Purple and lavender Hello Friend handmade card featuring Memento Inks by Tsukineko available from Imagine.

Hello Fellow Crafters! Today, I am sharing some of my favorite stencil techniques with you! Layering stencils are trending now and we can create beautiful designs and make techniques with the different patterns. I am sharing an all textured card with a “Hello Friend” greeting. This month our challenge is stencils and the Color of the Month is Lavender.

Skill: Intermediate
Time: 30 minutes

Directions


Step 1

Select the color of cardstock and the stencils that you want to use. I am using Wisteria Wonder cardstock and the Layering Dahlia A & B Bundle Stencil from Altenew. Use the layers with different colors of ink. In my sample, I am using Memento Ink in Lulu Lavender and Grape Jelly. Apply the soft color on the stencil with more free areas and the dark color on the detailed stencil. To create the first layer of texture, place the stencil over the stenciled layer in the corresponding place.


Step 2

Create a special sandwich on your big shot to make the embossing. Remember that the pressures of cutting machines are different so you need to test and listen to your version. In my big shot the correct sandwich is:

  • Closed Platform
  • Rubber Pad
  • A piece of cardstock (shim)
  • Stenciled card layer
  • Stencil
  • Embossing Plate

Paste the ensemble sandwich easily through your die cut machine to emboss the stencil design and voila, you will have the first textured.


Step 3

Now it’s time to create the traditional embossing over your card. To make this I am using a Stencil Word from Jillibean Soup. Secure the stencil over the stenciled layer. Apply VersaMark directly with the ink pad over the “Hello”. Remove the stencil and cover the stamped word with Embossing Powder in White. Melt the powder with the heat tool. Paste the stenciled layer over a whisper white card base. Stamp a complement of the word and paste it over the card with On Point Glue.

Supplies

Imagine
Other
  • Altenew – Layering Dahlia A & B Bundle Stencil
  • Hampton Art – Hello stencil from Jillibean Soup
  • Big Shot – Rubber Mat
  • Glue Dots
  • Cardstock – Wisteria Wonder, Whisper White
  • Big Shot Die Machine
  • Masking Tape

Color of the Month for August is Lavender

The Color of the Month for August is Lavender. We love this soft purple color and with summer in full gear, the lavender is blooming in full. We are reminded of how well this color compliments green leaves and also is the favorite of honey bees. With cardmaking and scrapbooking, lavender is a must-have to express sensitivity and delight! Imagine and Tsukineko offer several products to help achieve this beautiful color. Ink swatches such as Memento in Lulu Lavender, Brilliance in Pearlescent Purple, and All-Purpose Ink in Wisteria are great examples! In the meantime, we have a couple of sneak peeks of this month’s tutorials for you!

Kyriakos Pachadiroglou creates Lavender Feather Earrings 

Martha Lucia Gomez creates a beautiful Geometric Butterfly Card

Roni Johnson goes stencil crazy with this Mixed Media Stencil Art

Stay tuned to the Imagine Blog for more inspiration!