Use StazOn Pigment in Snowflake to Create Christmas Gift Tags

by Elina Stromberg

Use StazOn Pigment in Snowflake to Create Christmas Gift Tags

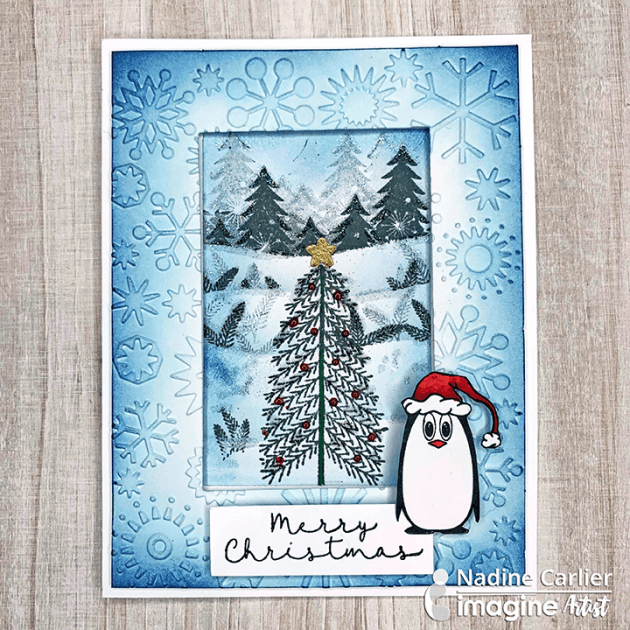
Very soon it is the time of the year again when we start wrapping Christmas gifts for our loved ones. A handmade gift tag makes the present even more special; it delivers a heartfelt message that the receiver is important to you. These adorable Christmas penguins by Joy Clair are the perfect addition to your personalized message. Just start by punching a pile of tags from leftover cardstock pieces, and soon you will have a pile of gift tags ready to spread out the Christmas feeling to your friends and family!

Skill: Beginner/Intermediate
Time: 1 hour

Directions


Step 1

Punch or hand-cut gift tags from light blue cardstock.

Stamp a snowy hill shape on each tag using white StazOn Pigment ink.
Step 2

Cut a wave shape from fun foam. Attach to an acrylic block using double-sided tape. Stamp a snowy hill shape on each tag using white StazOn Pigment ink.

Stamp Christmas penguins on white paper with black ink
Step 3

Stamp Christmas penguins on white paper with black ink. Color with markers or color pencils. Cut around the edges. To make the fuzzy cutting quick and easy you can cut out the little details on the wings and feet; those parts will be re-stamped later on the tag background.


Step 4

Stamp the penguins on the tags using black VersaFine Clair.


Step 5

Glue the fuzzy cut images on the tags, aligning the fuzzy cut and stamped penguin images. Decorate with a white gel pen.

Supplies

Imagine

StāzOn Pigment – Snowflake
Memento – Tuxedo Black
VersaFine Clair – Nocturne
Craft Mat

Other

• Joy Clair Stamps – Christmas Penguin
• Fiskars Tag punch
• Cardstock in light blue
• Piece of fun foam
• Double-sided tape. Glue
• Acrylic markers
• White gel pen
• Acrylic block for stamping
• Scissors

Come Let Us Adore Him Christmas Card

by Lindsay Adreon

Come Let Us Adore Him Christmas Card

I am constantly making backgrounds and sometimes, depending on the design of the card, I cut and die cut those backgrounds and I have “leftover” pieces. In today’s video, I wanted to share two different Christmas cards made with just one background. Using Joy Clair Stamps with Memento Ink makes it super fun!

Skill: Advanced
Time: 30 minutes

Directions

Supplies

Imagine
Other

Inking & Masking Technique To Create A Wintery Scene

by Nadine Carlier

winter-theme-penguin-card-by-nadine-carlier-ic-web

Watch my video tutorial below to see how I used Memento Inks and a mask to create a wintery Christmas scene. Enjoy!

Skill: Intermediate
Time: 30 minutes

Supplies

Imagine
Other

Visit our YouTube Channel for more inspirational videos and subscribe. Make sure to click the bell to get updates when we post new videos.

Color of the Month for November is Hunter Green

Color of the Month for November is Hunter Green

Color of the Month for November is Hunter Green. We feel this color is a perfect segway between Thanksgiving and the Christmas holiday season. We love dark rich greens inks and Tsukineko certainly has a great number of inks to choose from in this color hue. For a solid stamping ink try VersaFine in Rain Forest, VersaColor in Evergreen makes a nice blending ink with a sponge dauber and if you need a green with a bit of shine then don’t forget Delicata in Emerald Green.

November is also exciting because we are collaborating with Joy Clair Stamps this month. See the Joy Clair website for more information on their stamp sets.

Here is a peek of what we have coming up this month in cardmaking tutorials and videos!

Lindsay Adreon creates matching Christmas Cards 

Lindsay Adreon creates matching Christmas Cards

Lori Warren uses a cute Moose Stamp for a Holiday card. 

Lori Warren uses a cute Moose Stamp for a Holiday card.

Melissa Andrew uses this super cute sloth as a theme for a card. 

Melissa Andrew uses this super cute sloth as a theme for a card.

Decorate Your Home for the Holidays with Clay Ornaments

by Kyriakos Pachadiroglou

Decorate Your Home for the Holidays with Clay Ornaments

Light-weighted, these Christmas ornaments can be hung anywhere in the house to decorate during the festive holiday season. Use any Christmas theme casting mold to make the ornaments and if you don’t have any, a flat layer of clay with some cookie cutters can work too. They are easy to make and coloring is a breeze with All-Purpose Ink and StazOn Pigment inks.

Skill: Beginner
Time: 1 hour (excluding clay dry time)

Directions


Step 1

If you are creating the clay pieces yourself then allow clay of the Christmas shapes to fully dry. If you are using premade shapes then you are ready to start. Using a paintbrush, color the surface of the ornaments with All-Purpose Ink Poppy Red and Lemon Yellow. Premix the two colors or lay first the Poppy Red and add a layer of Lemon Yellow after. Let them dry.


Step 2

Cover the embossed details of the shapes with All-Purpose White to create a distressed or antique look. The easiest way to apply the color is by using a finger and lightly tapping on the embossed areas. Let them dry.


Step 3

Press the crystals directly on the StazOn Pigment ink pad, let them sit a bit to allow the ink to dry well and repeat for a good coverage. Cover on the backside only.


Step 4

Use a hot glue gun to set ribbons on the clay shapes, add beads and crystals.

Supplies

Imagine
Other
  • Fimo casting mold – Christmas shapes
  • White clay
  • Ribbons
  • Silver color beads
  • Chandelier crystals
  • Hot glue gun

Learn How to Use Vertigo Surfaces to Create Ornaments

by Roni Johnson

Learn How to Use Vertigo Surfaces to Create Ornaments

It’s almost time to start decorating the Christmas tree and in preparation for this fun family event, I have started making new ornaments. Inspired by the color of the month – Frosted Blue – I thought it would be fun to create an ornament or two using Imagine’s Vertigo film paired with Imagine’s various mediums in lovely shades of blue.

Skill: Intermediate
Time: 30 minutes + dry time

Directions


Step 1

Die-cut 3 hearts in 3 different sizes of any given shape. I am using Xcut hearts both in scallop and plain. I used 3 different styles of Vertigo film – (large to small) – Prism, Taffeta and Tilted.


Step 2

Rub a thin layer of Blue Hawaii StazOn Studio Glaze over the medium size shape and let dry.


Step 3

Once the glaze has dried, spread a second layer of Cotton White Studio Glaze over Blue Hawaii. Sprinkle a generous layer of Iridescent White Flitter Flakes over the glaze. Let the glaze dry then shake off the loose flitter.


Step 4

Affix the medium size heart to the large heart.


Step 5

Rub Blue Hawaii StazOn Ink to the outer edges of the small heart.


Step 6

Sponge Paradise, Blue Belle and Medieval Blue VersaFine Clair ink on a piece of white cardstock.


Step 7

Die-cut several small snowflakes from the inked cardstock.


Step 8

Use a brad to attach desired snowflakes to the center of the ornament.


Step 9

Attach jump-rings and any additional embellishments as desired. Make a hanger for the ornament from blue wire using jewelry tools.

Supplies

Imagine
Other
  • Meyers Imports – Iridescent White Flitter Flakes
  • White Cardstock
  • Jewelry tools – wire, jump rings, pliers
  • Mini Bell
  • Decorative brad
  • Die-cut Machine