Make an Elegant Happy Father’s Day Card

2021-may-kyriakos-happy-fathers-day-card-main-900

By Kyriakos Pachadiroglou

Match a few colors and an elegant sparkling background using the Mboss New Year’s Eve embossing powder to make a special card for Father’s day. Contrast among black and white with a touch of gold give a smart look on the card that can be made by anyone.


Skill: Beginner

Time: 45 Minutes


Directions:

2021-may-kyriakos-happy-fathers-day-card-step1

Step 1

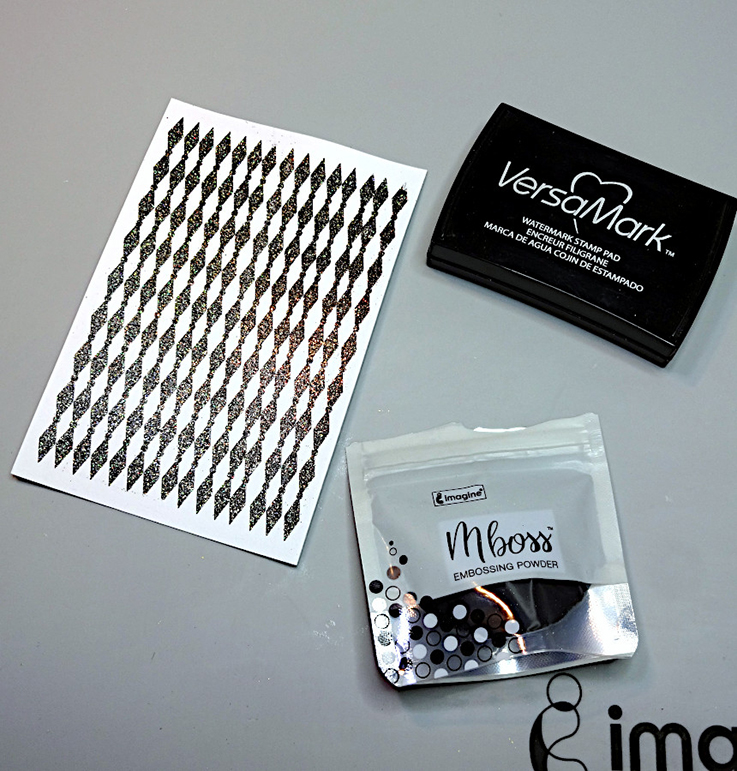
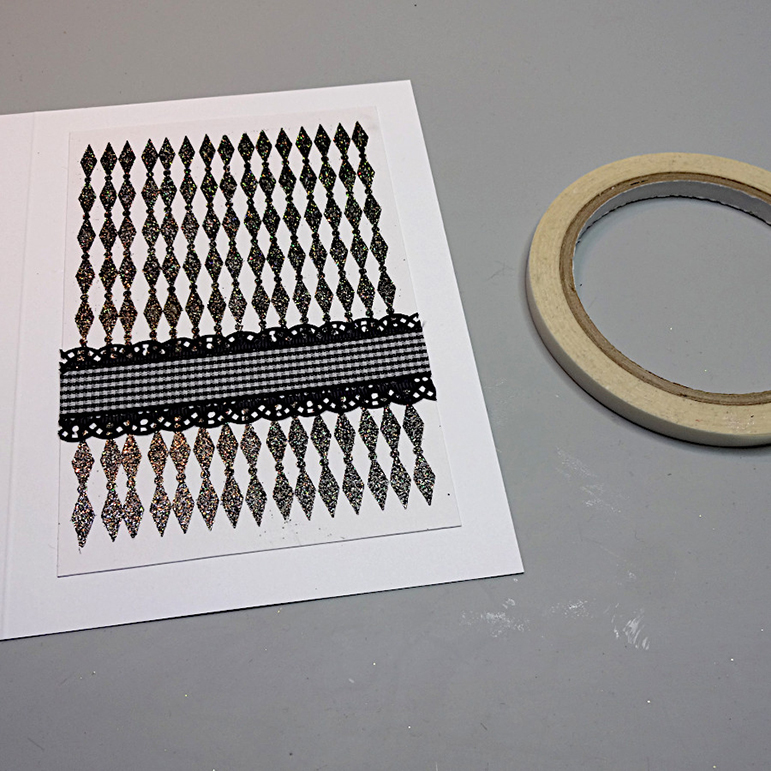
Stamp in a repetitive pattern the diamond chain stamp on a 4x6in card stock using the VersaMark Watermark Ink pad. Cover with the Mboss New Year’s Eve embossing powder and heat set to create the background.


2021-may-kyriakos-happy-fathers-day-card-step2

Step 2

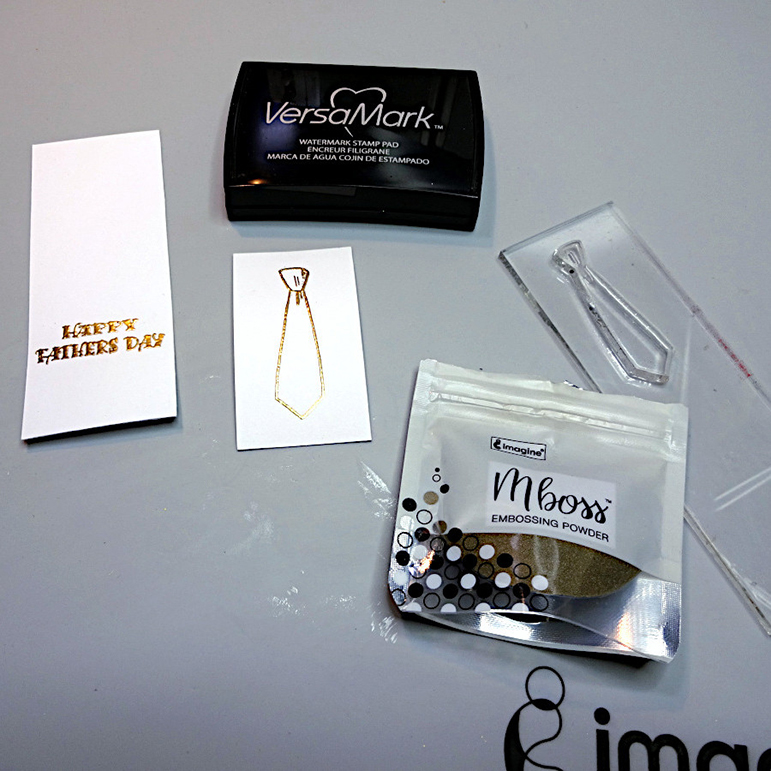
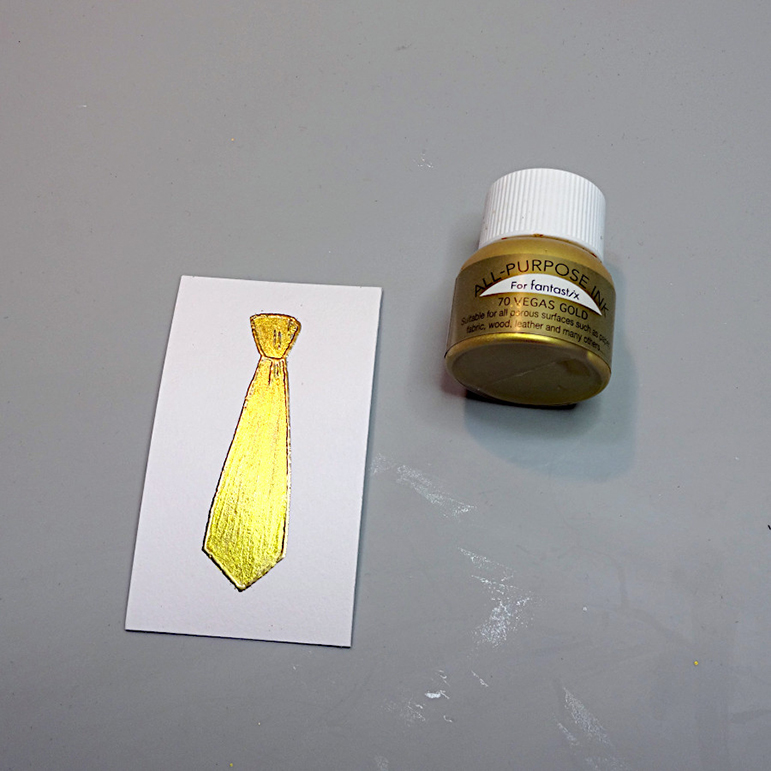
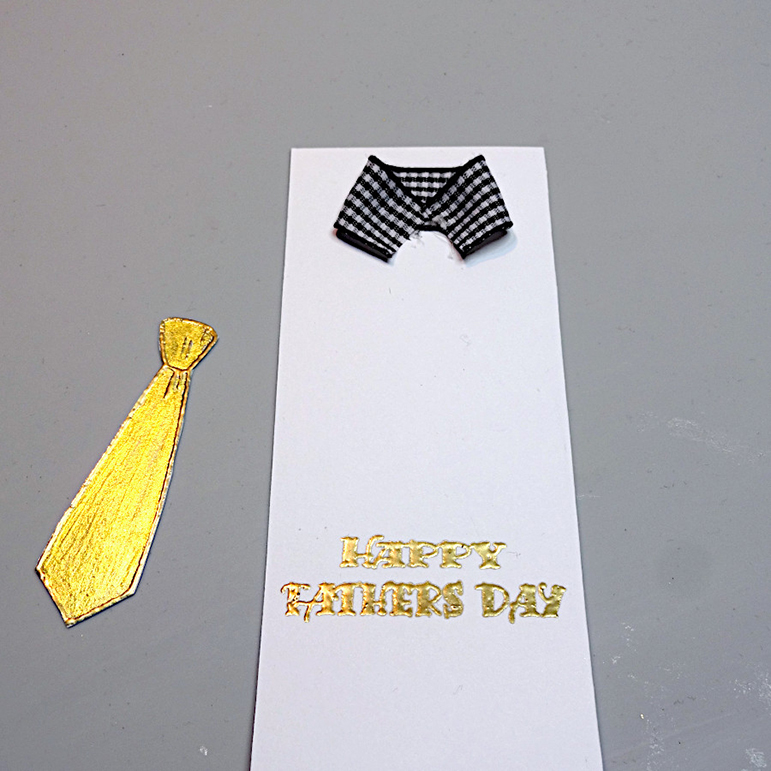
On a 4.5″ x 2″ piece of cardstock stamp the Happy Father’s Day sentiment on the lower part of it and on a small piece of cardstock the tie using the VersaMark Watermark Ink pad. Cover with gold Mboss Embossing Powder and heat set.


2021-may-kyriakos-happy-fathers-day-card-step3

Step 3

Color the inner part of the stamped tie with All-Purpose Ink Vegas Gold and cut around the design.


2021-may-kyriakos-happy-fathers-day-card-step4

Step 4

Cut a 2″ piece of the gingham ribbon and fold the two edges to the low middle of it to form a collar shape. Glue it on the long piece of the cardstock and add the stamped tie with some foam tape.


2021-may-kyriakos-happy-fathers-day-card-step5
Step 5

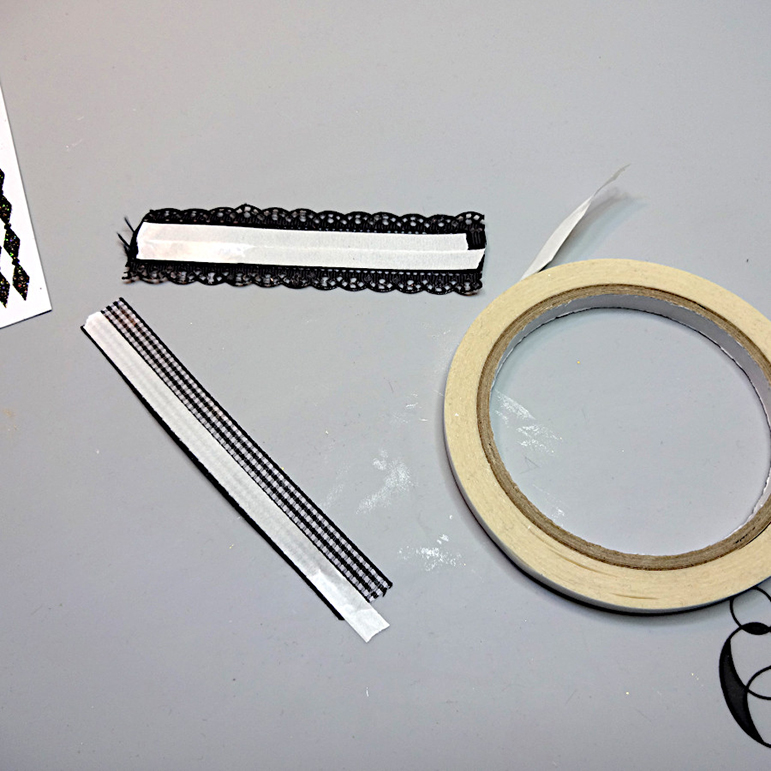
Cut 4″ long pieces of the ribbons and set together with Tear It! Tape.


2021-may-kyriakos-happy-fathers-day-card-step6
Step 6

Finally usually Tear It! Tape to set the ribbons on the background and continue adding the long cardstock piece.


Art Supplies:

Imagine

VersaMark Watermark Stamp Pad

Mboss Embossing Powder – Gold, New Year’s Eve

All-Purpose Ink – Vegas Gold

Tear It! Tape


Other

Grosgrain ribbon

Gingham ribbon

Crafty Secrets stamps – Favourite Fellas

Heat tool

Card stock

Hot glue

Foam tape

Make a Father’s Day Card with Gorgeous Textures and Dimension

2021_May_JN_Fathersdaycards_2

By Jowilna Nolte 

For Father’s day I a pulling out some of my favourite products from Imagine and creating gorgeous textures and dimension. Shades of blue gives card a fun but masculine feel and the shimmer adds just that bit of elegance – perfect for even the hardiest of men.

Skill Level: Intermediate

Time: 45minutes including drying time

Directions:

2021_May_JN_fathersdaycards_step1

Step 1

Use a variety of Memento Luxe inks in shades of blue and blend a background.
Tape your stencil to your smooth white cardstock to hold it in place.
Blend the darkest shade of blue Nautical Blue and then Teal Zeal.

2021_May_JN_Fathersdaycards_step2

Step 2
Blend some Bahama Blue – remember to overlap onto the previous colour to get a nice blended effect.

TIP: For seamless blending I vary the pressure I apply. When blending over the previous colour I have a very light hand ensuring I only blend the colour instead of replacing it.

2021_May_JN_Fathersdaycards_step3

Step 3

Lastly, I blend some Grey Flannel right at the bottom of my card.

2021_May_JN_Fathersdaycards_step4

Step 4

While my stencil is still in place I apply a thin layer of Creative Medium over the entire panel.
You can also get creative and tape off some shaped areas like I did here.
While the Creative Medium is still wet, lightly sprinkle with clear frosted glitter before removing the stencil carefully. Leave the paste to dry – as the medium dries it keeps the glitter in place.

2021_May_JN_Fathersdaycards_step5

Step 5

Punch a large vellum circle. Use Memento Markers to add a stamped element onto smooth white cardstock and punch into a circle.

Stamp a sentiment using VersaFine Clair and trim to size. Assemble your elements to the stencilled background once dry and adhere the panel to a folded card. Finish off with diamante and enamel dots.

2021_May_JN_Fathersdaycards_6

The embossing powder adds some glamour and shine to this simple yet fun card. Just like the couple – fun colours combined together with a touch of glam and pizazz.
Mboss embossing powder really takes any project t the next level. Available in a  huge variety of colours they truly are amazing.

So many fun products used for a simple but striking card.

Art Supplies

Imagine

VersaFine Clair Nocturne

Memento Luxe Nautical Blue

Memento Luxe Teal Zeal

Memento Luxe Bahama Blue

Memento Luxe Grey Flannel

Jumbo Dauber

Creative Medium

Palette Knife 

Craft Mat

Other

Smooth white cardstock
Vellum
Stamps: Joy Clair, PSX
Clear frosted glitter: American Crafts
Foam Tape: Kaisercraft

Make a Modern Wedding Card for a Fun and Vibrant Couple

2021_April_JN_WeddingCard_5

By Jowilna Nolte 

Recently I had to make a quick wedding card for a fun and vibrant couple. Instead of going the traditional route I opted for just having fun – mimicking their personalities.

Skill Level: Beginner

Time: 20 minutes

Directions:

2021_April_JN_WeddingCard_step1

Step 1

On a smooth white background panel used your StazOn ink Cherry Blossom and swipe the ink pad across the panel.

2021_April_JN_WeddingCard_step2

Step 2
Repeat the process this time using Versamagic ink to swipe across the background.

2021_April_JN_WeddingCard_step3

Step 3

Stamp a sentiment across the bottom of the panel using VersaFine Clair Nocturne.

2021_April_JN_WeddingCard_step4

Step 4

Emboss a scrap cardstock strip using Indigo Pealr Mboss embossing powder and VersaMark Frost. Then cut the strip with a scallop edge. Emboss a chipboard heart using the same Indigo Pearl Mboss embossing powder.

2021_April_JN_WeddingCard_1

Step 5

Assemble the card by adhering the panel to a folded card. Then adhere the embossed heart using On Point glue as well as the embossed strip and embellishments to finish off your card.

2021_April_JN_WeddingCard_step4

The embossing powder adds some glamour and shine to this simple yet fun card. Just like the couple – fun colours combined together with a touch of glam and pizazz.
Mboss embossing powder really takes any project t the next level. Available in a  huge variety of colours they truly are amazing.

Art Supplies

Imagine

VersaFine Clair Nocturne
Mboss Indigo Pearl
VersaMark Frost
On Point Glue
Tear it! Tape
StazOn Cherry Blossom
VersaMagic Mango Madness

Other

White cardstock
Chipboard: Celebr8
Stamps: Visible Images
Embellishments

How to Make a Mother’s Day Card

2021_April2_JN_Mothersdaycard_1

By Jowilna Nolte 

I am not one for a traditional Mother’s Day Card – although the message inside may be one of gratitude, on the outside it can reflect something personal as well.

Instead of doing the usual thing I combined some fun stamping and inking with a vinyl heart and a little stamped sentiment that will mean the world to my mom.

“FRESH START” is my prayer for her this Mother’s Day – the beginning of so much more than just being a mother.

Skill Level: Beginner

Time: 30 minutes

Directions:

2021_April2_JN_MOthersdaycard_step1

Step 1
Combine VersaMagic Mango Madness with  Delicata Champagne to ink some chipboard hearts.

2021_April2_JN_Mothersdaycard_step2

Step 2
On a white smooth cardstock background, use the VersaMagic and ink the background. Combine the “direct to paper” method carefully blending the ink and then use a sponge dauber for achieve an ombre effect towards the top.

2021_April2_JN_Mothersdaycard_step3

Step 3

Stamp onto the background several times overlapping different stamp designs and VersaMagic ink. Then finishing off the top layer using Delicate White Shimmer to stamp the last layer. Look at that gorgeous shimmer.

2021_April2_JN_Mothersdaycard_step4

Step 4

Apply a layered vinyl heart, stamped sentiment and chipboard heart, as well as some embellishments.
Matt onto white cardstock layer and then onto a kraft card.

2021_April2_JN_Mothersdaycard_2

And just like that I created a heartfelt and meaningful Mother’s Day Card with lots of sparkle and shimmer – wishing my mom a bright future ahead.

Art Supplies

Imagine

VersaMagic Mango Madness
Delicata Whte Shimmer
Delicata Champagne
On Point Glue
Tear It! Tape

Other

• Smooth White Cardstock
• Stamps: Hero Arts, Carabelle, Altenew
• Vinyl: Cricut
• Embellishments

Learn How to Make a Wooden Wall Art Family Tree

2021_04_Roni_MothersDay_FamilyTree_WM 002

By Roni Johnson

Since Mother’s Day is quickly approaching I thought it would be fun to make a different type of gift Mom could enjoy all year long. I decided to make a fun and beautiful Family Tree using a wooden tree from Creative Embellishments paired with Imagine’s Walnut Ink Crystals and Cottage Ivy Fireworks! Shimmery Craft Spray.

Skill: Beginner

Time: 1 hour + dry time

Directions:

2021_04_Roni_MothersDay_FamilyTree (1)

Step 1

Gather up your supplies, you will need a wood tree, Walnut Ink Crystals, Cottage Ivy Fireworks! Shimmery Craft Spray, VersaFine Clair Pinecone ink, Memento Dual Tip Marker and a bit of heavy duty cardstock.


2021_04_Roni_MothersDay_FamilyTree (2)

Step 2

Use a craft knife to make small cuts in the wood to separate the leaves from the branches.


2021_04_Roni_MothersDay_FamilyTree (3)

Step 3

Sprinkle a small amount of Walnut Ink Crystals into a cup and add a bit of water.


2021_04_Roni_MothersDay_FamilyTree (4)

Step 4

Paint the walnut ink onto the tree trunk and branches.


2021_04_Roni_MothersDay_FamilyTree (5)

Step 5

Paint the Cottage Ivy Fireworks! spray onto each of the leaves.


2021_04_Roni_MothersDay_FamilyTree (6)

Step 6

If desired, paint a second coat of ink where necessary and let the tree dry completely.


2021_04_Roni_MothersDay_FamilyTree (7)

Step 7

Spray a sheet of Bristol Cardstock with Cottage Ivy Fireworks! Shimmery Spray; add a spritz of water here and there.


2021_04_Roni_MothersDay_FamilyTree (8)

Step 8

Use a heat gun to mix the water and ink around on the cardstock.


2021_04_Roni_MothersDay_FamilyTree (9)

Step 9

Once dry, die cut desired number of leaves from the cardstock.


2021_04_Roni_MothersDay_FamilyTree (10)

Step 10

Ink the edges of each leaf with Pinecone VersaFine Clair Ink and a sponge dauber.


2021_04_Roni_MothersDay_FamilyTree (11)

Step 11

Use a Tuxedo Black Memento Dual Tip Marker to write the names of each family member on a leaf.


2021_04_Roni_MothersDay_FamilyTree_WM-IG


Step 12

Adhere the leaves to the tree as desired. You could add them in the form of a traditional family tree or place them randomly over the tree.


Art Supplies:

Imagine
Other
  • Creative Embellishments Home Décor Wood Tree
  • Paint Brush
  • Bristol Cardstock
  • Heat Tool
  • Craft Knife
  • Spellbinders – Leaf Dies
  •  

Learn How to Stamp Clay to Make a Jewelry Charm

2021-apr-kyriakos-stamped-clay-charm-main-wm

By Kyriakos Pachadiroglou

Metallic frames, usually used for epoxy, can work nicely to form clay and make jewelry pieces. Mix Walnut ink for a soft, pale shade to create a marble effect ink to the clay. Then stamp with any design using StazOn ink pads that will quickly dry, won’t bleed and give a sharp outcome. StazOn will also allow you to use markers and won’t mix with them. Add some sparkle with SHIMMER Spritz and secure the result with a coating of GlazOn. Use the charm as a jewelry piece or to decorate your cards and crafts.


Skill: Beginner

Time: 30 minutes plus drying time


Directions:

2021-apr-kyriakos-stamped-clay-charm-step1

Step 1

Separate two pieces of clay and color the one with Walnut Ink. Mix together.


2021-apr-kyriakos-stamped-clay-charm-step2

Step 2

Lay flat  the clay and place the frame. Remove the excess and let it dry.


2021-apr-kyriakos-stamped-clay-charm-step3

Step 3

Remove the clay from the frame and stamp with StazOn ink pad.


2021-apr-kyriakos-stamped-clay-charm-step4

Step 4

Add some color with a MEMENTO marker (or none, if you want to leave it just with the stamped image).


2021-apr-kyriakos-stamped-clay-charm-step5
Step 5

Spray with the SHIMMER Spritz Sparkle and let it dry.


2021-apr-kyriakos-stamped-clay-charm-step6
Step 6

Secure the result and add some shine with GlazOn.


2021-apr-kyriakos-stamped-clay-charm-step7

Step 7

Place On Point Glue to the inner sides of the metal frame. Let it sit for a few minutes and place the stamped clay. Add cord or chain according to your style.


Art Supplies:


Imagine

Walnut Ink – Lilac

StazOn – Royal Purple 

MEMENTO Marker – Lulu Lavender

SHIMMER Spritz – Sparkle

GlazOn – Clear

On Point Glue

InkBlushers


Other

Jewelry Metal Frame

Air Dry Clay

Rubber Stamps of your Choice

  •