See How to Make a Handmade Creative Art Journal

by Lori Warren

See How to Make a Handmade Creative Art Journal

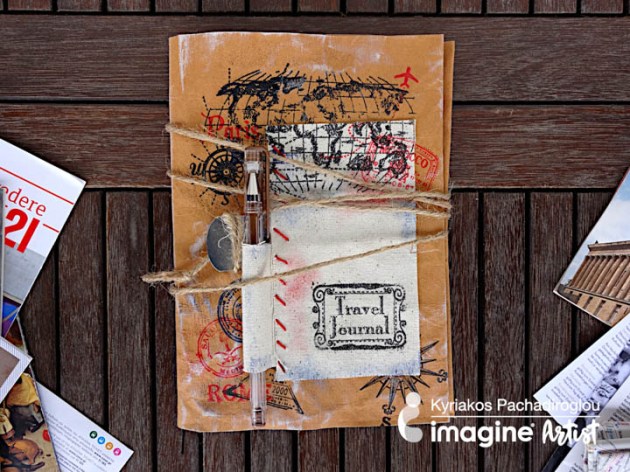
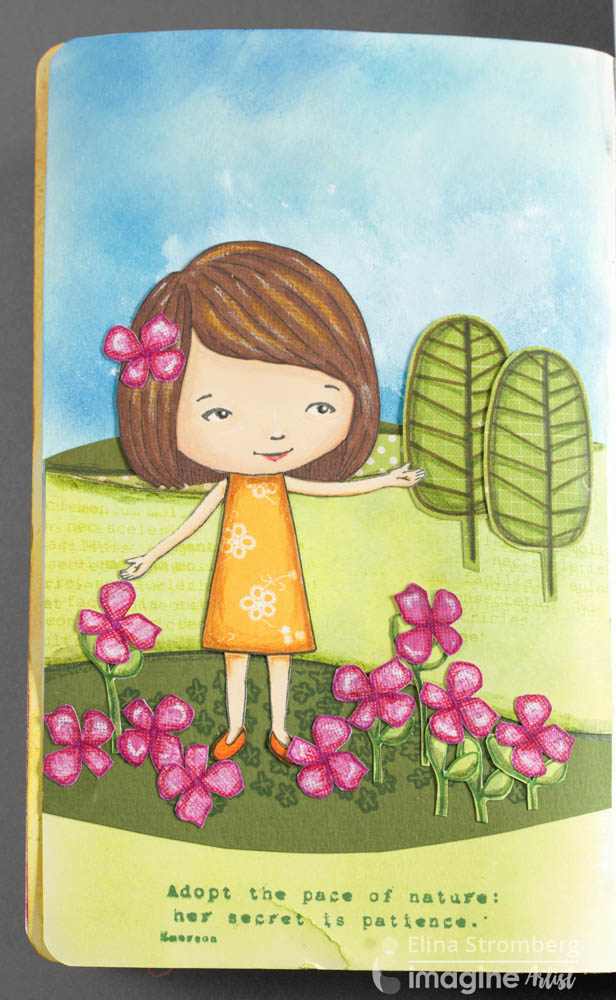
Interested is slowing down and being more mindful? A Daily Journal to document artsy ideas and creative thoughts might be just what is needed. This journal includes “My Creative Day” journal templates (with prompts for daily journaling), blank art pages (for art journaling, sketching and jotting down ideas) and a special hand decorated cover to house it all.

Skill: Advanced
Time: 1 hour


Directions


Step 1

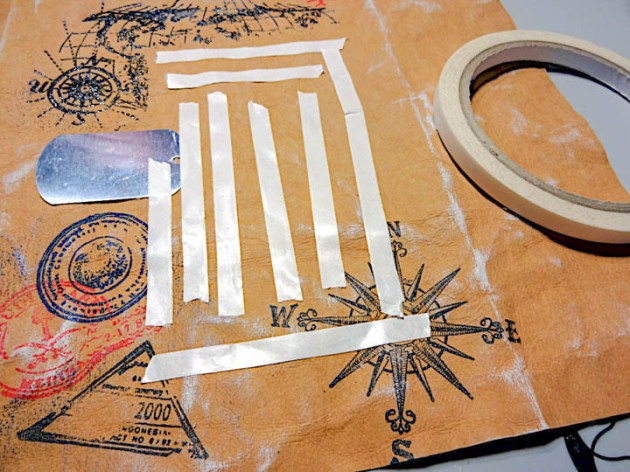
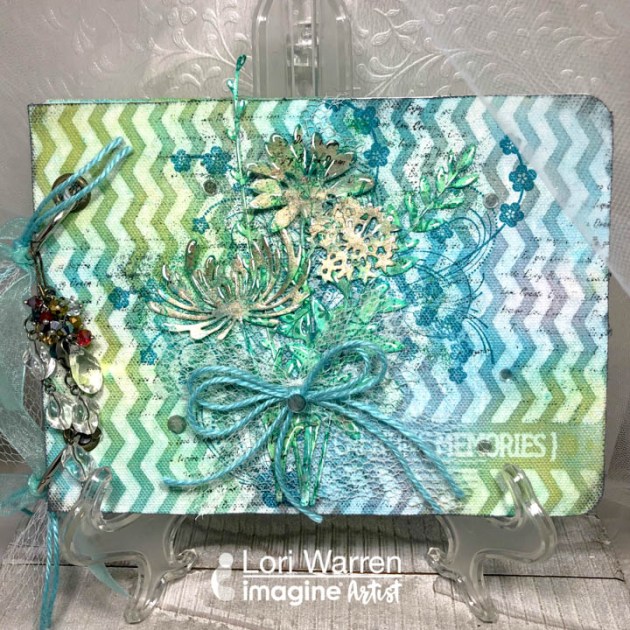
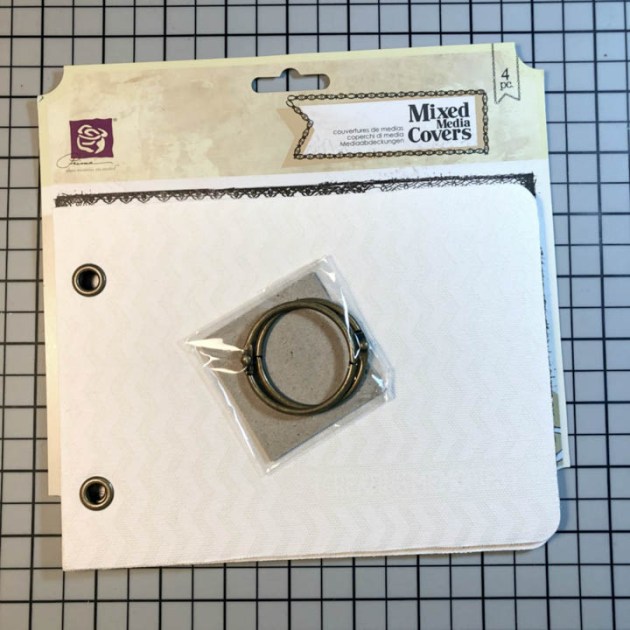
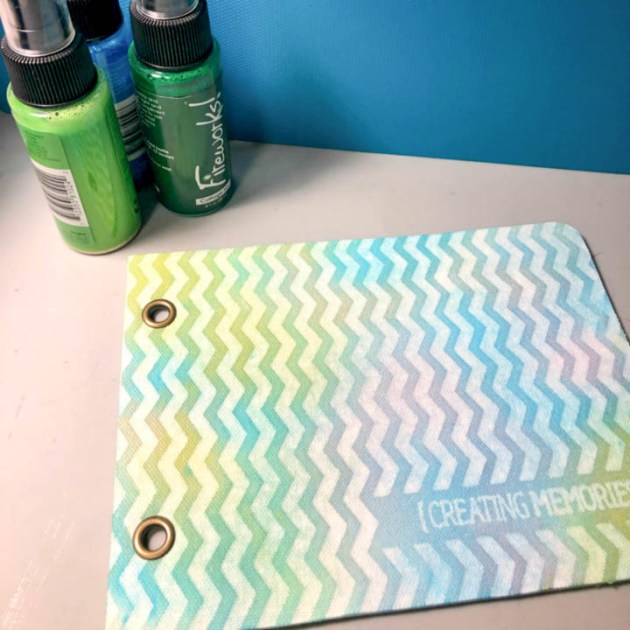
Select ready to make a cover or create a cover of your own (size 5 ½” x 7 ½”)


Step 2

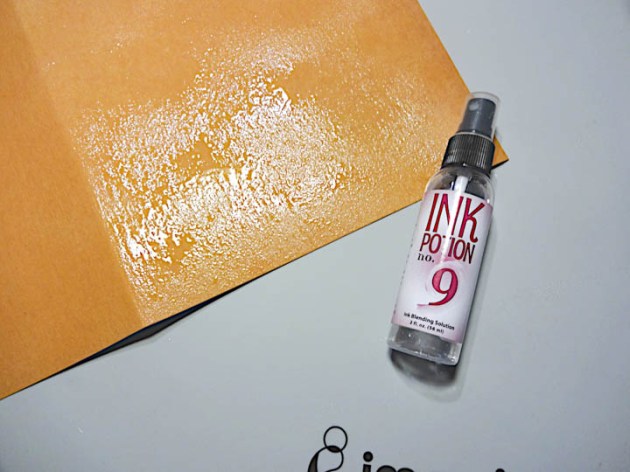
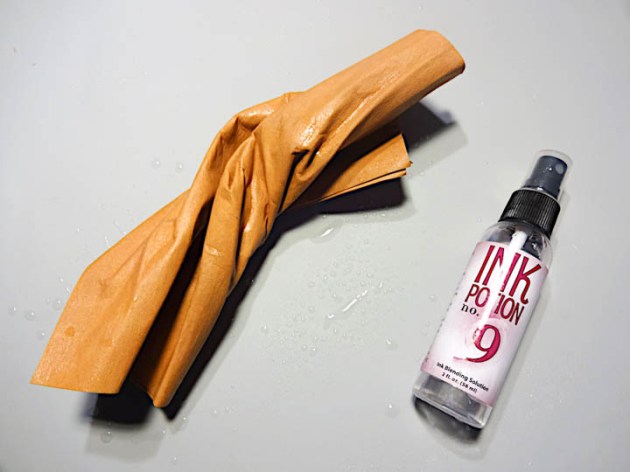
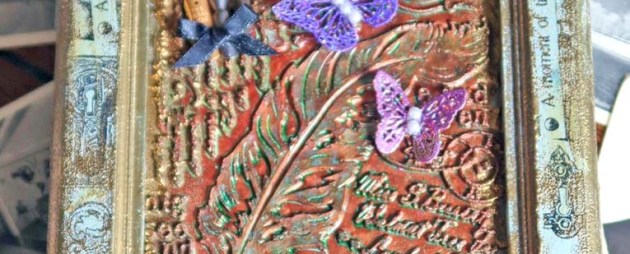
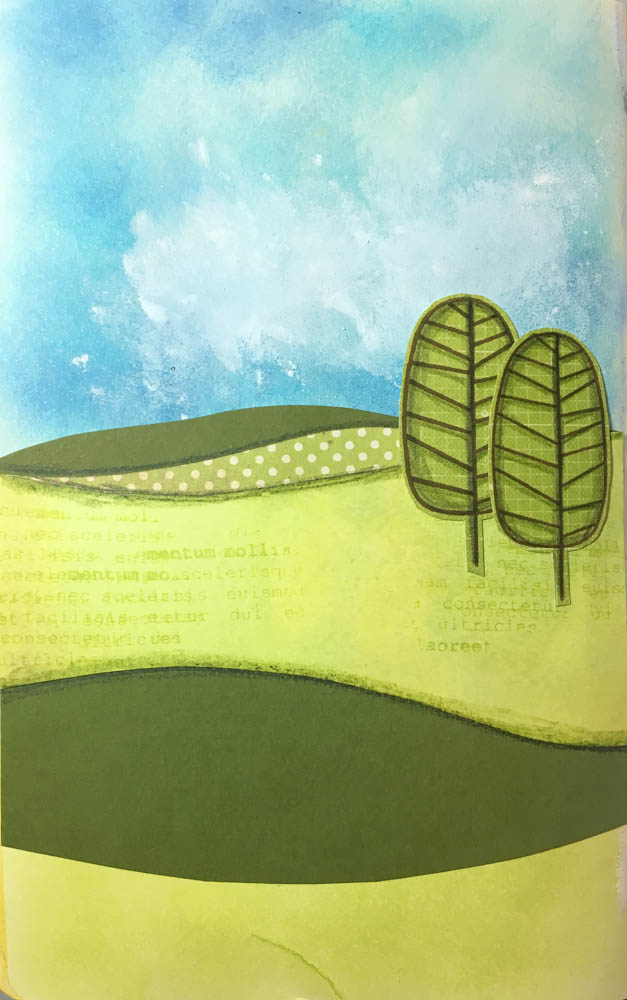
Apply a trio of Fireworks! Sprays to add color, allow to dry. As you can see the color of the waterbased inks brings out the chevron design that was preprinted.


Step 3

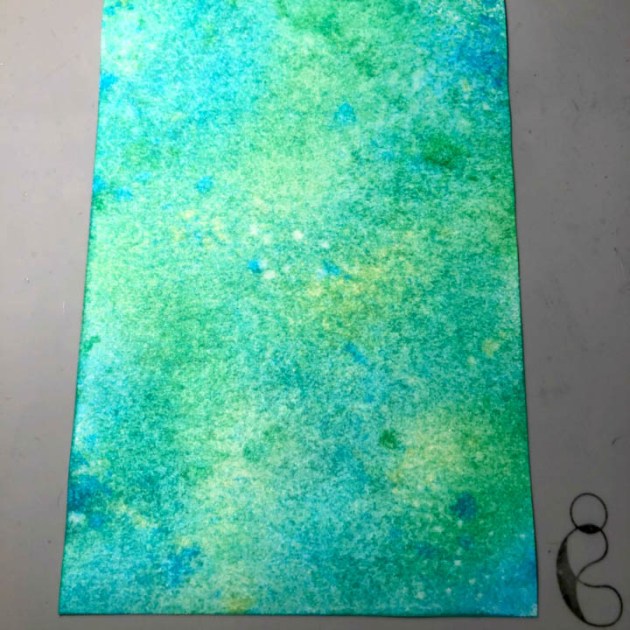
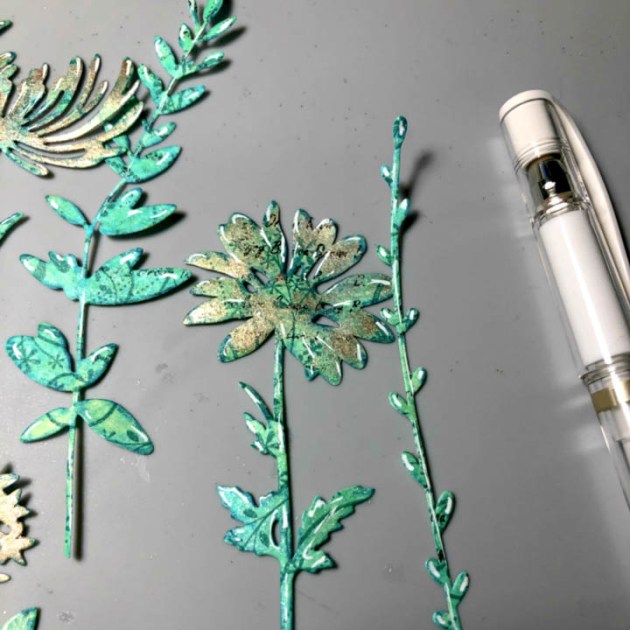
Use the same Fireworks! colors on a ½” sheet of white card stock, allow drying.


Step 4

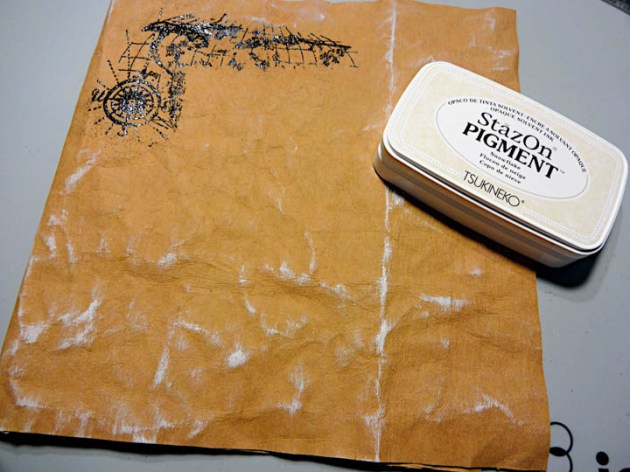
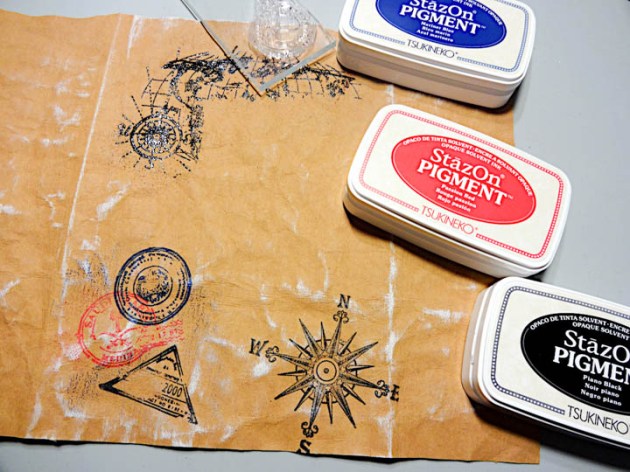
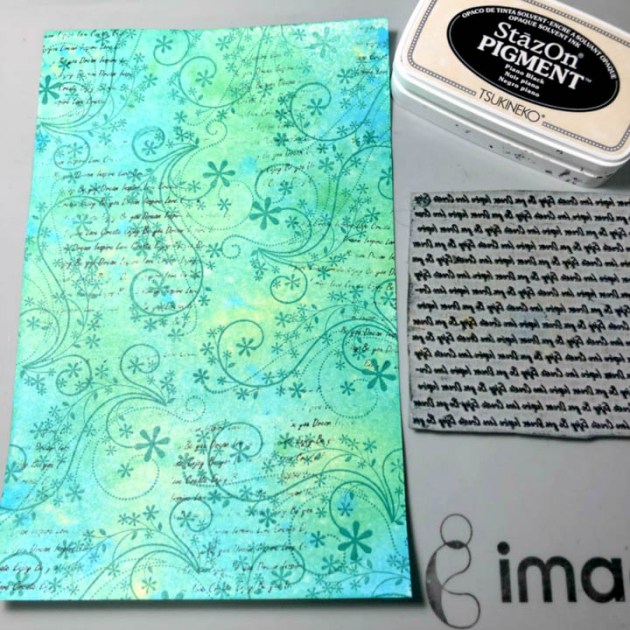
Stamp swirls and script randomly onto the card stock panel with StazOn Pigment ink.


Step 5

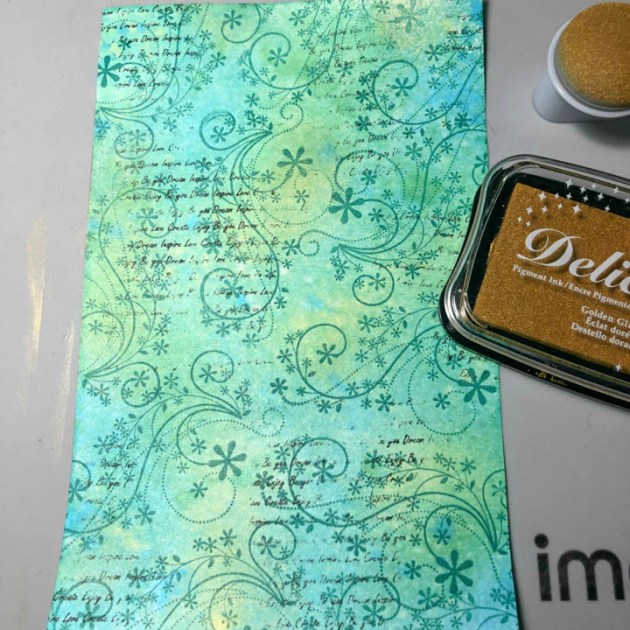
Add some shine to sections of the card stock panel with Delicata ink and a large Sponge Dauber.


Step 6

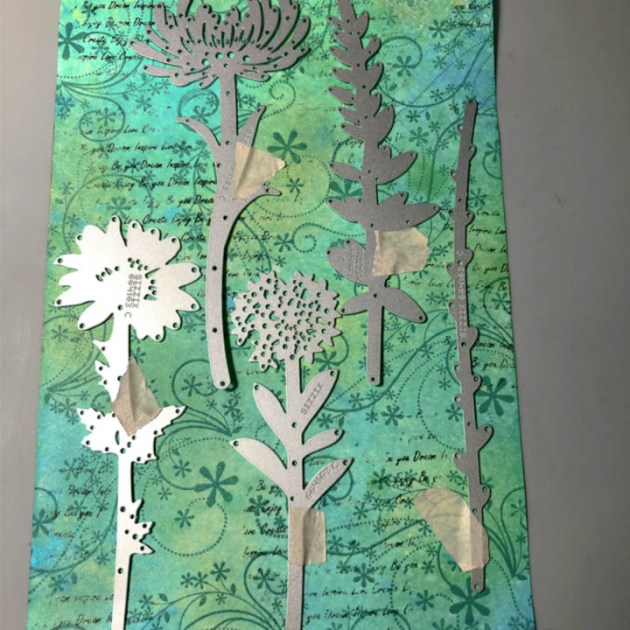
Use diecuts to cut out floral images from the card stock panel.


Step 7

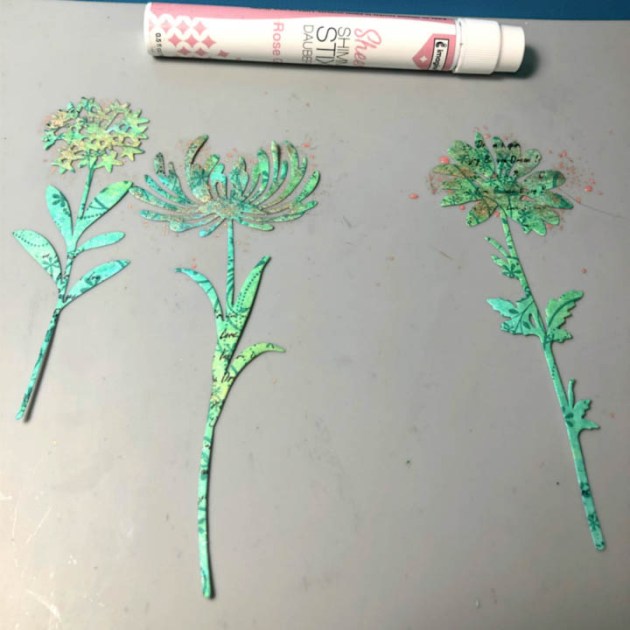
Add additional color to the flower heads with Shimmer Stix in Rose Gold.


Step 8

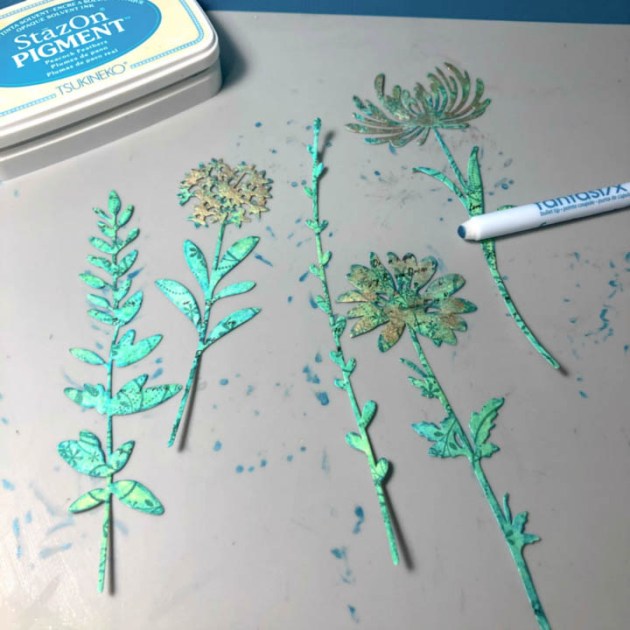
Apply shading to the flower by using a Fantastix tool with StazOn Pigment ink.
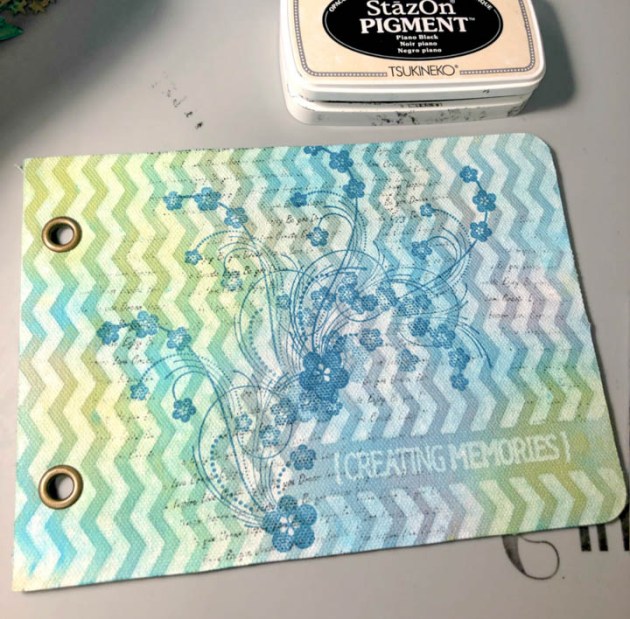

Step 9

Stamp a floral pattern and script onto journal cover with StazOn Pigment ink.
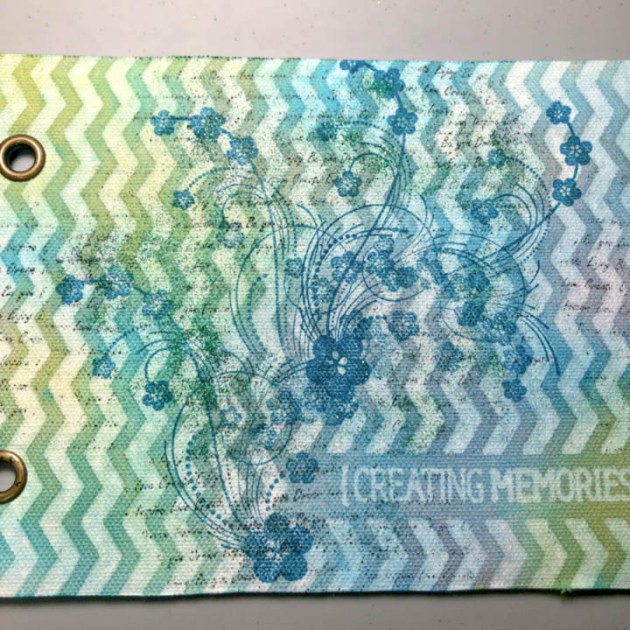

Step 10

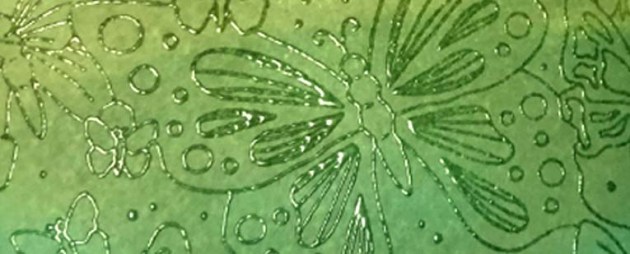
Directly apply VersaMark ink to cover, sprinkle with MBoss powder(s) and heat set for added texture.


Step 11

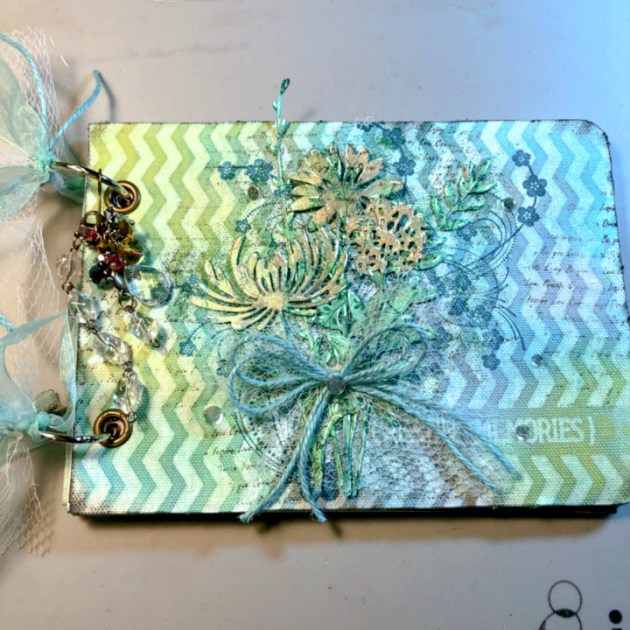
Adhere to a layer of tulle.


Step 12

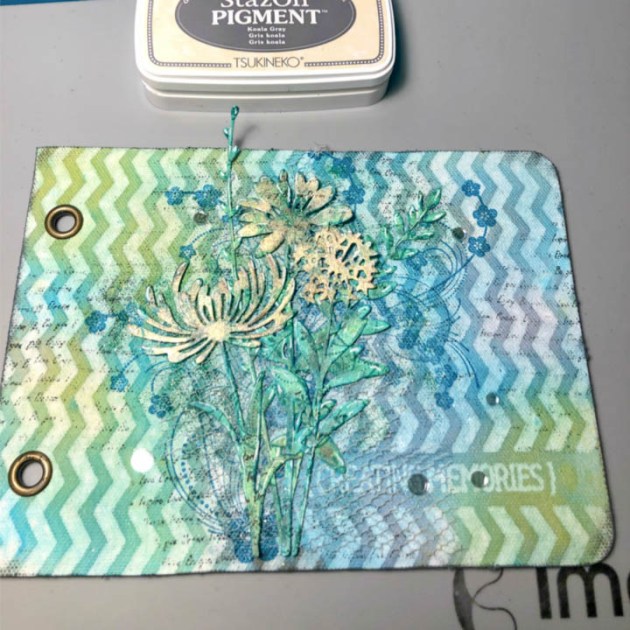
Highlight floral cutouts with white ink.


Step 13

Assemble floral die cuts, adhere sequence, and apply StazOn ink directly to edges of cover for shading.


Step 14

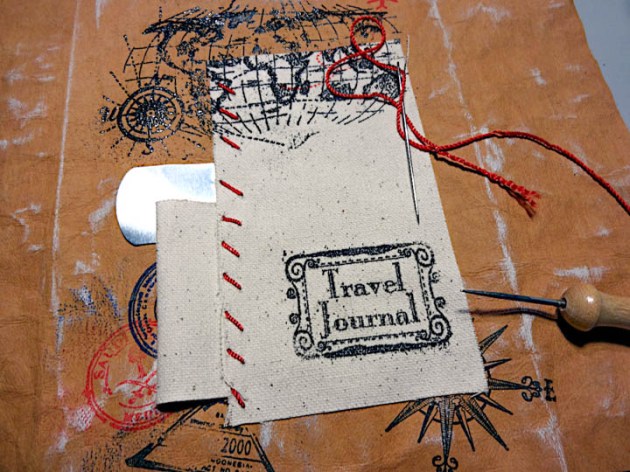
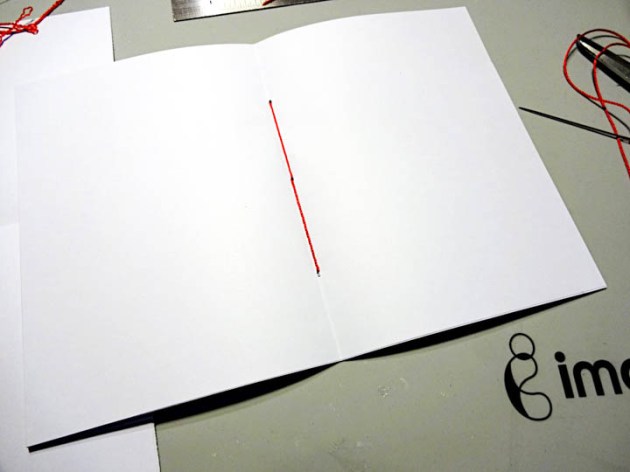
Assemble Journal and embellish with fibers.


Step 15

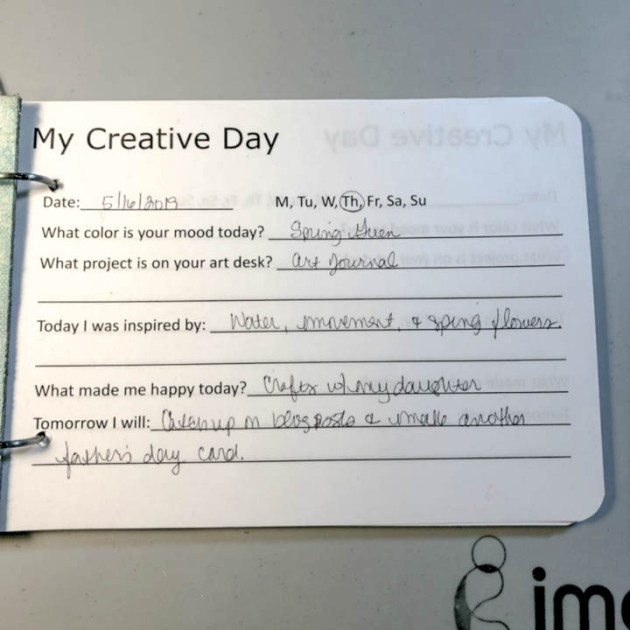
Complete first daily journal entry.

Supplies

Imagine

StazOn Pigment Inkpad – Peacock Feathers, Shamrock Green, Piano Black, Koala Gray
• Fireworks! Shimmery Craft Spray – Cottage Ivy, New Sprout, Bahama Blue
Delicata Inkpad – Golden Glitz
Fantastix – Bullet Tip
Sheer Shimmer STIX Dauber Top – Rose Gold
VersaMark Watermark Stamp pad
Mboss Powder – Shimmering Night Sky, Lucky Stars
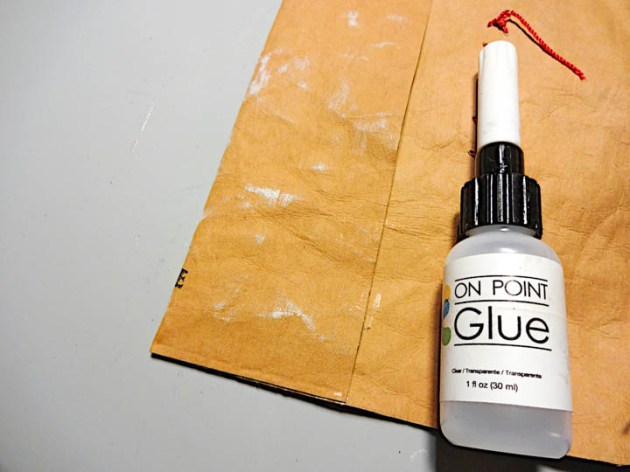
On Point Glue
Large Sponge Dauber

Other

• Prima – Mixed Media Covers
• Uniball Signo – White
• Inkadinkado Clear Stamps
• Lori’s Cards & Creations Stamps – Art Script
• Sizzix Thinlits – Wildflower Stems
• Hero Arts Sequence
• My Creative Day template
• Fibers
• Tulle

Learn How to Make a Travel Journal

by Kyriakos Pachadiroglou

Learn How to Make a Travel Journal

Keeping travel memories in real time while they are taking place and having them all gathered in a journal is the best way to have to keep every moment of your trip. Include blank pages, make pockets and keep tickets, notes, and photos in this handmade travel journal. To make the cover, I used Kraft-tex paper, which a fabric-like paper, which I sprayed with Ink Potion No.9 instead of water to keep it soft and allow better performance of inks. Stamping with the StazOn Pigment inkpads gave great coverage and sharp design on the wrinkled surface, while the ink dried fast to allow moving to the next step. Make this journal before your trip and have it handy during your travels.

Time: 2 hours
Skill: Advanced

Directions


Step 1

Cut a 16 ½ x 8 ½ inch piece of the Kraft-tex paper and spray it with the Ink Potion No.9


Step 2

Twist and crinkle the paper and while spraying a bit more of the Ink Potion No.9. Let it dry or use a heat tool.


Step 3

Cut a 5 ½ x 3-inch canvas piece and place it on the cover, leaving 2 ½ inch from the long side on the right, as it will be used an inner flap making a side pocket. Stamp with the map and the travel journal stamp with the VersaMark, cover with Mboss Embossing Powder in Black and heat set.


Step 4

Remove the canvas piece, press lightly on the surface with the StazOn Pigment Snowflake inkpad and distress the surface.


Step 5

Continue stamping with the StazOn Pigment in Passion Red, Mariner Blue, Piano Black ink pads with travel stamps on the surface. Distress around the compass image and maps with the same colors ink pads.


Step 6

Add Tear It Tape to the top side of the canvas piece and a Sheet Metal dog tag, gluing only half of it. Allow space as it will be used a hook to secure the burlap cord wrapped around the journal.


Step 7

Cut a 2 ½ x 2-inch piece of canvas fabric, fold in half and glue just the edge of the long side with the On Point Glue, creating a pen pocket.


Step 8

Place the canvas pieces on the Kraft-tex cover and using a piercing tool open holes to allow hand sewing of the red twine. Apart from decorative purpose, this also helps to secure it further the pen pocket to the cover.


Step 9

Continue decoration with stamps and the StazOn Pigment in Passion Red, Mariner Blue, Piano Black inkpads.


Step 10

Turn at the back and glue the previously left sides on top and bottom only making side pockets.


Step 11

Open two holes at the middle (spine-like) leaving about 1 ½ inches from top and bottom and pass three times the elastic black cord.


Step 11

Cut blank pages in stacks of 5 creating signatures in 10 x 7 inch (5×7 when folded) and secure with the red twine by opening 3 holes and passing the twine through them. Repeat the process and just pass between the elastic cord to secure them.

Supplies

Imagine
Other
  • Kraft-tex paper fabric – natural
  • Canvas
  • Viva decor – Travel and Paris, Rome, Berlin stamps
  • Black elastic cord
  • Red twine
  • Burlap cord
  • Blank pages
  • Heat tool
  • Piercing tool

Color of the Month for June is Fern Green

Color of the Month for June is Fern Green. We love this soft green color because it reminds us of the beautiful plants that come bursting forward into the lushness of Summer. Some of the inks we recommend for this color are StazOn Cactus Green, VersaColor Fresh Green, VersaFine Clair in Green Oasis and Verdant.

Here is a sneak peek for what we have coming up this month…

Green Eyes Art Canvas by Kyriakos Pachadiroglou

Mixed Media by Roni Johnson

Resist Embossing by Martha Lucia Gomez

See How to Stamp in an Embossed Surface with StazOn

by Kassy Tousignant

See How to Stamp in an Embossed Surface with StazOn

To create this cool Rebel Canvas I used the new MBoss Hologram embossing powder with a fun, classic technique to create a stamped impression in the embossing powder. The new Hologram embossing powder is soooo gorgeous and fun to use. I love that the new MBoss packaging allows for precision application and easy cleanup!

Skill: Advanced
Time: 45 minutes

Directions

Supplies

Imagine
Other
  • Carabelle Studios – stencil
  • Visible Images – stamp
  • Arteza – canvas panel
  • DecoArt Media – White gesso
  • Black twine
  • Heat Tool

Color a Journal Page in the Style of a Cute Nature Scene

by Elina Stromberg

Stamped collages provide an easy way to create beautiful and colorful pages into your art journal book. For this technique, you can mix and match stamps from various sets and take those small pieces of leftover papers and put them into use. Main images on stamped collages are like paper dolls; first, you stamp and cut out the body, then hair, clothes, and accessories. Finished pieces contain several layers; just like dressed paper dolls!

Skill: Intermediate
Time: 2 hours

Directions


Step 1

Stamp the main image on cream cardstock and again on brown, orange and patterned floral paper.


Step 2

Color the image face, hands, and legs. Add shadows and highlights to the brown hair and the flower-patterned skirt. Cut out. On the non-visible areas trim body image slightly smaller on the edges; this will ease the positioning of the colored and cut details.


Step 3

Using green papers hand-cut waves to build a landscape scenery. If you wish, decorate with stamped patterns.


Step 4

Ink the page background: Dab green ink on the bottom part of the page, and both lighter and darker blues on the top. The area in the middle may be left white as it will be covered with the green scenery papers. 
Create clouds on the inked sky by adding a hint of white gesso on top of the blue ink.


Step 5

Stamp trees on green patterned paper. Highlight the stamped lines with a color pencil. 
Cut out.


Step 6

Stamp flowers and stems on patterned or solid color paper. Color with color pencils and cut out.


Step 
7

Stamp small flower patterns on the layered landscape. Glue flowers on the background. Place the main image on the page. Stamp sentiment text on the bottom of the page. Done!

Supplies

Imagine
Other
  • Art Journal book
  • Colorful pieces of leftover papers
  • Carabelle Studio – “The girl smiling” stamp
  • 
Simon Says Stamp – One With Nature
  • 
Studio Calico – Set 17179
  • Gesso – white
  • Color pencils
  • Scissors

Create A “Not All Who Wander Are Lost” Greeting Card

by Iris Rodriguez

Create A Not All Who Wander Are Lost Greeting Card

I made a travel theme card with a porthole using the Vertigo film. This is a plastics film containing a 3D, hologram-like imprint. The porthole window view has a fantasy feel. It’s like looking into the abyss as you go onto your great adventure. Vertigo can be tinted with Imagine’s inks and cut with scissors or other cutting tools. Check out how this grungy, travel-themed card is made.

Skill: Beginner
Time: 1 hour

Directions

Step 1

Cut out or use a die cut tool to cut a circle containing an open center from the chipboard.

Step 2

Cut out four or more different size pieces of chipboard. This will be the steampunk looking wall. Rip the edges with your hands for added grungy-ness.


Step 3

Add a few Walnut Crystals to water and mix. Paint the chipboard with a brush. Dry the paper.


Step 4

Smoosh the Golden Glitz Delicata ink onto the craft mat. Spray with water and mix.


Step 5

Smoosh the card pieces onto the watered ink. Dry the paper. Ink the edges with VersaFine Vintage Sepia ink. Ink the porthole with Delicata Celestial Copper ink.


Step 6

Now we will create the porthole. It’s made using the Breeze Vertigo. This is a firm plastic film that has a cool effect imprint. Looks like a hologram.


Step 7

Tint the Vertigo with Cottage Ivy and Pear Tart Memento inks.


Step 8

Add tiny drops of the On Point Glue to the Vertigo circle and adhere the chipboard circle.


Step 9

Add tiny drops of the On Point Glue to the chipboard circle and adhere the metal studs.


Step 10

Ink an area onto one of the chipboard pieces with the White Shimmery Delicata ink and stamp the sentiment over it with the Piano Black StazOn Pigment ink. I did this so one can better see the sentiment. You may choose to stamp the sentiment over the chipboard piece as is.


Step 11

Adhere the map paper onto the card base first, then adhere the chipboard pieces. Next, adhere the porthole and finally add the rest of the studs onto the chipboard pieces.

Supplies

Imagine
Other
  • Map scrapbooking paper or map stamp
  • Cardbase
  • Chipboard
  • Metal studs
  • Sentiment Stamp