Create a Mini Halloween Bat Treat Box 

By Jessica Lin

Skill: Beginner
Time: 20 minutes

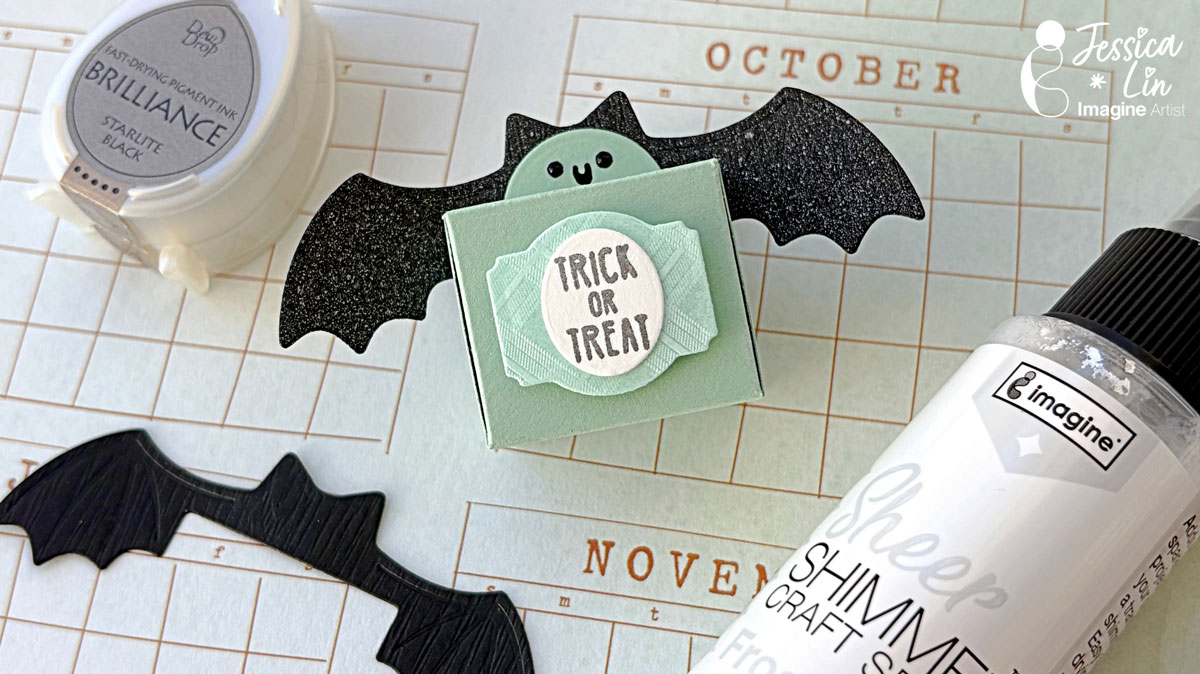
– Hi everyone! It’s Jessica here. Halloween is right around the corner and today I have a really quick & easy treat box idea for you. If you are interested in making mini treat boxes and dressing them up for Halloween, Christmas, or Easter, just keep reading!

Step 1:
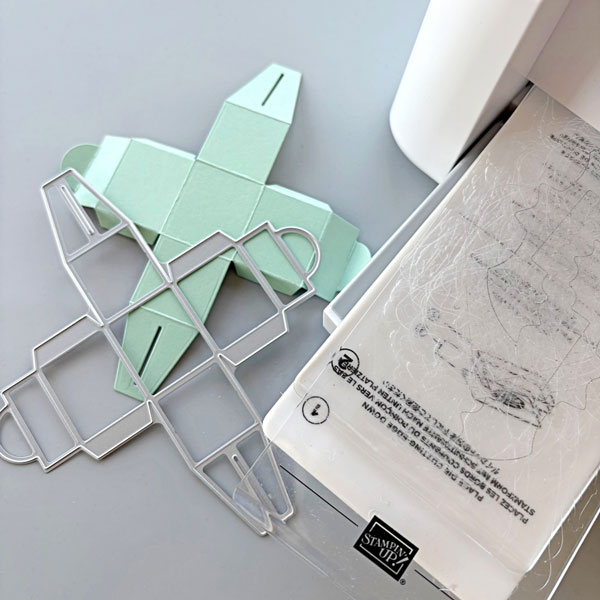
Die cut a piece of Mint Macaron cardstock with Design a Treatbox die from Stampin’ Up. Fold along the score lines to create a mini treat box.
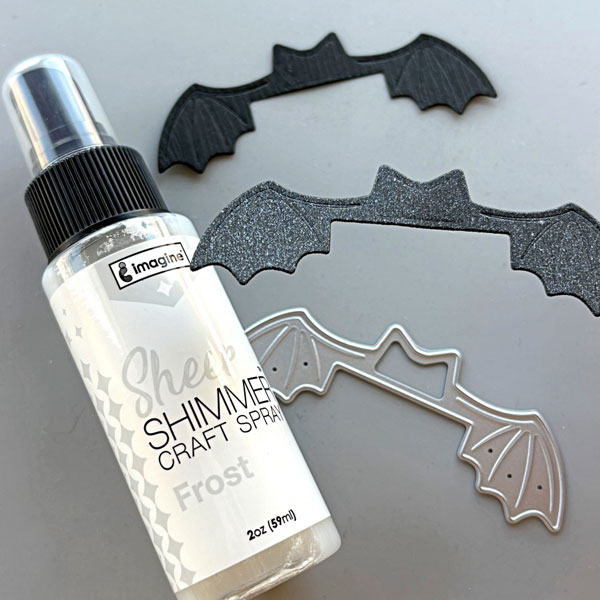
Step 2:
Die cut a piece of black cardstock with the bat wing die from the same set. Then spritzed it with a generous layer of Sheer Shimmer Craft Spray in Frost. The shimmer spray really adds a whimsical touch to the bat wings! You can compare it with the die cut in the back without the Sheer Shimmer Spray. Doesn’t it look so different?
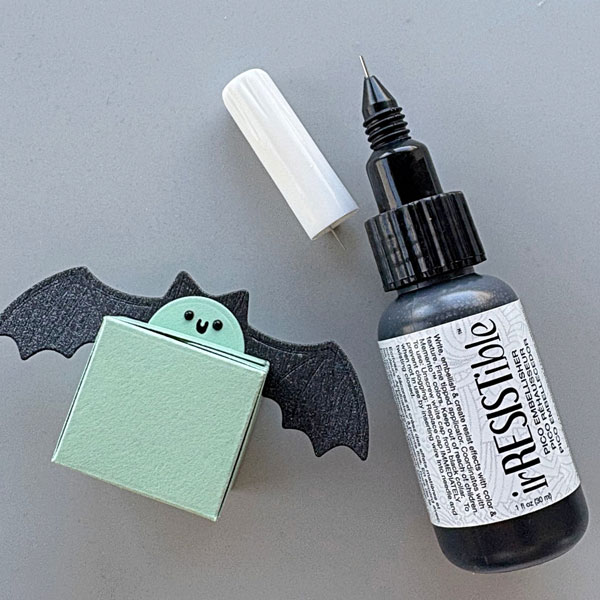
Step 3:
Then I added a smiley face to the tab of the treat box with irRESISTible Pico Embellisher. The fine-tip nozzle was so easy to use to create fine details.
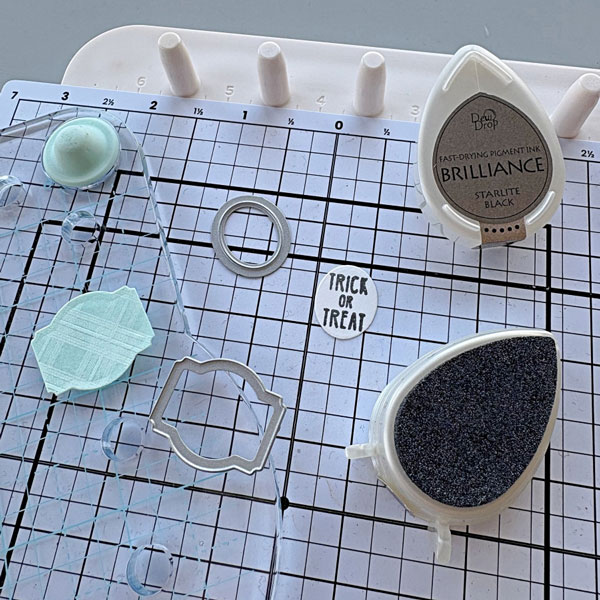
Step 4:
Die cut the box labels with mint patterned paper and white cardstock. The “trick or treat” sentiment is from Mama Elephant’s Meowlloween Extras set. I stamped it with Brilliance Starlite Black ink pad.
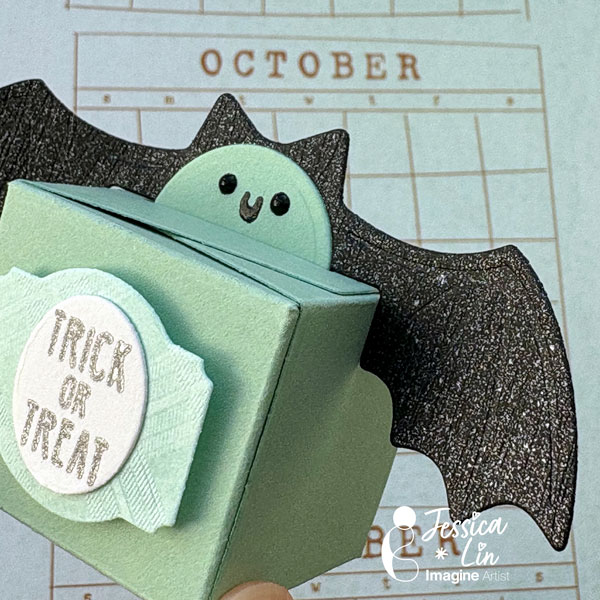
Step 5:
Since this is a mini treat box (holds 2 Hershey kisses), no tape or glue is required for the box assembly. Simply fold along the crease lines and hold it together with the flaps’ openings. This no-glue project is ideal for mass production and you could create many party favors in a short time!

Once the box is assembled, adhere the label dies to the front and slide the bat wings die between the top tabs. You could also create Christmas or Easter treat boxes with the other dies in this set.

Imagine Supplies:

Other Supplies:

  • Stampin’ Up! – Dies – Design a Treatbox
  • Stampin’ Up! – Tool – Mini Cut & Emboss Machine
  • Mama Elephant – Stamps – Meowlloween Extras

Stamping on Fabric: Muslin Bags with Ink and Stencils

By Helen Gullett

Hello crafty friends! Today’s projects are about how you can personalize any muslin bags or canvas bags by adding patterns, words, or anything you can think of with Fabrico Markers, Memento Luxe ink pads, and stencils. It will be fun projects to make for any occasion gift ideas or even for yourself to use. So, let’s make some together!

Skill: Easy
Time: 15-20 minutes

Direction:

Step 1
If your muslin or canvas bag has some wrinkles or folded lines on it, you can iron it before stenciling on it. I ironed my mini muslin bags that I used on these projects today.
Cut out a piece of a thick cardboard or cardstock as an insert mat to put inside the bag to prevent the ink from bleeding through the other side of the bag.
Tape the stencil on the bag with masking tape or washi tape.
Use Fabrico Markers to color through the leafy stencil. To do the ink blending, start with dark color first, then medium color, then lighter color after to blend the color together.
The ink from the bag will transfer to the marker, but do not worry because you can clean the other ink color from the marker tip by scribbling it off on a piece of paper.

Remove the stencil from the bag.

Step 2
Repeat the same step to add more pattern or word to the bag.
On this one, I decided to add the word Be Still on the bag using stencil and Fabrico Marker.
Remove the stencil and set aside for the ink to dry, or iron the bag to dry the inks permanently and quickly.
I love how versatile these Fabrico Markers are when it comes to coloring solid images. The colors blend well together.
The second technique to personalize a muslin bag you can try is by adding ink directly to the bag with ink pads, sponge daubers, and stencil.

Step 3
Add the insert mat inside the mini muslin bag.
Tape the stencil on the mini muslin bag with masking tape or washi tape.
Using a sponge dauber,  pick up the ink from the Memento Luxe Rich Cocoa ink pad by tapping on the ink pad a couple times.
Dab the ink on the sponge dauber on the stencil firmly through the stencil to make sure the ink transfers to the bag.
Repeat the steps until the bag is covered with the pattern.

Step 4
Remove the stencil from the bag.
Iron the bag to dry the ink permanently on the bag.

I love how they look after removing the stencils off the bags. I personally like both techniques, how about you? Which technique do you prefer better to do to personalize your own bags?

Hopefully you also will have fun personalizing your own bags by trying one of both techniques. Thank you for stopping by our blog today. Have a wonderful day!

Craft Supplies

Imagine Crafts:

Others:

Learn How to Make a Fun Treat Bag!

By Tracy Fear

Hello Friends! Tracy here and today I am excited to share with you  how to make a fun and easy little gift/treat bag!

Tracy

Skill: Intermediate
Time: 30 Minutes

Art Supplies

Stamping Platform
6×6 Pattern Paper
Plain Paper for Stamping
Scissors
Scoring Board
Hole Punch
Coloring Medium of your choice!

Imagine Products
VersaFine Clair in Twilight
Stazon Ink in Spiced Chai

Other Products Used
6×6 Pattern Paper, double sided of your choice
120lb paper in white and Kraft
Paper to stamp on
Coloring medium of your choice
Misti tool
PVA Adhesive

ALTERNATIVE PRODUCTS THAT CAN BE USED TO RECREATE SOMETHING SIMILAR

Any Inks any combination of background stamps and feature stamps

To learn how to create your own little treat bags click here!

Let’s Make a Repurposed Tea Tin Box

By Anna Escalada York

I’ve had a small metal tea box that I’ve wanted to repurpose into a mixed media piece for a while, so I took some time on a rainy day to make it happen.

Skill: Advanced
Time: 1 hour active time, 6+ hours (drying between layers)

Directions:

Step 1:

After applying two coats of gesso around all four sides of a tea tin, spray the top of the tin with Cherry Blossom Walnut Ink Antiquing Solution and allow it to drip down the sides of the tin. Set aside to dry.

Step 2:

Spray all four sides of the tin with Lulu Lavender Fireworks! Craft Spray and allow to dry.

Step 3:

While the tin was drying, die cut four leaf clusters out of watercolor paper. Then randomly add Paris Dusk Fireworks! Craft Spray to the centers of each leaf with the stick of the spray nozzle and color the outsides of the leaves with Elderberry Memento Dual Marker.

Step 4:

Spray each of the 4 leaf clusters with Lulu Lavender Fireworks! Craft Spray and allow to dry.

Step 5:

Partially stamp each of the four sides of the tin with Night Sky VersaMagic ink on a background stamp. (I used an old woodblock typewriter stamp.) Then press the ink pad along the top edge of the tin and the raised rib as well. Heat emboss the top rim of ink with clear embossing powder.

Step 6:

Ink blend Lilac VersaColor ink through a stencil on all four sides of the tin using a sponge dauber. (Not pictured was splattering more of the Paris Dusk Fireworks! Craft Spray onto each of the four sides as well.) Then allow everything to dry.

Step 7:

Glue two of the leaf cluster dies (one on top of the other) along the right edge of two of the sides of the tin.

Not pictured was the step after this where I decided to use my sponge daubers to ink blend some more of the Night Sky VersaMagic ink along some of the edges of the leaves while they were glued down, nor using my Gold Sheer Shimmer Stix Dauber Top to add some gold to the leaves as well.

Splatter the tin with more Paris Dusk Fireworks! Craft Spray. Allow it to dry. Then glue dark blue gems around the leaf clusters to finish the box on the two slides with leaves.

Art Supplies

Imagine

Fireworks! – Lulu Lavender and Paris Dusk
Memento Dual Marker – Elderberry
Sheer Shimmer Stix Dauber Top – Gold
VersaColor ink – Lilac
VersaMagic ink – Night Sky
Walnut Ink Antiquing Solution – Cherry Blossom
Sponge Daubers

Other

AALL & Create – stencil – Lotza Starz 6″x6″ stencil
Golden – Gesso Semi-Opaque Acrylic Primer
Scrappy Tails Crafts – embellishment mix
Simon Says Stamp – die cut – Autumn Leaf Branch
Old typewriter woodblock stamp in my stash
Clear Embossing Powder
Watercolor paper
Foam paint brush (for the gesso)
Die cutting machine
Glue

Blend Delicata Inks to Make a Beautiful Fall Florals Wedding Card

By Jessica Lin

Skill: Intermediate
Time: 1 hour

Hi everyone! It’s Jessica here. Fall is right around the corner and I have a fall floral card to share with you today. I decided to do some layered ink blending using shimmery Delicata ink pads. They are pigment-based and mostly used for stamping. However, they ink blend beautifully, too! Be sure to check out the shimmery effects of these ink pads at the end of this post.

Step 1:
Stamp the large floral image from Stampin’ Up’s Layers of Beauty set with VersaFine Clair Sand Dune ink pad. This color is becoming my favorite for stamping outlines. The soft, neutral tone creates an entirely different feel compared to black image outlines.

Step 2:
This particular stamp set coordinates with the Layers of Beauty decorative masks. I started with stencil 1 and ink blended with Delicata Golden Glitz. You could use the full size ink pad or the Quartet ink pad, which includes Golden Glitz, Silvery Shimmer, Celestial Copper, and Bronze Burst.

Step 3:
For stencil 2 and 3, I ink blended Bronze Burst and Celestial Copper. These two shades are similar, with Celestial Copper having a redder hue. I thought they contrasted too strongly against the golden base layer, so I ink blended Bronze Burst lightly to the base layer as well.

Step 4:
For the leaves, I ink blended VersaMagic Sage for stencil 4 and Hint of Pesto for stencil 5. Once the ink blending is completed, I die cut the floral image and mounted the back with foam tape.

Step 5:
I prepared a card base using Neenah Desert Storm cardstock. Then I embossed a 4’’ x 5 ¼’’ panel with Stampin’ Up’s Distressed Tile embossing folder. To create some background depth, I ink blended the corners of the embossed panel with VersaFine Clair Sand Dune ink pad.

Step 6:
Finally, I stamped the sentiment with VersaFine Clair Sand Dune ink pad and added matte white enamel dots from The Rabbit Hole Designs.

Here’s the finished card! I tried to capture the shimmery effects of the Delicata ink pads but the photo does not do it justice. It’s mesmerizing and so pretty in real life, I hope you will give ink blending with Delicata ink pads a try!

Craft Supplies:

Imagine Supplies:

Other Supplies:

  • Stampin’ Up! – Stamps, Die, Mask bundle – Layers of Beauty
  • Stampin’ Up! – Embossing Folder – Distressed Tile
  • Neenah – Paper – Desert Storm
  • Foam Tape

Quick and Easy Coffee Card

By Tracy Fear

Hello Friends! Tracy here and today I am happy to share this super quick and simple coffee card great for a man or a woman!
Tracy

Skill: Intermediate
Time: 30 Minutes

Art Supplies
• Stamping Platform
• White and Kraft colored paper paper
• Blending Brush
• Scissors

Imagine Products
VersaFine Clair in Fallen Leaves
Memento: Espresso Truffle, Desert Sand, Turquoise Gem
VersaMark Ink

Other Products Used
• Coffee Background Stamp and Coffee Cup stamp from Technique Junkies
• 120lb paper in white and Kraft
• Foam Tape
• Misti tool
• PVA Adhesive
• White Super Fine Embossing Powder

ALTERNATIVE PRODUCTS THAT CAN BE USED TO RECREATE SOMETHING SIMILAR
Any Inks any combination of background stamps and feature stamps
To learn how to create your own dressed up box click here!