Make a Simple Card with Embossing and Border Design with Rinea Foil

by Jessica Lin

Make a Simple Card with Embossing and Border Design with Rinea Foil

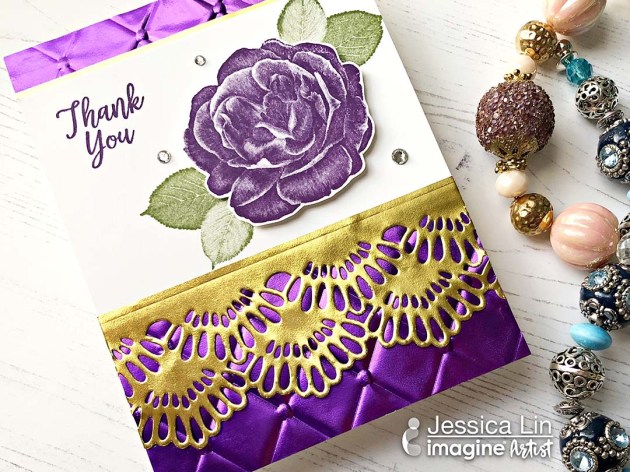
Hi everyone! I hope you are enjoying the mega inspirations from the Imagine & Rinea collaboration. Today I have a quick and easy card that revisits simple stamping, die-cutting, and embossing. Sometimes all you need is a couple of amazing supplies to put together an amazing card. Check out the details on the realistic-looking rose stamp and the beautifully embossed background by watching this tutorial.

Skill: Intermediate
Time: 20 minutes

Directions

Supplies

Imagine
Other
  • Rinea Foil Variety Pack – Peacock
  • We R Memory Keepers Next Level Embossing Folders – Quilted
  • Stampin’ Up Healing Hugs Stamp Set
  • Stampin’ Up Delicate Lace Edgelits
  • Stampin’ Up Stamparatus
  • White Cardstock
  • Rhinestones

Learn to Create Shine with Silver Mboss and Rinea Foil Paper for a Shaker Card

by Melissa Andrew

Learn to Create Shine with Silver MBoss and Rinea Foil Paper for a Shaker Card

Today, I am making a fun shaker card using a number of fabulous Imagine products including the new Mboss Embossing Powder in my new favorite color Silver! In addition, I’m adding some beautiful shiny Rinea paper. These two products really add a special touch to this handmade shaker greeting card. Join me in today’s fun paper crafting tutorial.

Skill: Advanced
Time: 45 minutes

Directions

Supplies

Imagine
Other 

Learn How to use Creative Medium to make a Mixed Media Tag

by Arjita Sepaha Singh

For today’s mixed media tag, I used Imagine mixed media products. I took the chipboard tag and added Black gesso to get a nice dark base. Then I took a stencil and Creative Medium to add a beautiful flourish. I also added decorative chipboard cutouts, resin pieces (heart with wings) and paper flowers to my layout. Creative medium is a great adhesive for adhering all my unique pieces onto the tag. Once everything was dry, I added the beautiful Fireworks Shimmery Craft Spray and Golden Delicata ink to give this creative gift tag extra sparkle and shine. The shimmer products are especially bright on dark backgrounds and take on a new life!

Skill: Intermediate/Advanced
Time: 30 minutes + dry time

Directions

Supplies

Imagine
Other
  • Chipboard
  • Stencil
  • Chipboard design
  • Resin Pieces
  • Paper Flowers
  • Black gesso
  • Paint Brush

See How to Make a Beautiful Purple Elephant Greeting Card with Rinea Foil

by Kassy Tousignant

See How to Make a Beautiful Purple Elephant Greeting Card with Rinea Foil

The sparkle of the Delicata ink on the patterned paper background helps to make the Rinea foiled paper die-cut pieces really pop off the card! See how I make this purple elephant themed card.

Skill: Intermediate
Time: 45 minutes

Directions

Supplies

Imagine 
Other 
  • Rinea Foil Paper – Ebony, Jade, Lavender, Gold
  • Anna Griffin – cutting dies
  • Die cutting machine
  • Acrylic ‘Hello’ stamp
  • Patterned paper

Learn How to Make a Background Pattern with Sponge Daubers

by Lori Warren

Need a quick and simple background technique for a greeting card? See how I create a patterned background with large sponge daubers and Memento Ink. Sponge daubers are dense foam and can behave like a soft textured circle stamp when inked up heavily. This technique is a perfect start for a card, art journal or even a scrapbook page. The color scheme and options are really endless.

Skill: Intermediate
Time: 45 Minutes

Directions


Step 1

Use a large dauber to apply Memento Inks to the card panel.


Step 2

Stamp floral images onto card panel with Memento in Tuxedo Black.


Step 3

Stamp a single flower and leaf image onto a separate piece of cardstock (with same dauber background) and cut out.


Step 4

Enhance single flower/leaf images with Memento Dual Tip Markers.


Step 5

Apply London Fog Memento to Craft Mat and add water; add ink splatters to the card panel.


Step 6

Edge card panel with Memento in London Fog.


Step 7

Use cutting die to die cut decorative strip from Rinea Foil paper.


Step 8

Adhere Rinea foil paper element to the card base.


Step 9

Adhere Single flower/leaf to the card panel with double-sided mounting tape. Highlight with a glitter pen.


Step 10

Double stamp sentiment. First stamp in Angel Pink then again, slightly offset, with Tuxedo Black.


Step 11

Edge card base with Memento in London Fog and Angel Pink.


Step 12

Adhere panel to the card base.

Supplies

Imagine
Other
  • Rinea – Double-sided foiled paper
  • Spellbinders Thin Die
  • Hot off the Press – Botanical Blooms
  • Double-sided mounting foam

Create a “Hello Friend” Card with Pico Embellisher

by Iris Rodriguez

Create a "Hello Friend" Card with Pico Embellisher

I love stamps as much as the next crafty person. Sometimes, I like to hand draw my own images though. Did you know you can draw your images with Imagine’s irRESISTible Pico Embellisher? IrRESISTible is a texture medium; which adds dimension to your project. It comes with a fine-tipped applicator for writing or making doodles. For the background, I used various All-Purpose Inks to create a watercolor painted look and then drew on top with the Pico Embellisher.

Skill: Beginner/Intermediate
Time: 30 minutes

Directions


Step 1

Determine how many colors of All-Purpose Ink. Prepare a water container for each color, so that you do not contaminate the colors; also, avoids running the risk of your ink turning into a mud color. Use a different for each color, or wash the brush between each color if using the same brush.


Step 2

First, wet the area with plain water. Place a small amount of ink into one of the ink wells. Add water to the ink and brush onto the paper.


Step 3

Repeat the same process for each color. Do not blend the colors; just lay them next to each other. Dry the paper.


Step 4

Brush on Creative Medium in order to seal in the All-Purpose Ink. Draw your image using Zeal Teal irRESISTible Pico Embellisher. If you are not used to this medium, first practice drawing on a piece of scratch paper. Always squeeze out the Pico Embellisher onto scratch paper to eliminate the bubbles, before applying to your project. Finally, stamp on sentiment and assemble the card.

Supplies

Imagine
Other
  • Watercolor paper
  • Ink well palette dish
  • Paintbrush
  • Cardbase – black