“Cheers To The Best Dad” Father’s Day Card

By Jessica Lin

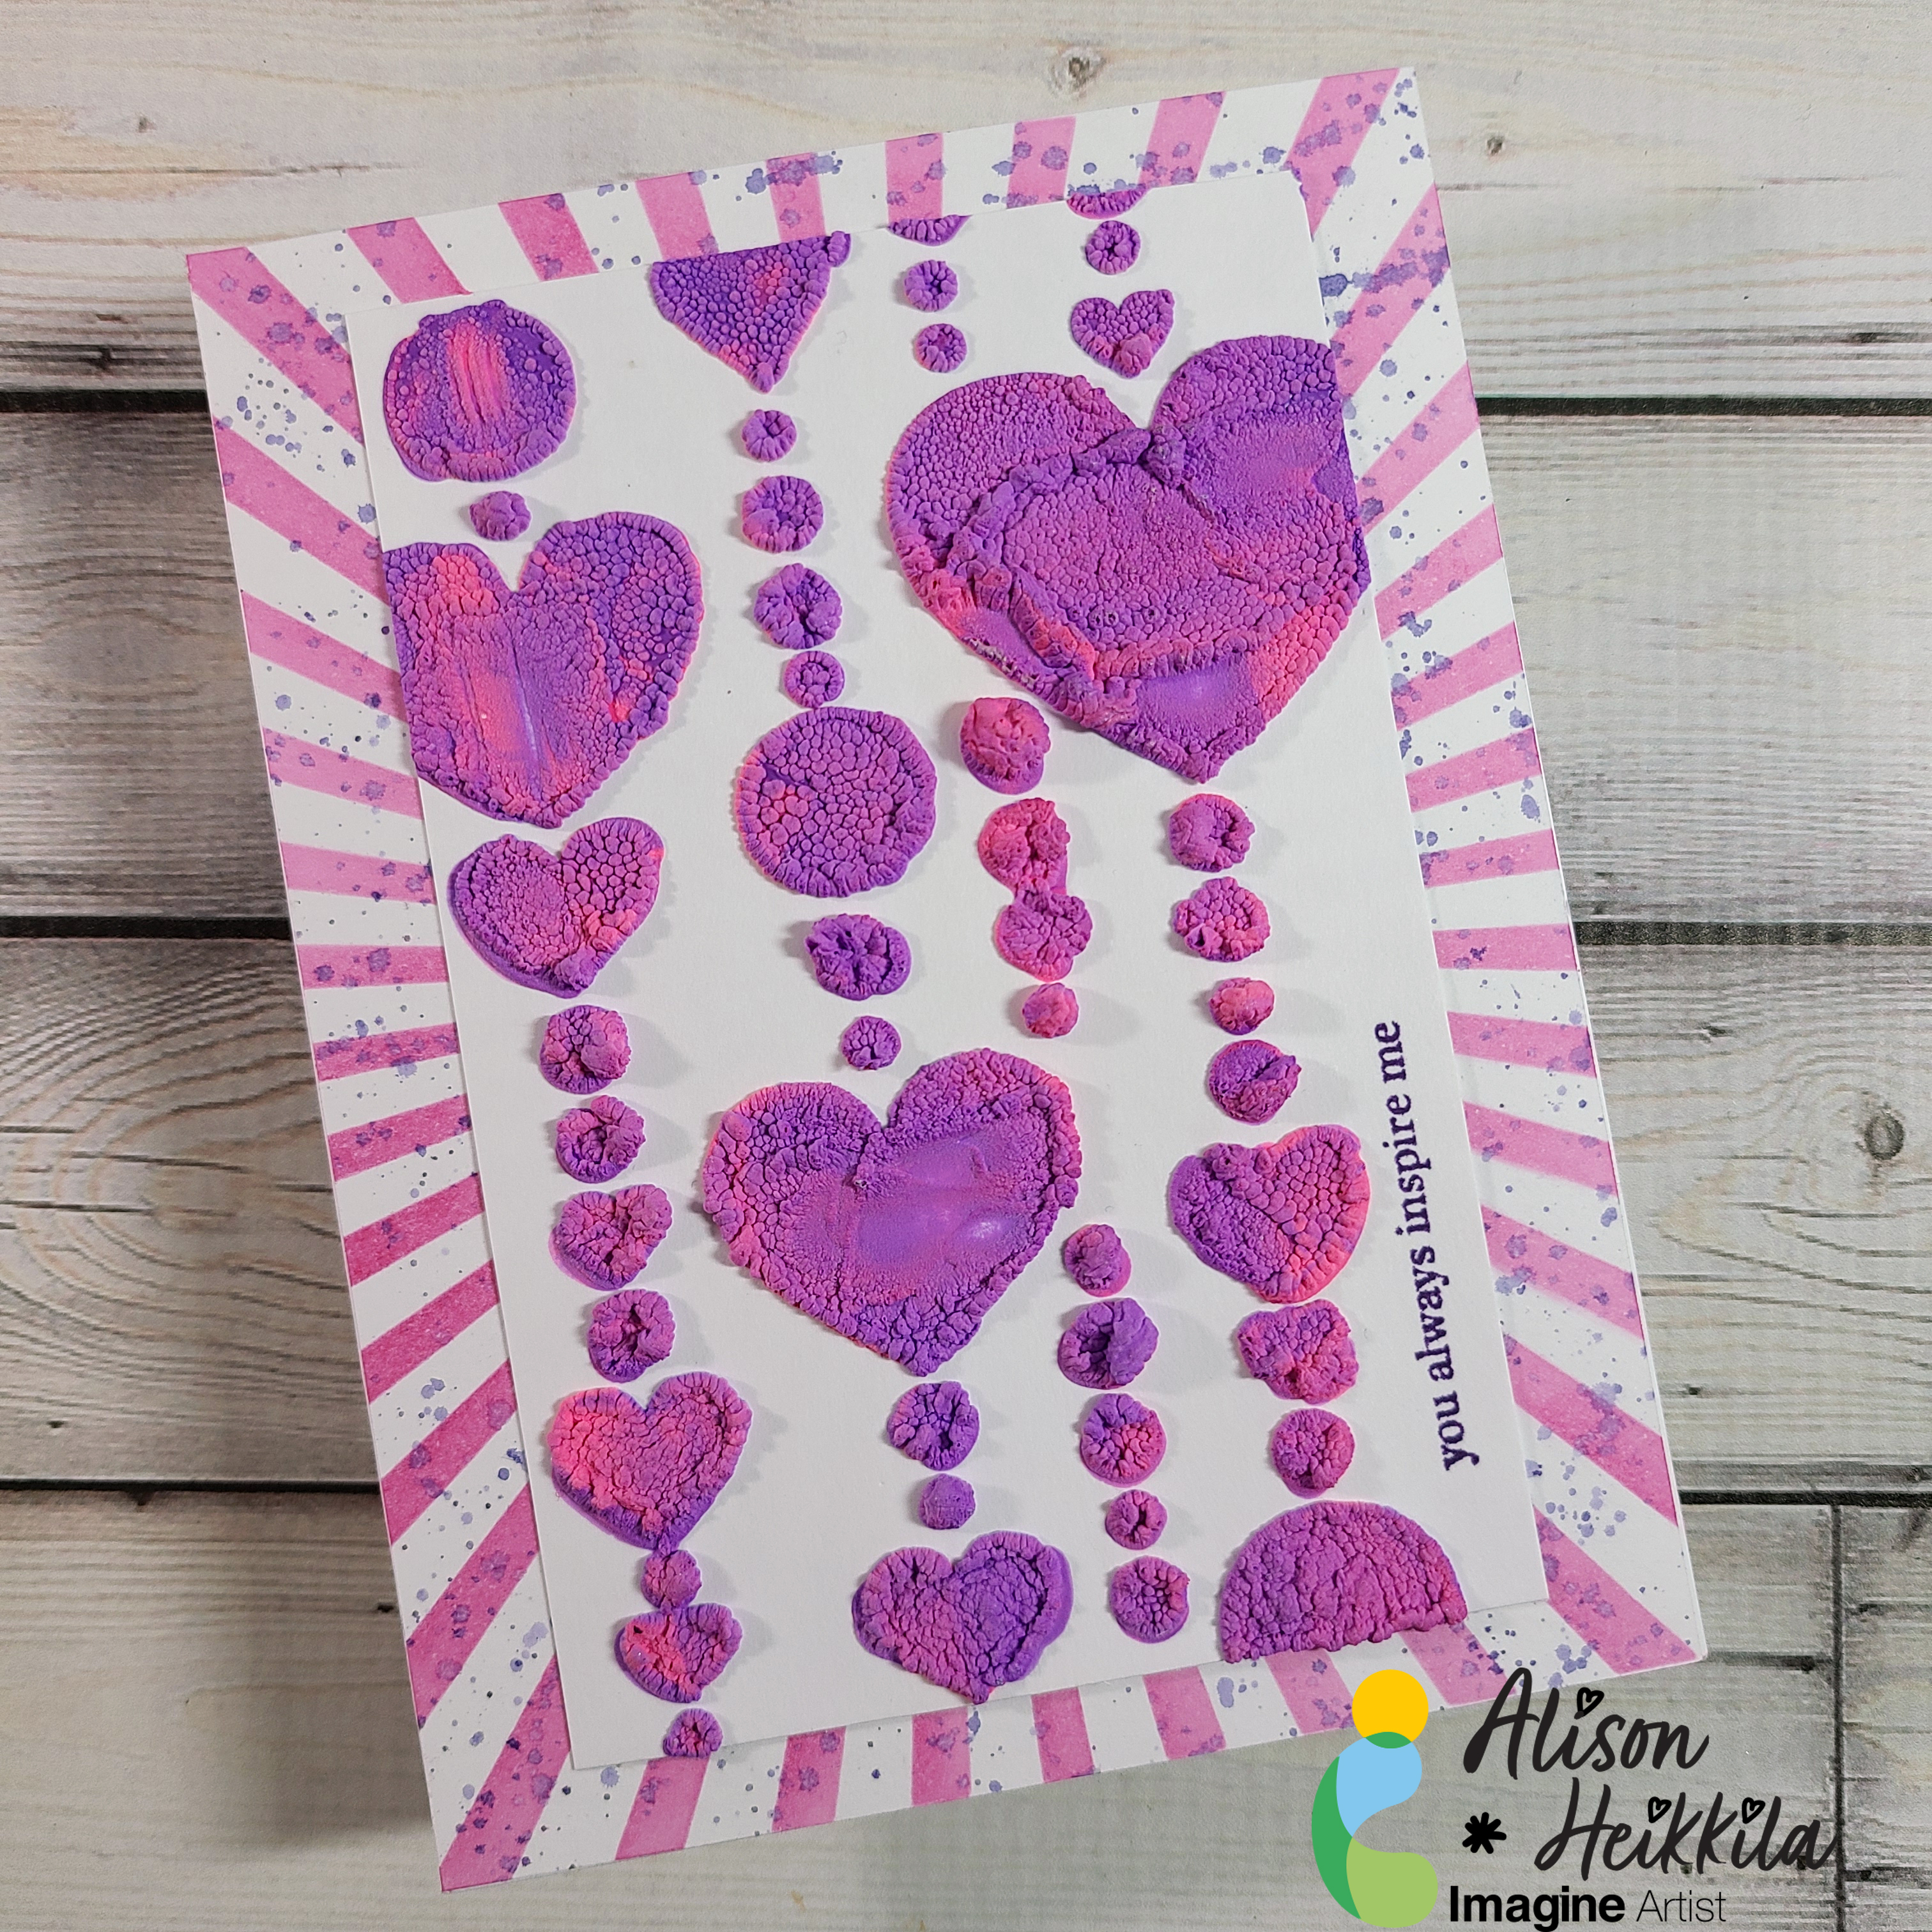
Hi everyone! I think I found my go-to die set for making cards for guys! It’s always been hard for me to come up with masculine card designs. This Brewed die set featuring beers, ale, and wine is gender-neutral and just perfect for a Father’s Day card.

Skill: Intermediate
Time: 30 minutes

Step 1:
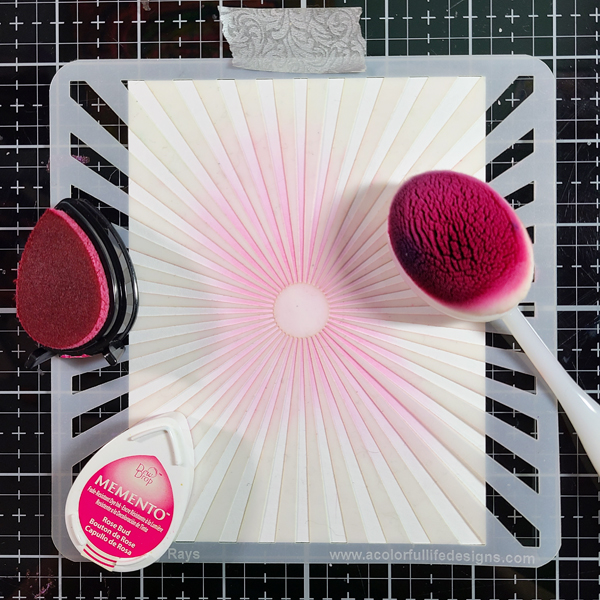
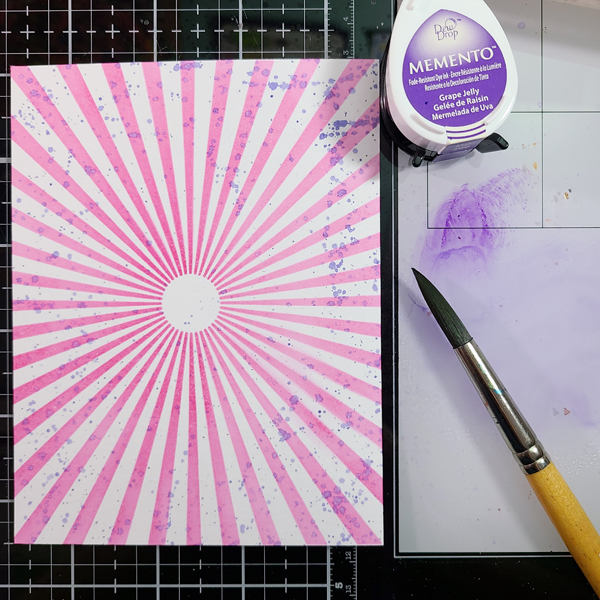
Ink blend a gingham pattern using the Artistic Mix masks with Memento Paris Dusk ink. I like to emphasize certain areas and use a light hand for others to create variations of shades.

Step 2:
Die cut the beer and hops elements using different color cardstock.

Step 3:
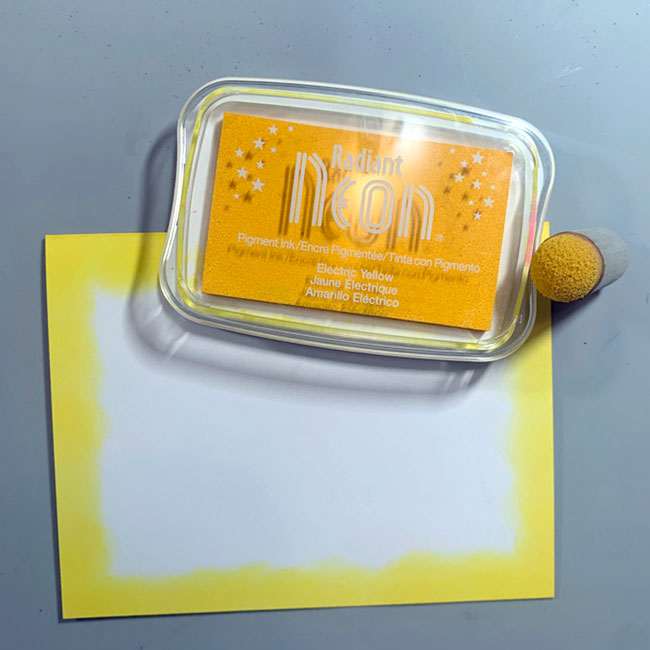
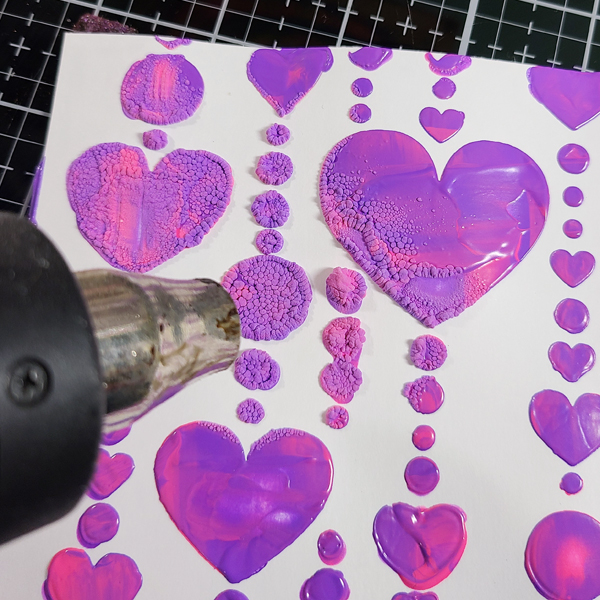
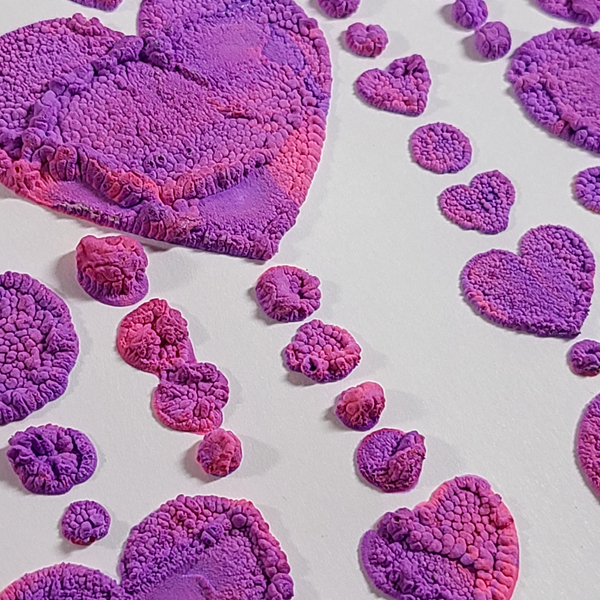
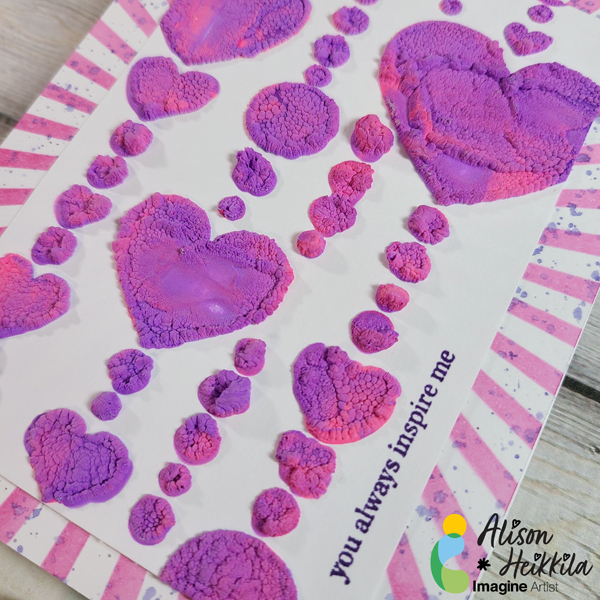
To add some foamy details to the beer foam, apply a layer of Radiant Neon Amplify! Then heat set with your heat gun until a bubbly texture starts to puff up. I haven’t used these in a long time and was surprised with how well the result looked! There’s no waiting time for drying, either. Just heat set as soon as you apply the liquid layer. 

Step 4:
Assemble the die cut elements with Tear-It Tape and foam tape. I used On Point Glue to adhere the two “Cheers” die cuts. The fine tip nozzle is really handy for applying small amounts of glue to intricate die cuts. For the final step, I heat embossed the sentiment with white Mboss powder and that completes the card!

Supplies Used

Imagine Supplies:

Other Supplies:

  • Stampin’ Up! – Dies – Brewed
  • Stampin’ Up! – Tool – Artistic Mix masks
  • Lawn Fawn – Dies – Scripty Cheers
  • Stampin’ Up! – Stamps – World’s Best Trophy
  • Stampin’ Up! – Tool – Heat Tool
  • Blending brush
  • Color cardstock
  • Vellum

Quick and Easy Thank You Card

By Martha Lucia Gomez

Hello crafty friends! Today, I have the easiest and simple tutorial to make a unique thank you card or any type of cards. Let me share the project with you.  

Skill: Beginning
Time: 60 minutes

Directions:

To make my model, I decided to use Radian Neon 4 Warm for two reasons. The first one is because I love the colors of this set of inks and the second, because Radian Neon brings the opportunity to create textures.

Step 1:

Select the colors of inks that you want to use in small sizes pads. For this idea, you can use any of our 4 Inkpads or small presentations like the Dew Drop of other inks, like Brilliance, VersaMagic, Delicata or Memento, just to mention some.  

Step 2:

Place the entire ink pad over the cardstock in the direction that you want the colors. I press mine three times over the card under different pression to obtain different textures in each color.

Step 3:

Let the ink dry naturally or speed the process with a heat tool. If you want, you can cover the stamped blocks of ink with clear embossing powder and emboss them with the heat tool, to obtain a better texture.

Step 4:

Stamp a sentiment over the color blocks using VersaFine Clair Nocturne to add a major contrast over your card.

Step 5:

Heat embosses the sentiment with clear embossing powder and paste the decorated layer over your card base.   

As you can see this is a really simple way to use your ink pads as stamps. Depending on the pression and intensity that you apply over the ink pad or 4Ink Pad, you will obtain different looks.

Thanks for stopping by and remember, you don’t need to create complicated projects. Just use the best inks and let your creativity shine!

Art Supplies:

Imagine:

Other:

  • Stamping Tool
  • White and colored cardstock.
  • Crafty Foam Tape

Let’s Make a Fun Inspirational Card

Lee_Ann_Aug_600x600

By LeeAnn McKinney –

Hey there friends and fellow crafters, LeeAnn here with a fun Inspirational Card I made using my absolute favorite technique, and those of you that have been here for a while know I love Kaleidacolors.

Skill level: Beginner

Time: 30 minutes


Art Supplies

Imagine:

• Imagine Craft Mat

• On Point Glue

• Tear It! Tape

• StazOn Stamp Cleaner

Desert Heat Kaleidacolor Dye Ink

• VersaFine Clair Nocturne

Other Products:

• Accent Opaque 120lb Cardstock 

• Kromecote Paper Marco’s Paper

• Stampers Anonymous Motivational 2 Stamps

“Hello Sunshine” Wooden Photo Frame

Jul22_LeeAnn_Feature

By LeeAnn McKinney

– Hi there friends and fellow crafters, today I am sharing a fun project with you that I have made for my oldest granddaughter. I saw this photo frame and it made think of her immediately. 

Skill level: Beginner

Time: 30 minutes


Art Supplies

Imagine:

• Fireworks! Shimmery Craft Spray – Dandelion

• Radiant Neon Electric Yellow

• Radiant Neon Electric Orange

• VersaMark

• Mboss Embossing Powder – Clear

• Imagine Craft Mat

Other Products

• Sun Frame

• Blender Brushes 

• Heat Tool

Make a Hibiscus Sympathy Card with Creative Medium

2022_May_Neva_Sympathy_650x650

By Neva Cole 

I am always searching for new ways to use supplies and tools.  Creative Medium comes in many colors, but the Iridescent Green creates stunning results on black paper.  The use of an Embossing Folder helps the layers of the iridescent effect really shine.  A few layered stamped images and I have a beautiful sympathy card to send to a dear friend.  

Skill: Beginner

Time: 1 Hour plus dry time

Directions:

2022_May_Neva_Sympathy_Step1
Step 1

Cover a section of black paper (with or without texture) with a thin layer of Creative Medium in Iridescent Green.  I used Imagine’s Squeegee to spread the layer across the paper.  The rubber edge was very helpful to get a thin even layer.  Set aside to dry, possibly overnight.  After it is dry it will still have a slightly rubbery texture.

2022_May_Neva_Sympathy_Step2
Step 2:

Trim a section of the paper to 4” x 5 1/4” and pressure emboss with Sizzix Tropical Paisley Embossing Folder.  You can really see the detail in this photo.

2022_May_Neva_Sympathy_Step3
Step 3:

Layer stamp the Hero Arts Hibiscus and leaves images.  Start with the lightest ink first.  For the Hibiscus–Radiant Neon Electric Yellow, Memento Cantaloupe, Memento Tangelo, and VersaFine Habanero.  The leaves are stamped in Memento Bamboo Leaves and Northern Pine.  The images are die cut twice more from white and layered under matching die cuts with OnPoint glue.

2022_May_Neva_Sympathy_Step4
Step 4:

The sentiment from Unity Stamp Company is stamped in Versa Fine Habanero then heat embossed with Iridescent Embossing powder.  (Not shown) The image is die cut with Lawn Cuts Everyday Sentiments die.  One end is trimmed off square.  The banner is inked with an ink dauber and Radiant Neon Electric Yellow.  The edges are inked with Memento Cantaloupe.  

2022_May_Neva_Sympathy_Step5
Step 5:

Ink the edges of a 4 1/4” x 5 1/2” card with Radiant Neon Electric Yellow ink with an ink dauber.

2022_May_Neva_Sympathy_Step6
Step 6:

The layers are adhered together with Tear It! Tape.  It adheres well with the textured layers of the card.  The two Hibiscus flower are lifted a bit with dimensional foam adhesive.

Art Supplies

 Imagine

• Creative Medium Iridescent Green

• Imagine Squeegee

• Radiant Neon Electric Yellow

• Memento–Cantaloupe, Tangelo, Bamboo Leaves, Northern Pines

• VersaFine Habanero

• Tear It! Tape

• Ink Dauber

Other

• Black and white cardstock

• Sizzix Tropical Paisley Embossing Folder

• Stamp Platform

• Heat Embossing Gun

• Hero Arts Hibiscus C1868

• Unity Stamp Company “beautiful life, blessed memories”

• Lawn Cuts Die Everyday Sentiments

• Dimensional Foam Adhesive

Make a Fun Puffed Hearts Card with Radiant Neon Amplify

Puffed-Hearts-1-800

By Alison Heikkila –

Hello! My latest tutorial for Imagine uses one of the most unique products they make…Radiant Neon Amplify. This stuff is so fun! It’s kind of a runny paint, that when you apply heat to it, it puffs up. I love using Amplify with stencils. Let me show you how.

Skill Level: Beginner to Intermediate
Time: Approx. 20 Minutes, plus drying time

Directions:

Puffed Hearts 2


Step 1:

Tape a piece of cardstock to your work surface. Lay your stencil on top and tape it down. You may want to use something like Pixie Spray to hold the stencil even more, depending on how detailed it is.


Step 2:

Squirt the Radiant Neon Amplify all over the stencil. I went pretty sparingly at first because I didn’t want to waste the product, but I did need to add more than what’s pictured above.


Puffed Hearts 3

Step 3:

Using a paste spreader or palette knife, spread the Amplify across the surface of the stencil. Don’t press too hard, because you may lift up the Amplify. The thicker you apply the Amplify, the bigger the puffs will be, so keep that in mind.


Puffed Hearts 4

Step 4:

Fill in any gaps you may have with more Amplify. Don’t over mix the colors…you want a marbleized look. It should look sort of like mine above.


Step 5:

Carefully remove your stencil from the cardstock and immediately wash it and any other tools you may have used. You don’t want the Amplify to dry on anything except your cardstock.


Puffed Hearts 5

Step 6:

Heat the wet Amplify with a Heat Tool. You will see the shine disappear and it will start to puff up. Again, the thicker areas will have bigger puffs.


Puffed Hearts 6

Step 7:

Trim the panel down to 3 1/4″ x 4 3/4.”


Puffed Hearts 7

Step 8:

Cut a piece of Smooth Bristol Cardstock to 4 1/4″ x 5 1/2.” Tape down to work surface.

Step 9:

Tape down your second stencil. I also used Pixie Spray for this one, because the rays can move easily.

Step 10:

Apply Memento Ink in Rose Bud using a blending brush. Remove the stencil.


Puffed Hearts 8
Step 11:

Apply Memento Ink in Grape Jelly to your work surface and spritz a little water on to the ink. Using a brush, flick the color on to your stenciled panel.


Puffed Hearts 10

Step 12:

Add a sentiment to the puffed panel with VersaFine Clair Ink in Monarch.


Step 13:

Adhere all layers to your card base.


Puffed Hearts 11 Full

I love the texture you get from the Radiant Neon Amplify. It’s so unique and fun! I hope you’ll give them a try. Thanks so much for stopping by. Have an inspiring day!

Art Supplies:

Imagine:

• Radiant Neon Amplify: Electric Purple & Electric Pink
• Memento Ink: Rose Bud & Grape Jelly 
• VersaFine Clair Ink: Monarch 

Other:

• A Colorful Life Designs: Love Strands Stencil & Bitty Rays Stencil
• Mama Elephant: Creativity is Contagious Stamps
• Palette Knife and/or Paste Spreader
• Smooth Bristol Cardstock
• Blending Brushes
• White Card Base
• Heat Tool
• Paint Brush