Make A Fun Happy Bird-Day Card

By Kathi Rerek

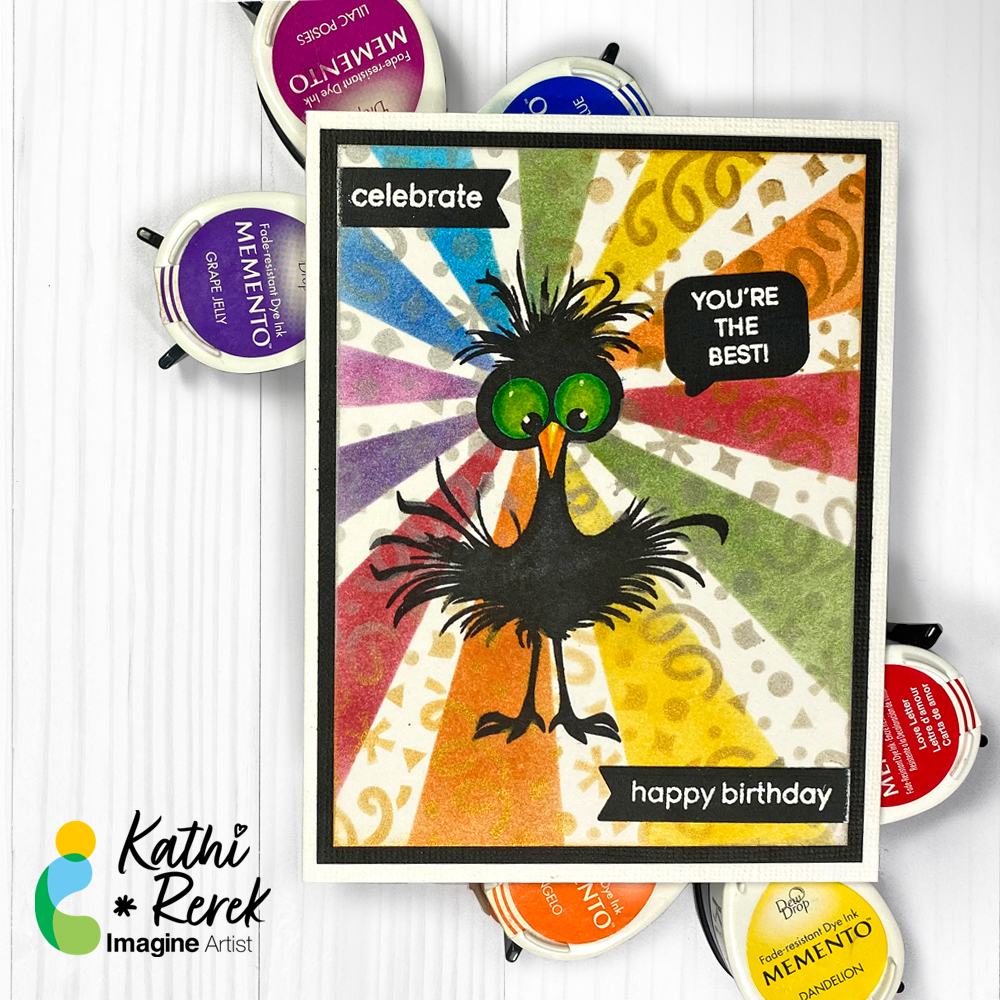
Let’s make a cheerfully bright and fun birthday card with a stamp, two stencils, and lots of ink!

Skill Level: Intermediate
Time: 1.5 hour

Step 1:
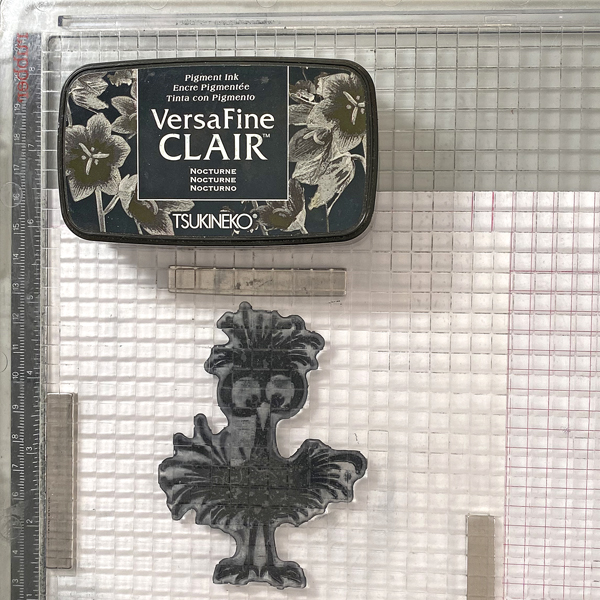
Use magnets to secure a  piece of white Bristol paper to the base of a stamping platform.

Use Nocturne VersaFine Clair ink to stamp the bird stamp from the “I’m Fine”  image twice — once onto the image panel and once onto repositionable sticker paper. Heat set the stamped image panel.

Step 2:
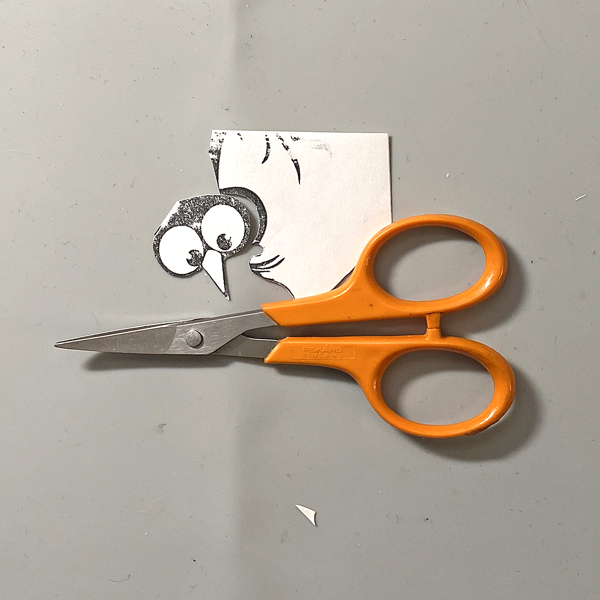
Fussy-cut the sticker paper version and place it onto the image panel as a mask.

Step 3:
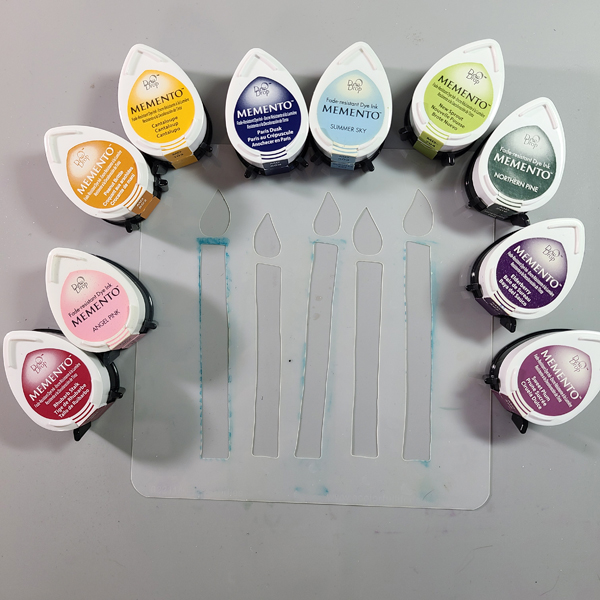
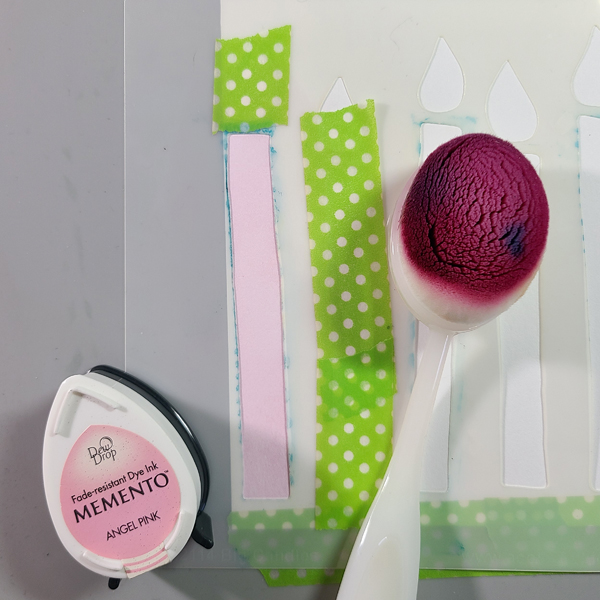
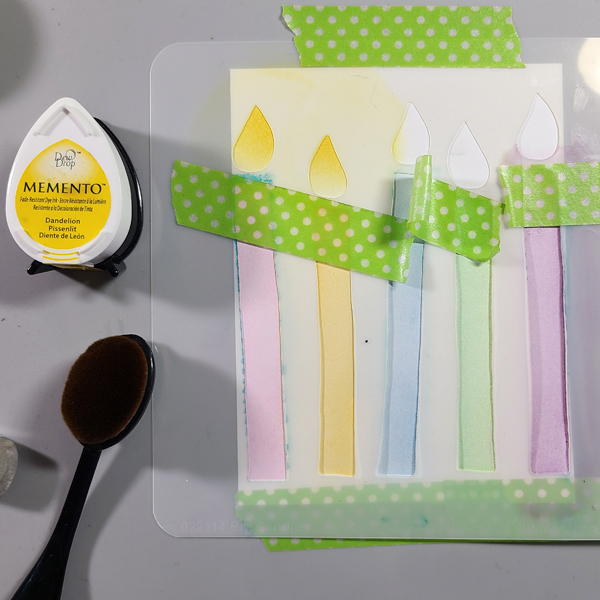
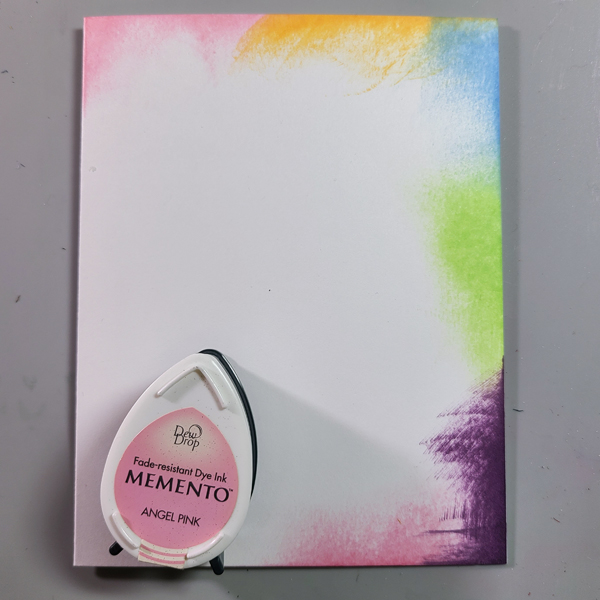
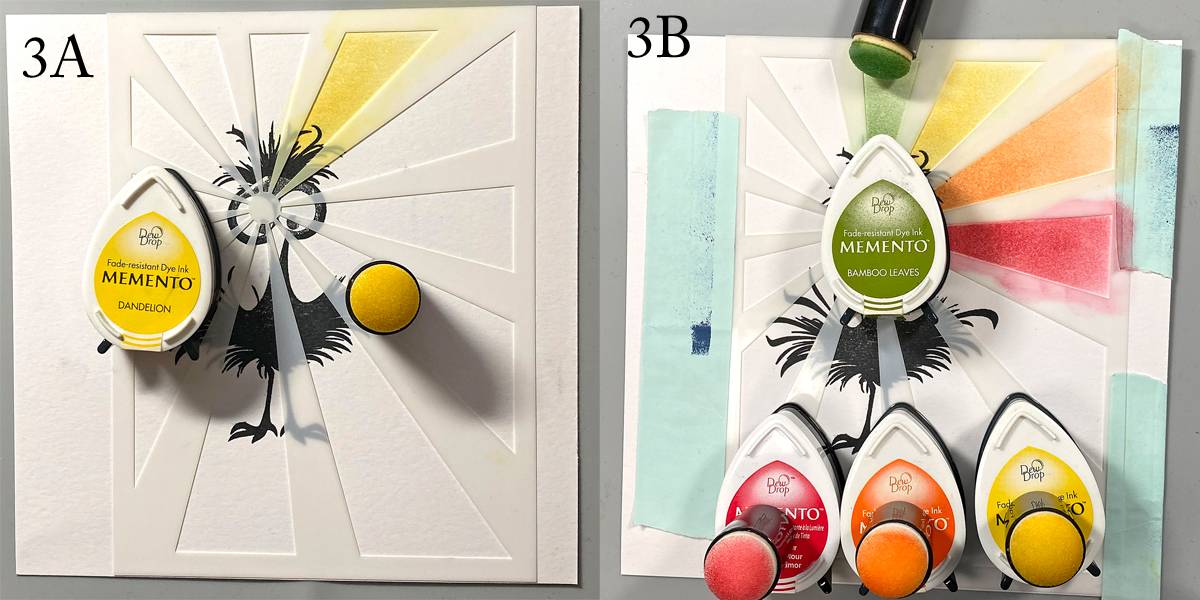
Use low-tack tape to secure the Sunshine Small Stencil onto the stencil so that the “sun” is over the bird’s face. Use a Sponge Dauber to apply Love Letters Memento ink over the mask and masked image onto the image panel (3A).

Use a separate Sponge Dauber for each color to apply Tangelo, Dandelion, Bamboo Leaves, Bahama Blue, Danube Blue, Lilac Posies, and Grape Jelly Memento inks in rainbow order (ROYGBIV) counter-clockwise over the stencil onto the image panel (3B). Not all stenciling is shown. Remove stencil.

Step 4:
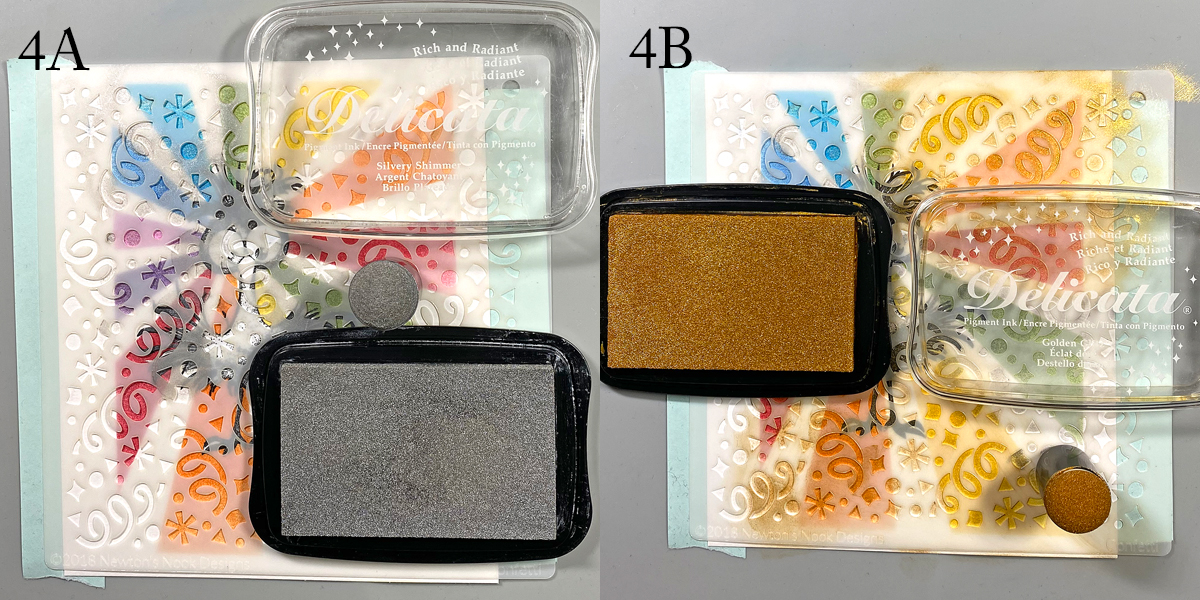
Use low-tack tape to secure the Confetti Stencil over the image panel. Use a Sponge Dauber to apply Silvery Shimmer Delicata ink over the stencil and masked image onto the top left and bottom right of the image panel (3A).

Use a separate Sponge Dauber to apply Golden Glitz Delicata ink over the stencil and masked image onto the top right and bottom left of the image panel (3B).

Remove the stencil and heat set the image panel. Set aside.

Step 5:
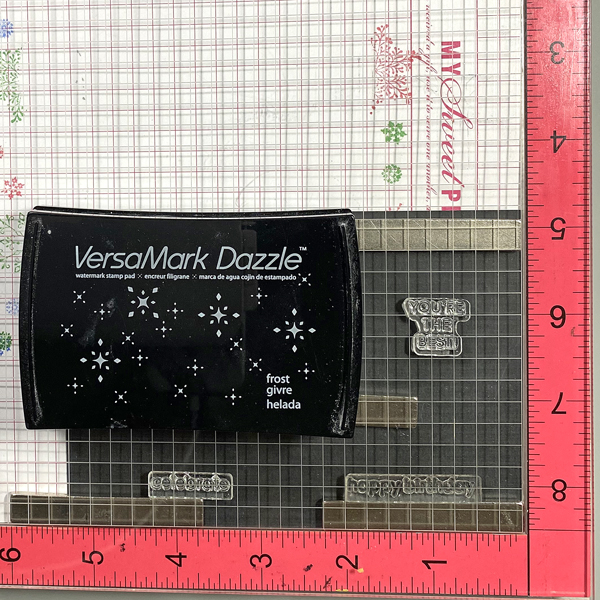
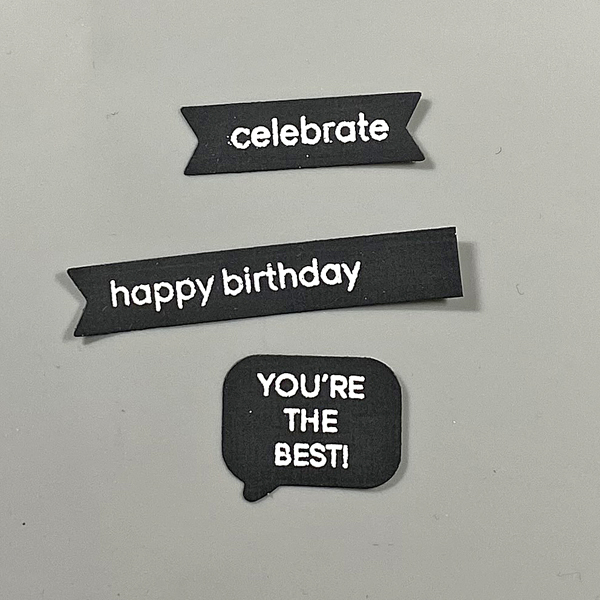
Secure a piece of black cardstock to the base of a stamping platform. Place the “You’re the best” sentiment from the Whatcha Saying? Clear Stamp Set, the “Happy Birthday”, “Celebrate”, and “Happy Birthday” sentiments from the Classic Sentiments Clear Stamp Sets facedown on the black cardstock.

Press the platform’s lid onto the back of the stamps, lift the platform, ink the stamps with the VersaMark Dazzle ink, and stamp. Remove the black panel from the stamping platform.

Step 6:
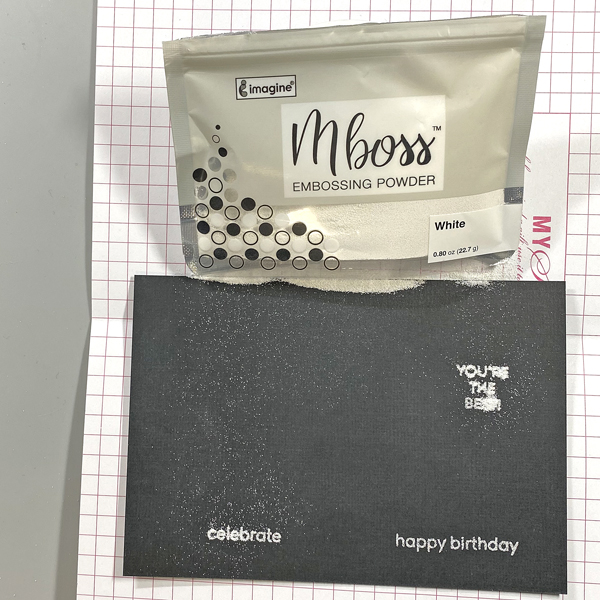
Sprinkle White MBoss Powder onto the stamped sentiments, slide the the excess powder back into the bag, and heat set the sentiment.

Step 7:
Use cutting dies to die-cut the sentiments. Trim the left side of the “celebrate” flag and the right side of the “happy birthday” flag. Use Silvery Shimmer Delicata ink to edge the trimmed sides. Heat set the ink. Put the sentiment die-cuts aside.

Step 8:
Use watercolor markers to color the bird’s eyes and beak. Use a white gel pen to add highlights to the eyes and beak. (No photo, sorry!)

Step 9:
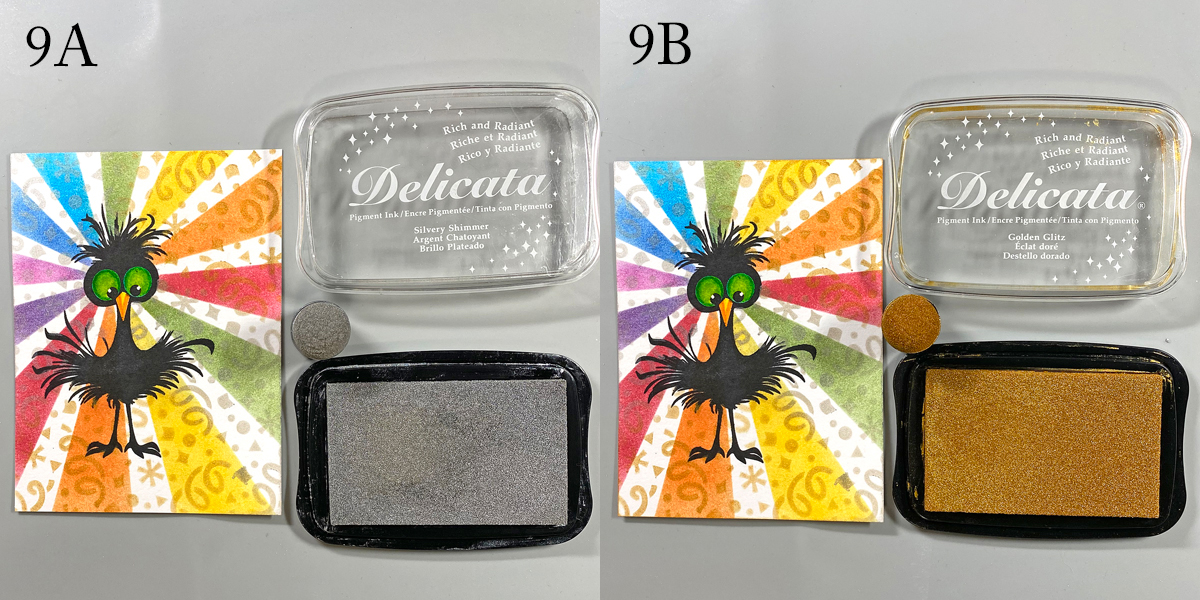
Trim the image panel to 3.75” x 5”. Use a Sponge Dauber to edge the top left and bottom right with Silvery Shimmer Delicata ink (9A).

Use a separate Sponge Dauber to edge the top right and bottom left with Golden Glitz Delicata ink (9B).

Step 10:
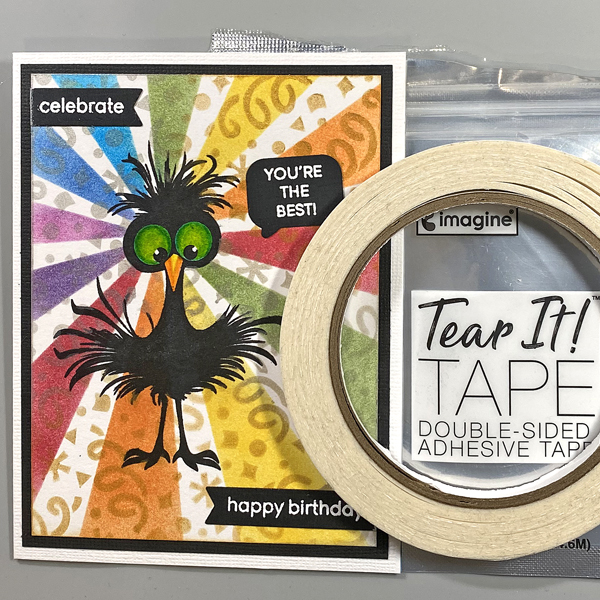
Use Tear It! Tape to adhere the image panel to a black panel cut to 4” x 5.25” and to adhere the matted image panel to a white A2 card.

Use Use Tear It! Tape to adhere the sentiments to finish the card.

Imagine Crafts Supplies:

Other Supplies:

  • Bristol Paper by Strathmore
  • Raven Cardstock by Bazzill Basics
  • Avalanche Cardstock by Bazzill Basics
  • I’m Fine Clear Stamp Set by Funky Fossil Designs
  • Classic Sentiments Clear Stamp Set by Hefty Doodle
  • Whatcha Saying? Clear Stamp Set by Hefty Doodle
  • Sunshine Small Stencil by Darkroom Door
  • Confetti Stencil by Newton’s Nook Designs
  • Sentiment Banner Die Set – Honey Bee Designs
  • Whatcha Saying? Die Set by Heffy Doodle
  • Emerald, Leaf Green, Light Green, Yellow, Brilliant Yellow, and Butterscotch Le Plume II Markers by Marvy/Uchida
  • Repositionable Sticker Paper by Avery
  • Curved Craft Scissors by Fiskar’s
  • Low-tack Tape
  • Stamping Platform by Tonic Studios
  • Misti Stamping Platform by My Sweet Petunia

How to Use Stenciled Papers and Ink to Create Unique Birthday Cards

By Amalia Montano

I wanted to create some backgrounds just to get my creative juices flowing. I am so glad I did because I was able to use many of the different cardstock scraps and designer paper scraps to make some really cute backgrounds.

I used different stencils from my stash, some blending brushes, and a few Imagine Crafts inks and daubers to create backgrounds that I turned into Birthday cards.

Skill: Beginner to intermediate

Time: 30 minutes

Craft Supplies:

Imagine:

VersaColor In Pads in Turquoise, Canary, Rose and Cardinal
Sponge Daubers
Brilliance Dew Drop 4 Pack
VersaFine Clair Nocturne Ink Pad
Delicata Ink Pads

Other Products Used

Blending Brushes
Brutus Monroe Stick and Stamp Mat
Brutus Monroe Super Sentimental Stamp set

Make a Birthday Card Using Multiple Stencils

By Alison Heikkila –

Hello! Since birthdays happen all year, it’s good to have a big stash of birthday cards at the ready for whenever you need one. Since I love to use stencils, I thought I would use a bunch of them together with many colors of Memento Inks from Imagine.

*Some affiliate links are used in this post. That means that if you shop through these links, I may receive a small compensation, at no cost to you. For more information, please see my Affiliates page, where I also have some coupon codes.

I chose a light color and a dark color Memento Ink for each candle of the Big Candle stencil. 

Step 1:

Step 1: Use washi or low tack tape to stick down your cardstock and stencil. Mask off any areas that you don’t want your first color of ink on. I masked off the second candle and the flames. 

Step 2:

Ink the candles with the lighter color from the pairs you chose. Be sure to mask off the areas that you don’t want your ink to go.

Step 3:

Mask off the candles so that you can ink the flames. I used Dandelion on the entire flame, and then Tangelo on the lower area of the flame.

Step 4:

Choose the stencils you want to decorate each candle with and ink with the darker shades you chose. You must keep the original candle stencil in place so that you only ink the candle. Slip the patterned stencil under the candle stencil to make inking easy. Be sure to mask off the other areas again! 

This is what the completed candles look like. You can stop here, if you want, but I kept going to make it even more festive!

Step 5:

Ink a stencil that looks like confetti or sprinkles on top of the entire panel.

Step 6:

Die cut your sentiment. First, I was only going to die cut my “happy birthday” out of purple, but I decided to cut one sentiment out of each main candle color so that I can have a stacked, 3D embellishment. You can glue these together with On Point Glue. 

Step 7:

Ink your card base using the lighter colors of Memento Ink, directly from the pad. I worked my way around my palette of colors two times. 

Step 8:

Glue the card front and sentiment on to the card base. Optional: Add sequins or rhinestones to the card front with On Point Glue. 

Here is the finished card! I love how happy it is, and it can easily work for anyone. It’s fun to work with so many colors and so many patterns of stencils, all on one project. I hope that you break out some of your stencils and try this technique! Thanks for stopping by. Have an inspiring day!

Supplies Used:

Imagine:

Memento Ink: Angel Pink, Rhubarb Stalk, Cantaloupe, Peanut Brittle, Summer Sky, Paris Dusk, New Sprout, Northern Pine, Sweet Plum, Elderberry, Dandelion, Tangelo, Teal Zeal

On Point Glue

Other:

A Colorful Life Designs: Big Candles, Milky Way, Cozy Knit, Primative Batik, Crocodile, Teeny Honeycomb, Layered Party 1

Simon Says Stamp: Happy Birthday Die

The Rabbit Hole Designs: Cotton Tail Blending Brushes

Sequins

Washi/Low Tack Tape

White Cardstock

How to Create Neon Birthday Cards

Annie_Collins_August_Blog

By Annie Collins

Hello Crafty Friends – Annie here with some quick and easy birthday card featuring some on trend Radiant Neon colors.

Directions:

Art Supplies:

Imagine

Radiant Neon 4: Warm and Cool
VersaFine Ink Pad: Onyx Black
Mboss Embossing Powder: Clear
Tear It! Tape
On Point Glue
Stazon All Purpose Stamp Clear

Other supplies used:

Zig Wink of Stella Pen: Clear
Sakura Gelly Roll Pens: White and Metallic Gold
Neon Clay Embellishments
Recollections Brand 65# Cardstock: Ruby Red
Recollections Brand 110# Cardstock: White

Annie Collins- Imagine Crafts -Guest Designer
Follow Me:
My Blog: https://littlewingscreates.blogspot.com/
Instagram: https://www.instagram.com/anniec09
Facebook: https://www.facebook.com/Little-Wings-Creates-275422213079163/
Pinterest: https://www.pinterest.com/acollins01/
YouTube: https://www.youtube.com/channel/UCq5m2p3z7KekR9JyWbqIr3g

New Techniques for Embossing Stunning Springtime Cards

By Neva Cole 

In today’s crafting tutorial, I will show you how to use various Imagine products to create a sparkly stunning springtime birthday card, featuring both Mboss Valentine, VersaMark Ink, and Embossing Powders. The tutorial will also show you how you can use VersaMark over other inks to create a cohesive embossed look for a card, even if you do not have embossing powders in additional colors.


Skill:  Intermediate

Time:  45 minutes

Directions:

Step 1

Trim card front to 4.75” x 6.25” to fit a standard A-7 card base.  It is important to use a stamp positioner platform for this technique to ensure that the image lines up properly on the finished card front.


Step 2

Color stamen portion of Penny Black First Waltz Tulip with VersaMarker and heat emboss with Black Mboss powder.

Pro tip: Use a dry fine tip paintbrush to remove any embossing powder that ends up on the card you do not want to emboss before heating.


Step 3

Use the Versa Mark small cube which allows you more precision in where you place the VersaMark ink to ink the flower portion of the image. Cover with Mboss Valentine, and carefully remove powder from the stamen area with a dry fine tip paintbrush then heat emboss.


Step 4

Color directly on the stem portion of the image with Memento Dual Marker in Pear Tart and Bamboo leaves.  Mist stamp lightly with water before stamping as this reactivates the ink to create a crisp image.


Step 5

Clean leaf portion of the image and ink with VersaMark ink. Stamp over the previously colored and stamped image with VersaMark Ink and heat emboss with Iridescent embossing powder.


Step 6

Stamp the “Celebrate” sentiment in VersaMark Ink and heat emboss with Mboss in Valentine.  Die-cut the sentiment, I used my Brother Scan N Cut.


Step 7

I also stamped the inside of the card, as I intend to send it to a special friend for her birthday. Stamp the sentiment in VersaMark Ink and heat emboss with Mboss in Valentine.


Step 8

Lightly ink the card base and card front with the Memento Luxe Pear Tart ink pad to add just a hint of green around both layers.  I ran the ink pad around the edges of the cardstock to create the light tint.


Step 9

Apply Tear It! Tape to the back of the card front and adhere to the card base.


Step 10

Adhere the “Celebrate” sentiment to the card front using adhesive foam tape.


Art Supplies

Imagine

• VersaMark Ink

• VersaMarker

• Mboss – Valentine

• Memento Dual Tip Marker – Pear Tart, Bamboo Leaves 

• Embossing Powder – Black, Iridescent

• Memento Luxe – Pear Tart

• Tear It! Tape

• 0.5 fl oz Spray Bottle


Other

• Penny Black – First Waltz

• Kelly Creates – Traceable Celebration Stamps

• Brother Scan N Cut

• Stamp positioner

• Fine tip paintbrush


Learn Beginner Stamping on Vellum with an Easy Coloring Trick

by Melissa Andrew

Learn Beginner Stamping on Vellum with No Line Coloring

Today I show you how to avoid coloring, just in case it’s not your thing. Beautiful floral stamps are available everywhere, and I’ll show you how to use VersaFine Clair under a vellum overlay to get the gorgeous pop of color, without all the detailing usually required of coloring in stamps. Stamping with the new StazOn Pigment allows you to use a simple technique to create beautiful color on your cards quickly and easily.

Skill: Beginner
Time: 20 – 30 minutes

Directions

Supplies

Imagine

StazOn Pigment Inkpad – Snowflake, Shamrock Green
VersaFine Clair – Charming Pink, Green Oasis, Cheerful
Sponge daubers
irRESISTible Pico – Shimmer
On Point Glue
Tear It! Tape
Imagine Craft Mat 

Other

• Mama Elephant – Peonies In Bloom
• White Cardstock
• Vellum
• Sequence
• Stamping Platform – Misti
• Paper Towels