Make a Father’s Day Card with Gorgeous Textures and Dimension

2021_May_JN_Fathersdaycards_2

By Jowilna Nolte 

For Father’s day I a pulling out some of my favourite products from Imagine and creating gorgeous textures and dimension. Shades of blue gives card a fun but masculine feel and the shimmer adds just that bit of elegance – perfect for even the hardiest of men.

Skill Level: Intermediate

Time: 45minutes including drying time

Directions:

2021_May_JN_fathersdaycards_step1

Step 1

Use a variety of Memento Luxe inks in shades of blue and blend a background.
Tape your stencil to your smooth white cardstock to hold it in place.
Blend the darkest shade of blue Nautical Blue and then Teal Zeal.

2021_May_JN_Fathersdaycards_step2

Step 2
Blend some Bahama Blue – remember to overlap onto the previous colour to get a nice blended effect.

TIP: For seamless blending I vary the pressure I apply. When blending over the previous colour I have a very light hand ensuring I only blend the colour instead of replacing it.

2021_May_JN_Fathersdaycards_step3

Step 3

Lastly, I blend some Grey Flannel right at the bottom of my card.

2021_May_JN_Fathersdaycards_step4

Step 4

While my stencil is still in place I apply a thin layer of Creative Medium over the entire panel.
You can also get creative and tape off some shaped areas like I did here.
While the Creative Medium is still wet, lightly sprinkle with clear frosted glitter before removing the stencil carefully. Leave the paste to dry – as the medium dries it keeps the glitter in place.

2021_May_JN_Fathersdaycards_step5

Step 5

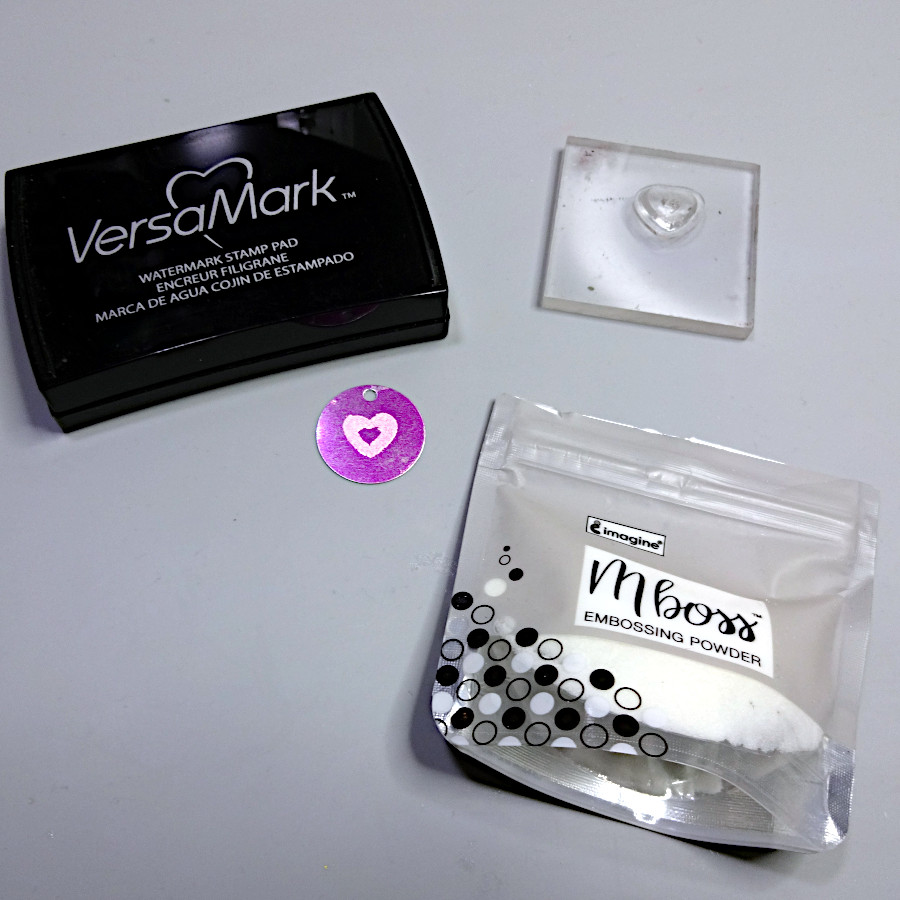
Punch a large vellum circle. Use Memento Markers to add a stamped element onto smooth white cardstock and punch into a circle.

Stamp a sentiment using VersaFine Clair and trim to size. Assemble your elements to the stencilled background once dry and adhere the panel to a folded card. Finish off with diamante and enamel dots.

2021_May_JN_Fathersdaycards_6

The embossing powder adds some glamour and shine to this simple yet fun card. Just like the couple – fun colours combined together with a touch of glam and pizazz.
Mboss embossing powder really takes any project t the next level. Available in a  huge variety of colours they truly are amazing.

So many fun products used for a simple but striking card.

Art Supplies

Imagine

VersaFine Clair Nocturne

Memento Luxe Nautical Blue

Memento Luxe Teal Zeal

Memento Luxe Bahama Blue

Memento Luxe Grey Flannel

Jumbo Dauber

Creative Medium

Palette Knife 

Craft Mat

Other

Smooth white cardstock
Vellum
Stamps: Joy Clair, PSX
Clear frosted glitter: American Crafts
Foam Tape: Kaisercraft

Make a Modern Wedding Card for a Fun and Vibrant Couple

2021_April_JN_WeddingCard_5

By Jowilna Nolte 

Recently I had to make a quick wedding card for a fun and vibrant couple. Instead of going the traditional route I opted for just having fun – mimicking their personalities.

Skill Level: Beginner

Time: 20 minutes

Directions:

2021_April_JN_WeddingCard_step1

Step 1

On a smooth white background panel used your StazOn ink Cherry Blossom and swipe the ink pad across the panel.

2021_April_JN_WeddingCard_step2

Step 2
Repeat the process this time using Versamagic ink to swipe across the background.

2021_April_JN_WeddingCard_step3

Step 3

Stamp a sentiment across the bottom of the panel using VersaFine Clair Nocturne.

2021_April_JN_WeddingCard_step4

Step 4

Emboss a scrap cardstock strip using Indigo Pealr Mboss embossing powder and VersaMark Frost. Then cut the strip with a scallop edge. Emboss a chipboard heart using the same Indigo Pearl Mboss embossing powder.

2021_April_JN_WeddingCard_1

Step 5

Assemble the card by adhering the panel to a folded card. Then adhere the embossed heart using On Point glue as well as the embossed strip and embellishments to finish off your card.

2021_April_JN_WeddingCard_step4

The embossing powder adds some glamour and shine to this simple yet fun card. Just like the couple – fun colours combined together with a touch of glam and pizazz.
Mboss embossing powder really takes any project t the next level. Available in a  huge variety of colours they truly are amazing.

Art Supplies

Imagine

VersaFine Clair Nocturne
Mboss Indigo Pearl
VersaMark Frost
On Point Glue
Tear it! Tape
StazOn Cherry Blossom
VersaMagic Mango Madness

Other

White cardstock
Chipboard: Celebr8
Stamps: Visible Images
Embellishments

How to Make Little Paper Bags for Wedding and Party Favors

2021-apr-kyriakos-party-favors-bags-main-wm 2

By Kyriakos Pachadiroglou

Decorate folded into bag paper cuttings that are distressed with Walnut Inks and stamped with a lace design using MEMENTO ink. Add a round SHEET metal charm with an embossed heart on it. Add sweets in the bags and place them in baskets, on side tables or hang them on branches in a large vase.

Skill: Beginner

Time: 30 min

Directions:

2021-apr-kyriakos-party-favors-bags-step1

Step 1

Cut 8×3″ pieces (~half of an A5)of the cardstock and spray them with Ink Potion No 9. While still wet, spray with the Walnut Inks Cherry Blossom and Lilac in some distance from the papers.


2021-apr-kyriakos-party-favors-bags-step2
Step 2

Let them dry (or speed up the process with a heat tool), mark the center (long side) and score ¾in from the center left and right.


2021-apr-kyriakos-party-favors-bags-step3

Step 3

Stamp the lace stamp with MEMENTO Grape Jelly ink pad.


2021-apr-kyriakos-party-favors-bags-step4

Step 4

Color the round SHEET Metal pieces with the StazOn Royal Purple.


2021-apr-kyriakos-party-favors-bags-step5

Step 5

When the ink dries, stamp a heart with the VersaMark ink pad, cover with Mboss White Embossing Powder and heat set.


2021-apr-kyriakos-party-favors-bags-step6

Step 6

Add Tear It! Tape to the inner if the card cuttings and place the sweets (flat ones will fit better and they can be any shape (like hearts, squares).


2021-apr-kyriakos-party-favors-bags-step7

Step 7

Punch a hole to the folded sides and cut 4″ long pieces of the lace, the ribbon and and the cord.


2021-apr-kyriakos-party-favors-bags-step8

Step 8

Fold in half the above cuttings and glue them just below the punched hole.


2021-apr-kyriakos-party-favors-bags-step9

Step 9

Add the round SHEET Metal charm with some cord (which can be also used to hang the paper bag).


Art Supplies

Imagine

MEMENTO – Grape Jelly

Walnut Ink – Cherry blossom, Lilac

Ink Potion No.9

SHEET Metal – Round 1″

Tear It! Tape

Sponge Daubers

Mboss Embossing Powder – White

VersaMark – Original

 
Other materials

250g/m2 – 115 lb Cardstock Natural

Kaiserkraft Stamp – Lace

Heart Stamp

Hole Punch

Heat Tool

Hot Glue

Lace, Ribbon, Cord

Sweets


Ink Blending with Memento Inks to Create a Rose Wedding Card

2021_Apr_JL Wedding_blog

By Jessica Lin

Hi everyone! It’s Jessica here and I have a fun stenciled card to share with you. I first stenciled the roses with Memento Dye inks, then I stepped it up and stenciled a second layer with shimmery embossing powder. The concept is really simple, and you don’t need a lot of supplies either, but the final effect is just so pretty! I hope you’ll enjoy this tutorial! 

Skill: Beginner

Directions:

Art Supplies

Imagine:

VersaFine Clair – Nocturne, Glamorous

Memento Dew Drop Inks – Angel Pink, Rose Bud

Other products:

Blending Brushes STAMPlorations Stencils –

Faces: Pensive, Old Rose

Neenah Solar White Cardstock

Gold Glitter Cardstock

How to Make a Mother’s Day Card

2021_April2_JN_Mothersdaycard_1

By Jowilna Nolte 

I am not one for a traditional Mother’s Day Card – although the message inside may be one of gratitude, on the outside it can reflect something personal as well.

Instead of doing the usual thing I combined some fun stamping and inking with a vinyl heart and a little stamped sentiment that will mean the world to my mom.

“FRESH START” is my prayer for her this Mother’s Day – the beginning of so much more than just being a mother.

Skill Level: Beginner

Time: 30 minutes

Directions:

2021_April2_JN_MOthersdaycard_step1

Step 1
Combine VersaMagic Mango Madness with  Delicata Champagne to ink some chipboard hearts.

2021_April2_JN_Mothersdaycard_step2

Step 2
On a white smooth cardstock background, use the VersaMagic and ink the background. Combine the “direct to paper” method carefully blending the ink and then use a sponge dauber for achieve an ombre effect towards the top.

2021_April2_JN_Mothersdaycard_step3

Step 3

Stamp onto the background several times overlapping different stamp designs and VersaMagic ink. Then finishing off the top layer using Delicate White Shimmer to stamp the last layer. Look at that gorgeous shimmer.

2021_April2_JN_Mothersdaycard_step4

Step 4

Apply a layered vinyl heart, stamped sentiment and chipboard heart, as well as some embellishments.
Matt onto white cardstock layer and then onto a kraft card.

2021_April2_JN_Mothersdaycard_2

And just like that I created a heartfelt and meaningful Mother’s Day Card with lots of sparkle and shimmer – wishing my mom a bright future ahead.

Art Supplies

Imagine

VersaMagic Mango Madness
Delicata Whte Shimmer
Delicata Champagne
On Point Glue
Tear It! Tape

Other

• Smooth White Cardstock
• Stamps: Hero Arts, Carabelle, Altenew
• Vinyl: Cricut
• Embellishments

Learn How to Make a Spring Color Blocking Card

By Jowilna Nolte 

Celebrating Spring with an easy to create color blocker card using stamps and inks only – such a quick way of creating a fun effect without a lot of effort. Anyone can create this with only a few supplies.


Skill Level: Beginner

Time: 20 minutes


Directions:

Step 1

Ink a large floral background stamp using 3 ink colors. I am using ink pads from Imagine’s latest StazOn On Trend Collection in Cherry Blossom, Plum and Caribbean Green. Swipe the lightest color across your stamp in a straight line. Then use your second color and your third color and swipe over your stamp as well.


Step 2

Immediately stamp the image onto smooth white cardstock. Trim your image to fit into the front of a card panel. Keep a small piece of the edge that you cut off.


Step 3

Use Tear It! Tape and adhere the thin strip to the bottom edge of the stamped panel and adhere to your card base.


Step 4

Stamp your sentiment onto your card panel using VersaFine Clair and finish off with diamante and embellishments.


Art Supplies

Imagine

StazOn full-size inkpad Cherry Blossom
StazOn full-size inkpad Caribbean Green
StazOn full-size inkpad Plum
VersaFine Clair Full-size Inkpad Nocturne (black)
Tear It! Tape

Other

Stamp: Stampers Anonymous, Joy Clair
Smooth white cardstock
Enamel dot and diamante