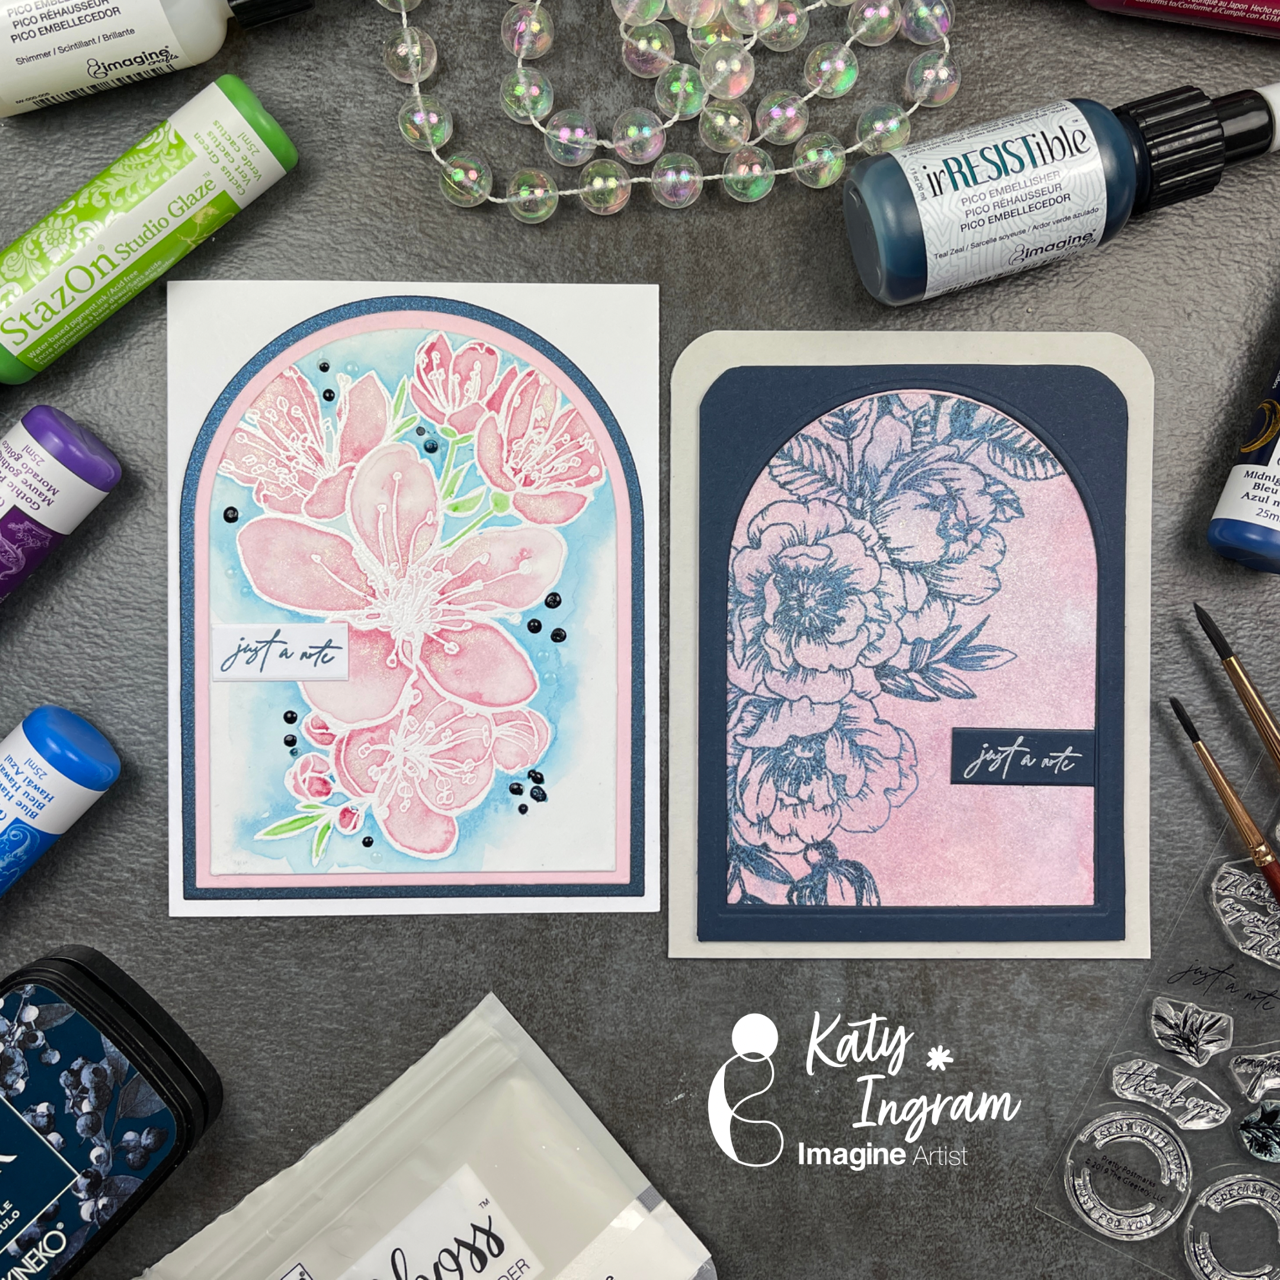
Hello Friends! Katy here and today I am sharing two ways to watercolor with StazOn Studio Glaze.
In today’s video tutorial I am sharing two watercolor techniques. The first is traditional watercoloring with a watercolor brush and the second technique is the popular ink smooshing technique. Both are great ways to use StazOn Studio Glaze and I hope you hive it a try. Check out the video to see the process in action. I hope you enjoy and thanks for stopping by.
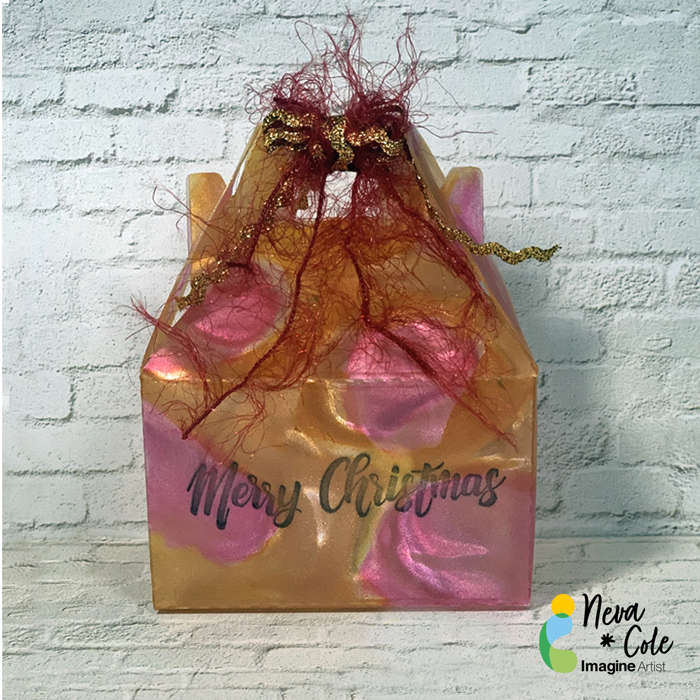
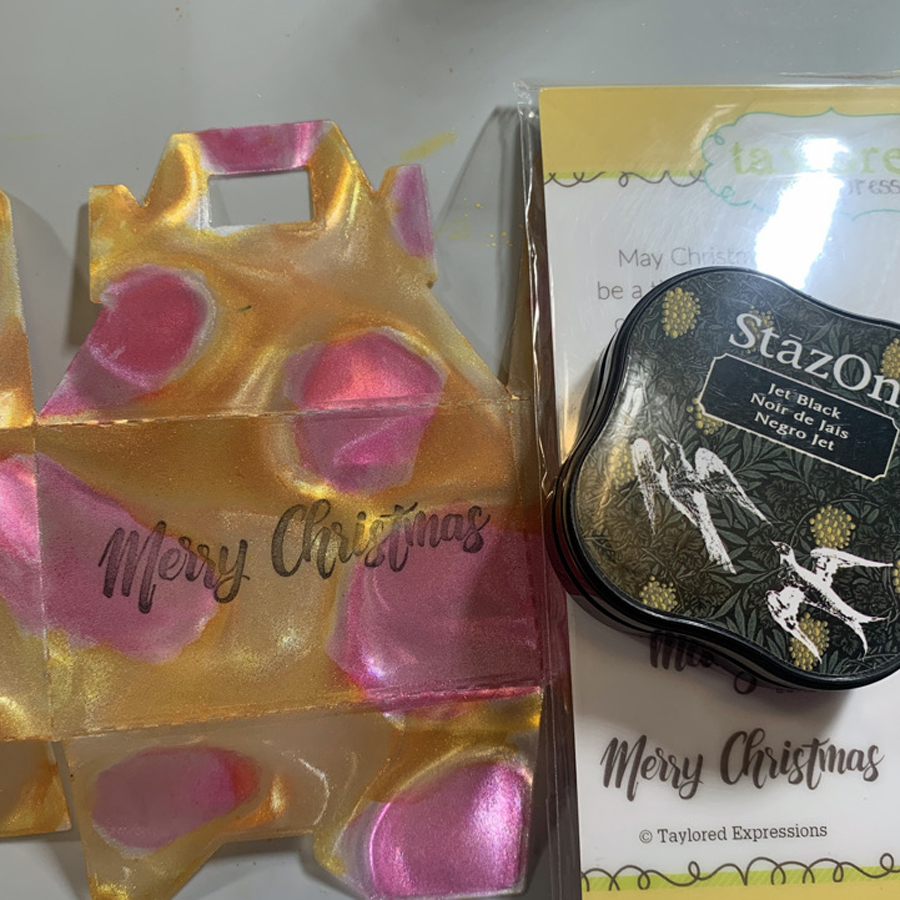
Vertigo is a beautiful translucent material to use in creating projects, in today’s tutorial, I am sharing tips and hints to make your project shine! The perfect ink for this box is StazOn, as it is the only ink that will dry on Vertigo and other plastics.
Skill: Intermediate
Time: 1 hour
Directions:
Step1:
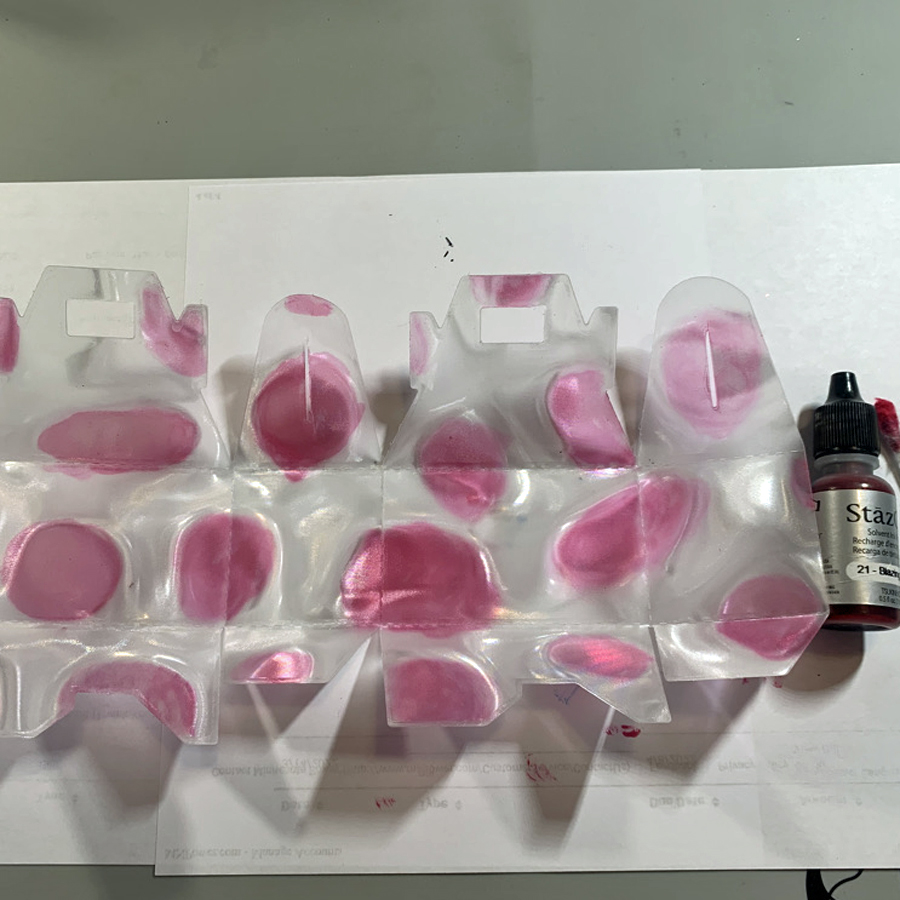
Vertigo can be cut with scissors OR with a simple die. Complex dies do not work well with most plastics, Vertigo included. This particular box needed 8.5” by 5” section of Vertigo, 12” x 12” sheets can be purchased directly from Imagine Crafts website. Recycled packaging may be substituted for Vertigo, however the results will not have the stunning effect the the patterns that Vertigo provides. The Pebbles pattern of Vertigo was used for my box.
Step 2:
Place a few drops ink from StazOn Blazing Red inker on a plastic surface to use as a palette. On the INSIDE of the box use a cotton swab to color each of the pebbles from the center out. A little goes a long way with the translucent colors.
Step 3:
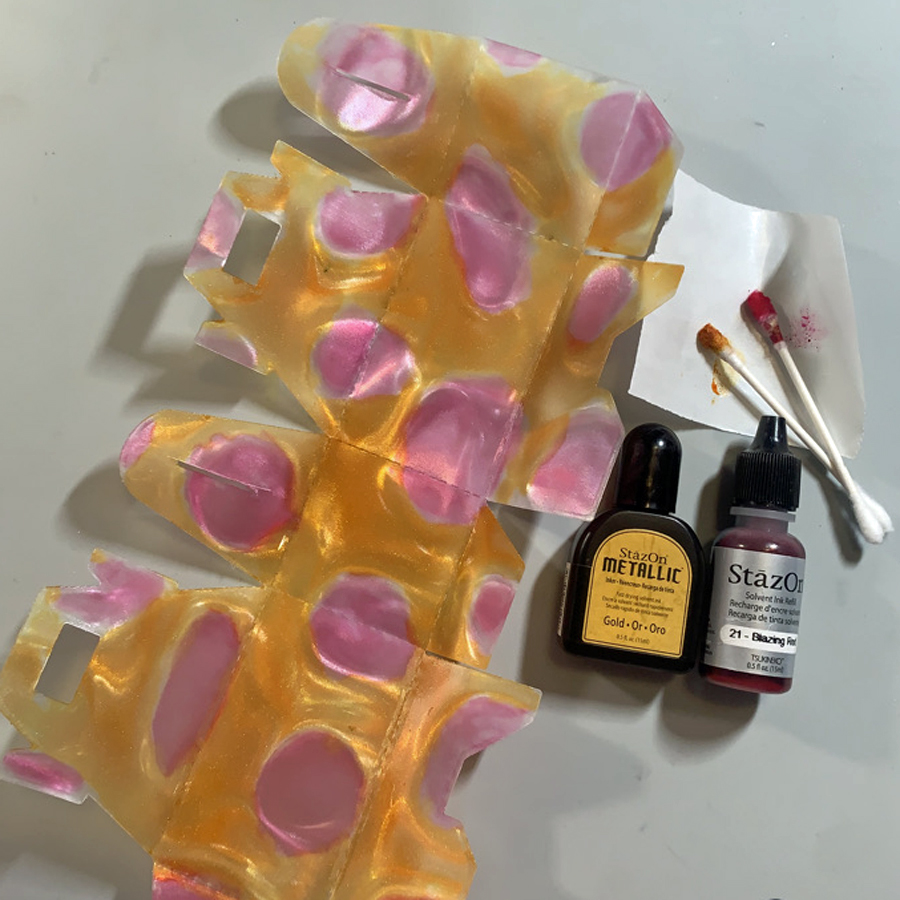
Metallic StazOn ink is slightly less translucent than the other colors. To capture more shimmer, apply a drop or two of StazOn Metallic Gold on the INSIDE of the box and move the ink with a cotton swab to color around the pebbles.
Step 4:
Continue to add StazOn Metallic Gold ink to cover the remaining areas of the inside of the box. Set aside to dry, as the Metallic ink is a bit thicker and takes a longer to dry.
Step 5:
Using StazOn Jet Black, stamp the “Merry Christmas” sentiment on the OUTSIDE of the box. This keeps the interior of the box ink from lifting and to have the correct orientation.
Step 6:
Tear It! tape is perfect to hold the bottom of this gift box together. Assemble box and determine the best placement for the Tear It! tape. Unfold box and add Tear It! tape, my project called for five sections to hold the box in shape.
Remove Tear It! Tape liner and assemble gift box.
Decorate with matching ribbon and fibers to close the top and keep your gift secure.
Greetings! Alison here and today my latest tutorial for Imagine is a textured, fall-themed thank you card. I can see making a bunch of these to put as place setting on your Thanksgiving table, as a thank you to your guests for celebrating the holidays with you. I used several simple techniques on this card that when combined, look really fancy and festive.
Skill Level: Beginner to Intermediate Time: 45 minutes- 1 Hour
Directions:
Step 1:
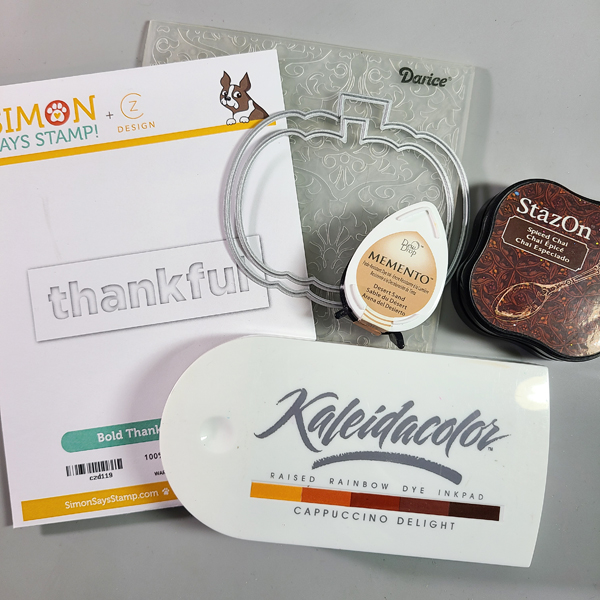
Using a piece of metallic cardstock, run it through your die cutting machine with an embossing folder.
Step 2:
Using a sanding block, a piece of sandpaper, or even a nail file, sand the raised areas of the embossed cardstock. This will give it an aged or distressed look.
Step 3:
Gently rub Spiced Chai StazOn ink across the surface to add more interest to the piece of cardstock.
Step 4:
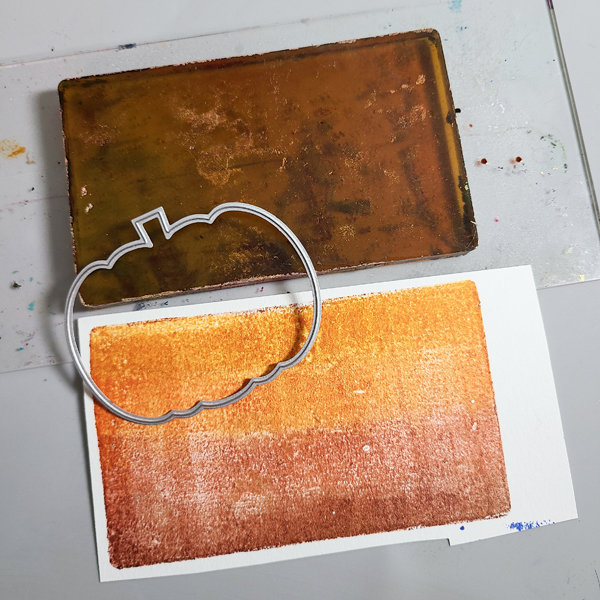
On a Gel Press Plate, gently tap the Cappuccino Delight Kaleidacolor Inks across the surface. You can use a brayer to blend the colors, as well as a few spritzes of water or Ink Potion No. 9.
Step 5:
Lay white cardstock on to the Gel Press Plate and rub to get the ink to transfer. Pull the print and let it dry. I pulled a couple of prints and then chose my favorite to use for this card.
Step 6:
Die cut a pumpkin out of the monoprint.
Step 7:
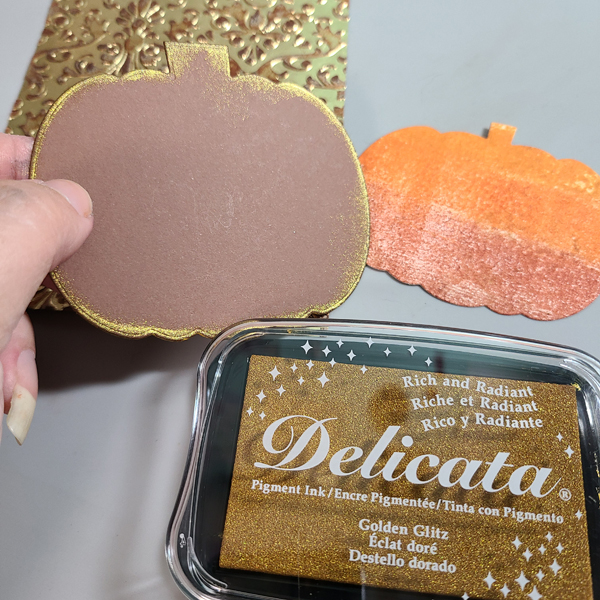
Die cut a bigger pumpkin out of brown cardstock and ink the edges with Golden Glitz Delicata Ink.
Step 8:
Die cut the sentiment out of cream colored cardstock and ink the edges with Desert Sand Memento Ink.
Step 9:
Add Tear It Tape to the back of the embossed panel. I like to use this adhesive when I am working with a piece that has a lot of texture. It holds everything in place really well, and you don’t need to worry about liquid adhesive getting “stuck” in the wells.
Step 10:
Assemble the rest of the card. I used On Point Glue to attach the rhinestones.
Isn’t it pretty?
I love all of the shine from the embossed panel. I also really like seeing all the colors on the pumpkin through the die cut. I hope you’ll give some of these techniques a try!
Hey there friends and Fellow Crafters, LeeAnn here with a fun stencil project using VersaFine Clair inks. I had so much fun with this project and I hope you enjoy.
Hey there friends and fellow crafters, LeeAnn here with a fun Inspirational Card I made using my absolute favorite technique, and those of you that have been here for a while know I love Kaleidacolors.
Welcome to our blog! Imagine Crafts is pleased to be a super sponsor for the Coffee Lover’s Blog Hop for the Spring/Summer of 2022.Our design team members all joined in to show you some of the fun and coffee themed cards they made using some of the Imagine Inks and readily available stamps/dies that are coffee themed.
We are also having a giveaway!Since Imagine Crafts is a super sponsor, we will be giving away a $25.00 gift card to the store. Please comment below for your chance to win.
Some of our design team members have created extra projects in order to participate in the Coffee Lovers Blog Hop and we will now share their photos of their projects and links to the Imagine items used. That way, you can go visit the item and see if it is for you.
– Hi there Coffee Lovers, for my project today I used The Perfect Blend Stamp Set from Gina K Designs. Using Memento Espresso Truffle I stamped the background and since Memento is a dye based ink it dried quickly.
I cut a panel of vellum to cover most of my background panel, and then grabbed a circle tag out of my stash. I stamped the coffee cups on the tag with the Memento Espresso Truffle and then used Memento Markers to add a pop of color. For The cup part I used Bamboo Leaves and Pistachio, while for the rings I used Rich Cocoa and Desert Sand.
The final stamping was the sentiment in which I used VersaFine Clair in Pinecone. I used Tear It! Tape and On Point glue to adhere my panels together and with that my project is complete.
Happy Hopping in the Coffee Lover’s Blog Hop Spring/Summer 2022!!!
– I went with a simply designed card that is perfect for any coffee lover. I ink blended two VersaFine Clair Inks with my coffee bean stencil. My sentiment was die cut and I used the die itself as a mask to softly ink around the sentiment. Sparkle Blends were adhered with On Point Glue for some shine.